Programming a Key Fob for a 2GIG GC2e
Related Products
Description
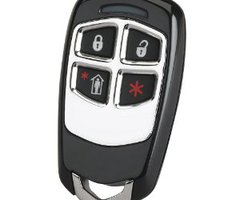
In this video, Michael shows you how to program a key fob for a 2GIG GC2e Security System. The 2GIG GC2e uses 345 MHz key fobs, such as the Honeywell 5834-4 and the 2GIG KEY2-345. It can also use the encrypted 2GIG KEY2e-345, which is built specifically for the GC2e and GC3e. However, all key fobs for the system enroll in the same way.
A key fob is a small, handheld device that you can use to arm and disarm your system while you are on-site. It can be more convenient than having to get up to control your system, or open up a mobile app on your phone. Some key fob devices can also be used to trigger an alarm on the system in the event of an emergency, such as a break in. You may even use a key fob as a sort of "medical alert device" for an elderly or disabled loved one to carry around in the event of a slip or fall.
The 2GIG GC2e has a section within System Configuration dedicated to key fob programming. This is Q3 for key fob programming. Up to eight (8) key fob devices can be enrolled with a GC2e. When programming the key fob, you will apply various settings so that the device works in the way that you want it to. Another big part of programming a key fob involves enrolling the Serial Number and configuring the Equipment Code for the key fob slot so that the system can properly recognize the signals from the device.
After you have programmed the key fob, make sure to test it out so that you are sure that it works in the way that you want. If you plan to test the panic feature for the key fob, then remember to put your system on test mode first. The 2GIG GC2e only allows 2GIG Key Fobs to trigger emergency panics. Honeywell Key Fobs like the 5834-4 can be used to arm and disarm, but they cannot trigger panic alarms on the GC2e. For a 2GIG Key Fob like the KEY2e-345, you trigger a panic by pressing and holding the top two buttons on the key fob.
https://www.alarmgrid.com/faq/how-do-i-program-a-key-fob-into-a-2gig-gc2e
http://alrm.gd/get-monitored
Transcript
Hi, DIYers. This is Michael from Alarm Grid. And today, I'm going to be showing you how to program a key fob into a 2GIG 2GIG GC2e security system. Now, the 2GIG GC2e, it uses 345 megahertz key fobs. Some examples of key fobs you would use, the ones we have today, the 2GIG KEY2-345 and the Honeywell 5834-4. They're both four-button key fobs that work great with the GC2e. The GC2e and the GC3e also support the encrypted KEY2E-345. And that's an encrypted version of the KEY2-345. They all enroll the same way. With the KEY2E, you do want to make sure you get the correct equipment code for the device. That's very important for the eSeries sensors. But like I said, they all enroll the same way. If you are using a 5834-4, which we are today, you're going to have it in low security mode with the green LED. You can't use it in high security mode with the red LED. And you'll also see, as I go through this, that you can only trigger a panic on the 2GIG key fobs, the KEY2 and the KEY2E. You can't trigger a panic on the 5834-4, but I'll demonstrate that as we go through it. But we have a lot of programming today. So I'm going to do the first one in more detail and then I'll breeze through the second one just to give you a recap. So we're at the main screen of the 2GIG GC2e. We're going to choose the 2GIG logo in the bottom right corner and then we're entering our installer code. Our is at the default 1 5 6 1. And we're going to choose System Configuration. And now we're going to get to the key fob section here and that's question number three. So we can press Skip twice to get to section three for key fob or you can press Go To and then enter in 03 to get to that question number. But we're at the proper slot here. You can use the left and right arrows to scroll between different key fob slots. You can have up to eight on the system by the way. It says it right there 1 to 8. And we're just going to start with key fob slot one for our programming. And so now we want to set it to Enabled. Because if you have this at disabled for fob 1 use then that key fob slot will be inactive. So we want this key fob to be active, so we'll press Enabled. And then we're setting the equipment code. We're going to do the KEY2E key fob first. Let's take it out the box. That's probably a good idea. And so for the 2GIG ones, you can definitely find the proper equipment code. And that's what it is right there 0 8 6 6 for the KEY2-345. That's exactly the one we want. Just to show you, if you have an existing one, that's the one we'll be using for the Honeywell one. And you also have the eSeries option over here. And that's about it, but we'll keep ours at the proper one. And press the down arrow. Now we're enrolling the serial number for the key fob. So to do this for auto enrollment, you press Shift and then Learn. And then it's going to be waiting for an RF transmission signal, so we're just going to press and hold the button on the key fob. And it learned in the serial number successfully. We'll press OK and press down to continue. And now equipment age, new or existing, really doesn't matter. That has absolutely no effect in there. It's just for your own record keeping. Now we're setting the emergency key for the key fob. And I'm going to be testing the emergency functions on the fob just to show you what happens. So we'll set ours to an audible alarm, so that way it works successfully. We're going to be setting off a siren a little bit, but we'll press the down arrow to continue. And then set key fob to be able to disarm. If you want to be able to disarm using the key fob then you want to have this enabled. If you had this disabled then you wouldn't be able to disarm the system using the key fob. You would have to use the main panel, or Alarm.com, or a keypad, or a key fob that is set to disarm. But we want ours to be able to disarm, so we'll keep that enabled. And this is where you would build the voice descriptor. This is how the panel will identify the key fob. It serves as the name. You can use the left and right arrows to scroll between different words in there. You can press the forward arrow to go to the next word. So we can scroll through those a little bit, back, forward. If you press Insert then it will add a new word. It starts at abort and you can scroll through them or you can enter in a three-digit code. We'll press 60 and that gets us to driveway. And then we can scroll through that as needed. If we enter 90 then we get to foil. So lots of options in there. But we don't want a third word, so we'll press this box with the exit to delete. And we're fine with key fob 1 as the name, so we'll press Next. And then it's going to take us to the summary screen. We're fine with our changes, so we'll press Skip. And now we want to do the next key fob. It takes us to the next question by default. So we're going to press Go To and then we'll do 0 3 for key fobs. And we're going to enroll the second key fob now. So we'll go to key fob slot two and I'll just go through this really quickly. We want it enabled. We're going to set it to an existing key fob remote because there is no Honeywell option in here. And now we're learning the serial numbers, Shift, Learn. I got to get our Honeywell 5834 out of the box here. And so here it is. And it's probably tough to see, but if you look closely, it does have a green LED when you light up. Otherwise, if it's red then that means it's in high security mode. You need to have it in low security mode to be used with the GC2e for the Honeywell key fobs. So we're good with the serial number there, so we'll press OK. We go to the next question. New or existing, we'll keep it at new. Emergency key, I'm going to show you that this doesn't work on the Honeywell key fob, but we'll set it to audible alarm. And then we want our key fob to be able to disarm and we're fine with that as the voice descriptor. And we don't want to delay for arming. So those are the changes that we're making to the system. We'll press Skip. And now we're done with everything, so we're going to price End in the bottom right corner. Once you've finished enrolling your key fobs, you want to make sure the Save Changes box is marked to apply the changes in the system. Press Exit. It's going to reboot the system. That's normal. And it's just taking the time to configure the settings and get everything proper, so that way we can use to key fobs. So I'll give you a quick demonstration once the system boots up. System disarmed. Ready to arm. Which there we go. We got the verbal announcement from the GC2e letting us know that it's ready, but it is still waiting for the screen to appear. So the system is ready to arm. And so we have the KEY2 key fob here. We'll try Arming Stay first. Arming Stay. You see it did Arm Stay. And now we'll press the Disarm button. System disarmed. Ready to arm. Now let's try arming Away with the Honeywell key fob. Arming Away. Exit now. You see it gave us the option. We'll disarm. System disarmed. Ready to arm. Now I just want to show you the panic functions on the key fob and how it doesn't work on the Honeywell one, but it will work on the 2GIG one. Now, you might think that the star key is how you would trigger the panic, but it's actually the top two buttons here. But I'll show you both just to prove it. So we're not getting any results when we press the star key, nor when we press the top two keys at same time. So we can't trigger a panic using this key fob, but we can using this key fob. So first of all, this one doesn't do anything without the bottom right button, the star button. But when I press these top two buttons, it's going to trigger an alarm on the system. So if you're wearing headphones be careful here. We're going to trigger an audible alarm right now. Alarm, key fob 1. [ALARM BLARING] It took a little bit, but it did go through. So we're going to press the 1 1 1 1. Disarmed. Ready to arm. That was the default master code, by the way, 1 1 1 1, how we disarmed. But it is sending a cancel transmission letting the central station know that we did cancel the alarm. You know the report was sent out. We'd probably still get a phone call, in which case, make sure to know your false alarm passcode if you do this or put your system on test mode before testing this. That's really the best option. Don't cause false alarms. So now we'll press OK. And we do get the message stating that an alarm had occurred because we triggered one. We'll clear the alarm history there. And so that's how you trigger a panic. You press the top two buttons on the 2GIG key fob. But that's how you program a key fob to a 2GIG GC2e security system. You can use the Honeywell 5834, the KEY2E-345 and the KEY2-345. They all work great. So if you have any questions about the 2GIG GC2e, or key fobs, or about alarm monitoring service, send an email to support@alarmgrid.com and we'd love to help you out. If you find this video helpful, make sure to give it a thumbs up below to like the video. And remember to subscribe to our channel for updates on future videos. We hope you enjoy the video. Thank you.
- Uploaded


