Can I Change the Rev Chip on a Vista 21iP?
The main reason for chip upgrading a panel is to support added features, primarily Total Connect 2.0. While the chip upgrade of an older Vista-20P may add this feature, the Vista-21iP first requires that the cellular communicator support it. If not, upgrading the chip won’t change that.
Because it is both an alarm panel and an AlarmNet communicator, the Vista-21iP is a complicated creature. Older versions of the system (Pre-Version 3) have an internal communicator that will not support Total Connect 2.0. In short, upgrading the panel firmware cannot upgrade the internal communicator to make it compatible.
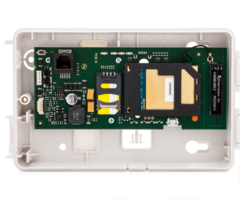
For those systems, not only must the PROM Chip be upgraded, but an external communicator that supports Total Connect 2.0 must be added. Some of the communicators that can be used for this purpose include the 7847i, LTE-XA, LTE-XV, LTEM-XA, LTEM-XV, LTE-IA, LTE-IV, LTEM-PA, LTEM-PV, LTEM-PIA, and LTEM-PIV.
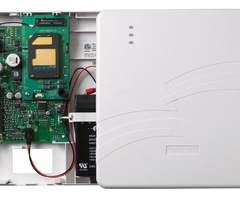
Honeywell sells a VISTA-21iP PROM Chip that can be installed to allow the alarm panel to support Total Connect 2.0. Complete the steps below to add the PROM Chip and disable the internal communicator, if necessary:
- Power the panel down completely (AC and Battery).
- Remove the existing chip using a small screw driver, paper clip, or chip puller.
- Install the new chip, making sure to orient it correctly. Press down all four (4) corners to be sure it is fully seated.
- While the panel is still powered down, set the Internal IP/GSM Jumper to “Off” by moving it to the bottom two pins. This disables the internal communicator by removing its connection to power.

- Connect the External Communicator (any of the models listed above) to the panel's keypad bus per its included instructions.
- Power up, AC first, then Battery.
- Work with your alarm dealer to program and register the External Communicator.

Vista-21iP panels with date code S300 or later should have an internal communicator version 2.10.15 or higher. You can verify this using an alpha keypad via *29 programming. This means that the panel will support Total Connect 2.0. The date code will be on the upper right side of the panel, either silk screened on the circuit board or on a white sticker. The format is a letter, followed by a 3 digit number as shown above.
If you want, you can chip upgrade one of these panels from a 3.13 to the latest version, you can do so by following steps 1, 2, 3 and 6 above.
The features added in version 4.21 that differ from older versions are:
- Added the Keypad Lockout Feature, enabled in *188
- If 30 keystrokes are made without the entry of a valid code, the system locks the keypad for 15 minutes (30 keystrokes = 6 attempts of code + command)
- While locked, the message "User Code Error" is displayed on alpha keypads in the locked partition
- Upon lockout, a message is transmitted to the central station (Event 461 Wrong Code Entry), as well as being logged in the event log
- When the 15-minute lockout window expires, a Restore message is sent to the Central Station and entered into the Event Log.You can reset and avoid the 15 minute wait by powering completely down and back up.
- Keypad Addresses 17 - 23 enabled by default (*190 - *196) for Partition 1
- RIS is enabled by default and can’t be disabled.
Please note that when upgrading an older VISTA-21iP to support TC2, we recommend adding an external communicator and replacing the PROM chip versus replacing the panel with a new 21iP System. Although both options are of similar cost, replacing the panel will force you to reprogram the system entirely. You will also have to rewire and remount the panel, causing further inconvenience. Upgrading the PROM and adding a communicator is a much easier option.
Did you find this answer useful?
We offer alarm monitoring as low as $10 / month
Click Here to Learn MoreRelated Products


Related Categories
- Wired Alarm Control Panels
- Internet Security Systems
- Wired Security Systems
- Wired Security Systems
- Internet Alarm Communicators
- Cellular Antennas
- Cellular Alarm Communicators
- Cellular Alarm Communicators
- DIY Wired Security Systems
- AT&T Security Systems
- Verizon CDMA Security System Cellular Communicators
- Answered
- Answered By
- Julia Ross