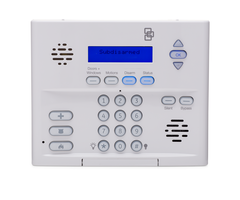
How Do I Change the Date or Time on an Interlogix Simon XT?
You can change the date or time on an Interlogix Simon XT by accessing the corresponding menu option from the main screen of the system. This will require knowing the Master code for the system. Both options can be easily accessed from the main menu of the Interlogix Simon XT System.
Complete the following steps to change the date and time on an Interlogix Simon XT:
1. Change the time. With the panel disarmed and on the main screen, press the down arrow until you reach the option "Set Clock". Then press the "OK" button. You will then need to provide the Master Code for the system. By default, the Master Code is set to 1234. Press the "OK" button twice after you have entered the Master Code to begin adjusting the clock.
The hour selection of the clock should begin slowly flashing, indicating that it is ready to be adjusted. You can use the up and down arrows to adjust the hour, or you can use the numeric keypad. Once the appropriate hour is displayed, press the "OK" button.
The minute selection of the clock should begin slowly flashing, indicating that it is ready to be adjusted. You can use the up and down arrows to adjust the minutes, or you can use the numeric keypad. Once the appropriate minutes are displayed, press the "OK" button.
The setting for AM or PM will begin flashing, indicating that this setting is ready to be be adjusted. Use the up or down arrow to toggle between the two options. Choose "A" for AM or "P" for PM. Press the "OK" button once you have made the selection. Then press the "Status" button twice to return to the main menu.
2. Change the date. With the panel disarmed and on the main screen, press the down arrow until you reach the option "Set Date". Then press the "OK" button. You will then need to provide the Master Code for the system. By default, the Master Code is set to 1234. Press the "OK" button twice after you have entered the Master Code to begin adjusting the date.
The year selection of the date should begin slowly flashing, indicating that it is ready to be adjusted. You can use the up and down arrows to adjust the year, or you can use the numeric keypad. Once the appropriate year is displayed, press the "OK" button.
The month selection of the date should begin slowly flashing, indicating that it is ready to be adjusted. You can use the up and down arrows to adjust the month, or you can use the numeric keypad. Once the appropriate month is displayed, press the "OK" button.
The day selection of the date should begin slowly flashing, indicating that it is ready to be adjusted. You can use the up and down arrows to adjust the day, or you can use the numeric keypad. Once the appropriate day is displayed, press the "OK" button. Press the "Status" button until you are returned to the main screen.
3. Confirm the time and date. Use the up and down arrows on the system to scroll between different options. Check the time option and the date option. Confirm that the displayed time and date are both correct. If they are not correct, readjust the options using the processes outlined above.
Did you find this answer useful?
We offer alarm monitoring as low as $10 / month
Click Here to Learn MoreRelated Products

Related Categories
- Answered
