How Do I Install the XCVR3-GC3 to a 2GIG GC3e?
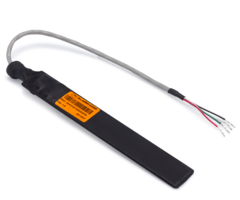
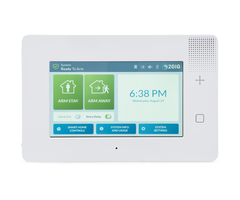
Install the 2GIG XCVR3-GC3 to a 2GIG GC3e by powering down, and connecting the four (4) leads to the terminal block. Connect Black to GND, Red to SMOKE +, Green to RX, and White to TX. Then, push the XCVR3-GC3 into the wall, or, if using a desk mount, put it as far from the GC3e as possible.
 The 2GIG XCVR3-GC3 is an optional add-on device for the 2GIG GC3, the 2GIG GC3e, and the 2GIG Edge. A side note about the Edge is that it comes as either an AT&T Version, or a Verizon Version. As for the 2GIG XCVR3-GC3, this transceiver module operates at 900MHz, and it allows the panel to receive signals from the Alarm.com Image Sensors. There are two image sensors that work with the XCVR3-GC3. These are the IMAGE2 and the IMAGE3. The IMAGE2 has been discontinued by Alarm Grid, but if you happen to have one, or if you purchase one elsewhere, it should still work. The 2GIG GC3e can support up to ten (10) of these sensors after the XCVR3-GC3 has been connected.
Image sensors are combination devices. They include both a Passive Infrared (PIR) motion detector, plus a built-in still camera. The 2GIG GC3e was initially released at version 3.2.1, therefore all GC3e panels support the addition of the XCVR3-GC3 and image sensors. All of the Alarm Grid monitoring plans that support a connection to Alarm.com with interactive service include support for image sensors. This includes the Alarm Grid Gold and Platinum Plans (Self or Full). If you're not being monitored by Alarm Grid, check with your monitoring company to see what you need to do to be able to use these sensors.
To add the 2GIG XCVR3-GC3 to the 2GIG GC3e, follow these steps:
1. Power down the panel. If the panel is mounted to the wall, carefully remove it from its backplate. You will need to loosen the set screw at the bottom of the panel to do this. Once the screw is loosened far enough, pull the panel straight forward, and it should come loose from the backplate. If this is the first time it's been taken apart, it may be a bit tight. The backplate is held on by two plastic catches at the top, as well as another two plastic catches at the bottom. It may be necessary to use a flathead screwdriver to press down from the top, and up from the bottom, to get it started. If it is mounted using a desk mount, remove the mount starting with the bottom, then moving to the top. Next, remove the backplate in the same manner as described above.
At this point, the back of the panel should be exposed. Remove power from the panel by either unplugging the transformer from the outlet, unplugging the barrel connector on the back of the GC3e Panel (if used), unplugging the barrel connector of the Honeywell LT-Cable, or, if you can't do any of those things, by shutting off power at the circuit breaker. Unless you're using the barrel connector, it is not recommended to remove primary power by disconnecting the wires at the panel. Once AC power has been removed, you can carefully unplug the panel's backup battery.


2. Make the wired connections. Now turn your attention to the XCVR3-GC3. It has four (4) pre-stripped wires coming off one end. You can see this in the picture up above. The wires are Black, Red, Green, and White. Make the connections as shown below. Note that Red, Green, and White are being connected to the terminal block with only six (6) terminals, while Black will be connected to the terminal block that has eight (8) terminals. If you have the panel mounted to the wall, and you are using the 3rd hand strap to hold it in place, then you will be looking at these terminals upside down from the way they are shown below:
- Black -> GND
- Red -> Smoke +*
- Green -> RX
- White -> TX

*The Smoke + terminal is not actually marked as such on the 2GIG GC3e. When looking at the terminals on the panel, the two (2) terminals beneath OCL2 are unmarked, as seen in the diagram above.
3. Complete the installation. After making these connections, it's time to power the panel back on. First, reconnect the battery. The panel will not power up on battery alone. This is normal. Next, reconnect primary power. Based on how you removed AC power to begin with, just reverse that process. If you removed power by turning off a breaker, then turn the breaker back on. If you unplugged the panel's DC transformer, plug it back in. If you are using the barrel connecter directly at the panel, reconnect power there. And if you are using the LT-Cable with the dongle, reconnect at the barrel connector. If you are using the LT-Cable with the dongle, you can remove the dongle, and plug the barrel connector end from the longer section of the LT-Cable directly into the panel's barrel connector if you find that easier to do.

Once power has been restored, mount the panel back to the rear mounting plate. If the panel is wall mounted, it is recommended that you put the XCVR3-GC3 into the wiring hole in the wall and allow it to hang down behind the panel. If your 2GIG GC3e is desk mounted, then reapply the panel to the desk mount with the XCVR3-GC3 passed through the rear wiring hole of both the panel and the desk mount. For best results, get the XCVR3-GC3 as far from the GC3e Panel as the included wiring will allow. Once the panel has booted completely up, you can begin learning in IMAGE2 and/or IMAGE3 devices.
Did you find this answer useful?
We offer alarm monitoring as low as $10 / month
Click Here to Learn MoreRelated Products


Related Videos
Related Categories
- Answered
- Answered By
- Julia Ross

