How do I Remove the Battery from My Honeywell 5811 Sensors?
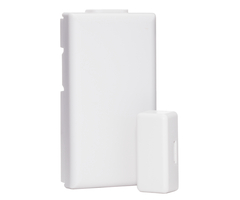
Remove the battery of your Honeywell 5811 sensor by inserting a small flathead screwdriver into the notch at the end of the sensor and gently twisting. After the case is open place the screwdriver between the battery and the empty bottom corner and gently twist to pop out the battery.

-
If monitored place the account on test mode with the central station.
It's important to place your system on test before changing batteries to prevent tamper trouble signals reporting to a central station, causing a false alarm and possibly dispatching authorities.
-
Open the 5811 tamper cover.
Insert a small flathead screwdriver into the opening at the end of the 5811 and twist. This should pop open tamper cover.
-
Gently pop out the 3V lithium battery.
Use a small flat head screwdriver and and place the tip between the battery and the bottom left hand corner of the case. Gently twist and pop up the battery. Do not try and pry the battery up from any other corner except the bottom left. If you pop it up from any other corner it can cause damage to the Honeywell 5811 sensor.
The Honeywell 5811 uses One CR2032, 3V lithium coin cell battery and will last up to 4 years. Once the battery voltage reaches 2.3V, the 5811 will send a low battery signal to the control panel the next time it sends another signal. The 5811 will stop working once it reaches 2.0V.
-
If replacing the battery, snap in a new battery.
The positive side must be facing up! We find it easiest to slide one edge of the coin shaped battery under the plastic housing. Then firmly press down on it. The older model 5811 used the CR2025 3V lithium batteries. There were some battery draining issues on the first generation sensors. Generally you should install the CR2032 coin cell battery. This is the exact same voltage and can be used on any 5811.
-
Close the tamper cover.
Hinge the two small tabs into the opposite end of the tamper cover. Then firmly snap the cover shut.
- Clear tamper and low battery troubles from the keypad.
To clear a tamper and low battery trouble, disarm the system twice in a row. - Test the 5811 door/window sensor.
After clearing the tamper and low battery troubles the system should be ready to arm until you remove the magnet from the side of the 5811. If you had to remove the sensor from the wall just remember to align the two protruding tabs on the side of the 5811 with the magnet. Fault the door or window a few times to ensure that the system is properly registering the sensor. - Remove the test mode.
Reach out to your central station and remove your system from test mode. This means all your alarm system's reporting will be live again.
General Notes:
The Honeywell 5811 dimensions are 2-⅛” x 1-3/16" x 1/4" and is compatible with the Lynx Plus, all the Lynx Touch panels, the Lyric Controller, the Lyric Gateway, any 5800 wireless receiver, Honeywell RF keypad and the2GIG Go! Control panel and the 2GIG GC3 panel. The 5811 is perfect for double-hung windows and has a built in normally closed reed switch that gets programmed to Loop 1.
The Honeywell 5811 is a surface mount sensor. The magnet gets mounted to the moving part of the door or window and has a maximum magnet spacing gap of up to 0.75". Users have the choice to use the included double sided adhesive or screws to mount the 5811 sensor.
Did you find this answer useful?
We offer alarm monitoring as low as $10 / month
Click Here to Learn MoreRelated Products


Related Categories
- Answered
- Answered By
- Connie Michael


