How Do I Reset an Interlogix Simon XT to Factory Defaults?
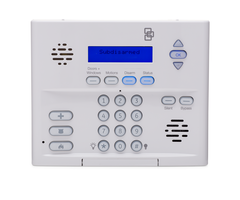
You can reset an Interlogix Simon XT to factory defaults by first powering down the panel completely. Then hold down the four top buttons on the panel while the system is being powered back on. If successful, the Simon XT will reboot with its factory default settings fully restored.
Please note, there is a field in panel programming called "Phone Lock". This feature is set to "Off" by default, however, if it is enabled, a panel default will not affect the following settings: account number, dealer code, code length, call wait cancel setting, phone numbers 1 and 2, phone report modes 1 through 4, phone lock, downloader phone number, and downloader code. For more information about the dealer and installer codes, click here.
Restoring an Interlogix Simon XT to its factory default settings will accomplish a few different things. For starters, any user codes that were set up with the system will be removed. The Master Code will be restored to its default of 1234. The Installer Code will be restored to its default 4321. This makes resetting an Interlogix Simon XT to factory default useful if you ever don't know the system's Installer Code and you need to access programming. Any settings or configurations that were set up with the system will be set to their default values. Finally, any sensors or devices that were programmed with the system will be removed from programming. This means that any sensors being used with the system will need to be reprogrammed.
Complete the following steps to reset an Interlogix Simon XT to factory defaults:
1. Disconnect the battery. Open the back cover of the Simon XT System, and disconnect the backup battery that is connected to the circuit board. Then close the panel.
2. Unplug the transformer. Remove the transformer for the Simon XT System from the wall outlet. Check to make sure that the screen for the system is blank and that the system will not respond to any keypad inputs. This will confirm that the system has been powered down entirely. If a cellular module is installed in the panel, it will need to be removed prior to performing the next step.
3. Reset the panel. With the panel powered off, press and hold the four top buttons on the Simon XT System. These buttons are labeled "Doors + Windows", "Motions", "Disarm" and "Status". While holding down these buttons, plug in the system's transformer to an active wall outlet. You may need another person to help you do this. The system should power on. Once it has fully rebooted, you can release the buttons.
Note: In order to perform a factory default, the panel's internal tamper switch must also be held down while the system is being powered back on. As long as the panel is on its backplate correctly, then the internal tamper switch will also be held down.
4. Confirm the reset. If the reset was successful, there should be no sensors programmed with the system. You should also be able to get into programming using the default Installer Code of 4321. Any settings and configurations for the system should be reset to their default values.
5. Complete the process. Once you confirm the panel has been returned to factory default, unplug the transformer again and re-install the cellular communicator, if necessary. Plug in the panel's backup battery, and secure the front of the panel to the mounting plate. Finally, plug in and re-secure the transformer.
Did you find this answer useful?
We offer alarm monitoring as low as $10 / month
Click Here to Learn MoreRelated Products

Related Videos
Related Categories
- Answered

