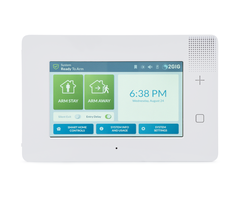
How Do I Run Power to the 2GIG GC3e?
You can run power to the 2GIG GC3e by connecting the panel with its plug-in transformer. The maximum wire run will depend on the thickness of the cabling. Thicker wire allows for a longer run. One option is to use a Honeywell LT-Cable, which comes prepared and requires no stripping.

AC power from a plug-in transformer represents the primary power source for a 2GIG GC3e Security System. The proper transformer is rated at 14VDC, 1.7A, and it comes included with the system. However, alarm cabling to connect the transformer with the panel is not included. You must supply your own. You can use standard 2-conductor alarm wiring for this purpose. We recommend stranded alarm wiring, as it is more forgiving and easier to work with. But if you have solid core wire, then that will still work fine. We find that 18-gauge wire or 22-gauge wire works best.
One thing to keep in mind when powering your 2GIG GC3e System is the maximum allowed wire run. The maximum distance depends upon the thickness of the wire. As electrical current travels down a wire, a small amount of power is lost along the way. If the wire run is too long, then not enough power will reach the panel, and it won't operate properly. Using thicker cabling will result in less current being lost, as the thicker wire will make it easier for electricity to travel down the line. If you want to achieve the longest wire run possible, then you should use thicker wire.
The 2GIG GC3e must receive at least 11 Volts of DC power from its plug-in transformer in order to prevent an AC loss trouble condition from being displayed. The table below shows the maximum run distance for different gauges of wire. Remember, the lower the gauge, or AWG, the thicker the wire. Notice how an 18 AWG wire will allow for a wire run of up to 135 feet, while a 22 AWG wire will only allow for a wire run of up to 55 feet.

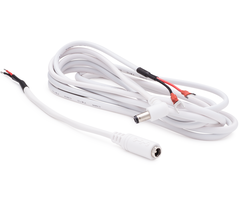
However, many DIY users prefer to use a Honeywell LT-Cable with the 2GIG GC3e. The Honeywell LT-Cable is a prepared wire that does not require any stripping. All you need is a screwdriver to connect the spade ends of the LT-Cable to the terminals at the transformer. But you must keep in mind that the LT-Cable is only 8-feet long. If you need a longer wire run, then you will obviously want to go with more traditional cabling. But for a short run, the LT-Cable is certainly a great option.
 The 2GIG GC3e has two (2) locations where you can connect the wires at the panel. The spot you use will depend on whether you are using traditional wiring or an LT-Cable. If you are using traditional cabling, then you will want to connect the wires at the terminal block. The ports labeled "PWR-" and "PWR+" are used. Since DC power is being used, you must observe proper polarity. Normally, black is used for negative (-), and red is used for positive (+). This is true when using the LT-Cable. You will need a small Phillips head screwdriver to make the connections. Also remember to follow correct polarity at the transformer.

But if you are using a Honeywell LT-Cable, then there is a plug-in barrel port on the panel where you can simply plug-in the cable. You only need to use the long portion of the LT-Cable, and you can simply set aside the shorter portion. One end of this long portion has spade connectors for connecting at the transformer terminals, while the other is the male barrel connector which plugs into the female barrel port on the 2GIG GC3e. You can see the GC3e barrel port in the picture below. Alternatively, you can retain the small portion of the LT-Cable and use it to connect at the GC3e terminal block. But most users find it easiest to just forgo the short portion and connect directly to the GC3e barrel port. Again, you must observe polarity at the transformer. Pay attention to the positive (+) and negative (-) terminals.

We strongly advise checking out this FAQ for more detailed steps on powering on a 2GIG GC3e System. But we have a brief overview of the process outlined below. Complete the following steps to provide power to a 2GIG GC3e:
1. Remove back plate. You need to remove the panel from its back plate so that you can access the inside. Keep in mind that you will need to loosen the set screw at the bottom of the panel if you haven't done so already. That is required for opening up the panel. Please see this helpful FAQ for more information on opening the GC3e if needed.
2. Connect backup battery. As is standard practice for a wireless alarm panel, you want to connect the backup battery before providing AC power. You should be able to easily recognize the GC3e backup battery with its distinct blue and yellow coloring. Take the cable from the backup battery, and plug it into the designated port.
3. Connect wire at panel. You can now connect the transformer wire at the panel. Remember to run the wire through the panel back plate first so that you can properly close the panel later. If you are using a traditional wire, then you will connect at the designated terminals on the 8-terminal block. Make sure that you do not connect to the 6-terminal block by mistake. Make sure to observe polarity and have black go to negative (PWR-) and red go to positive (PWR+). Remember that a small Phillips head screwdriver will be needed to complete this process. If you are using an LT-Cable, then just plug the male barrel connector of the cable into the female barrel port on the GC3e.
4. Connect to the transformer. Take the other end of the wire, and connect it to the two (2) terminals at the plug-in transformer. Remember to observe proper polarity and have black go to negative (-) and red go to positive (+). You can then plug-in the transformer to begin powering on the system.
5. Close the panel. With all the connections being complete, you can now close the panel. There should be a clicking sound to confirm that the panel has "locked" onto its back plate. You can tighten the set screw at the bottom of the panel if you want, though this is optional.
Did you find this answer useful?
We offer alarm monitoring as low as $10 / month
Click Here to Learn MoreRelated Products

Related Videos
- Answered

