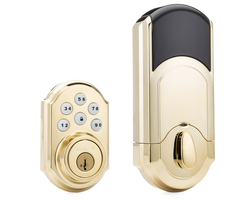
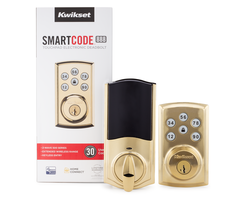
Including a Kwikset Z-Wave Lock
Related Products


Related Categories
Description
In this video, Joe shows users how to include a Kwikset Z-Wave Lock with a Z-Wave network. This is necessary for achieving some of the most basic functionality for the lock. Many home security panels also double as Z-Wave hubs. You can pair a door lock with your system and control it from the panel.
Z-Wave is a wireless protocol that is used with many smart home automation devices. Popular Z-Wave devices include light switches, thermostats and door locks. A Z-Wave device is smart and can recognize when it is paired with a network. Each Z-Wave device can only be paired with one network at any given time. If you try to pair a Z-Wave device with a second network, then it will not work until it is cleared from the original one.
Alarm Grid recommends always clearing a Z-Wave device before attempting to pair it with a network. This is true even if the device is brand-new. Many Z-Wave devices are paired with networks before they even leave the factory. Clearing a device first will help ensure that it can be enrolled successfully. The Z-Wave controller or hub provides acknowledgement whenever devices are included or excluded from the network.
Once a Z-Wave device has been paired, you will then be able to control it remotely. Nearly every Z-Wave controller will have some compatible app that can be accessed from Android and iOS devices. For alarm control panels, this is usually an interactive service platform like Total Connect 2.0 or Alarm.com. The end user will need an alarm monitoring plan that includes access to one of these services.
By pairing your Z-Wave lock, you can also have it set to activate based on a set schedule or with certain predetermined events. For instance, you might have the lock open every day at 3:00pm when your kids get home from school. You could also have the device lock automatically whenever you arm your system. This functionality is referred to as a "smart scene", and it represents one of the most useful functions of a Z-Wave lock.
http://alrm.gd/get-monitored
Transcript
Hi, DLRs. Joe from Alarm Grid. And today we're going to talk about how to include a Kwikset SmartCode 916 Z-Wave lock. Today, we're going to include this onto our IQ2 panel, as it does have a Z-Wave controller built in. But this lock is compatible with many different types of panels and many different types of Z-Wave controllers. Z-Wave locks are really convenient, as after you install them, get them powered up and turned on, and you connect them to a Z-Wave controller or an alarm system, there's lots of really great functionality that you can use with the system, as far as locking, unlocking, remote control. At the house, through the system, or if you have your alarm system activated through a service, there's a good chance that you'll be able to control the lock through the app that you have with the alarm system, depending on what system you have and depending on what service you're using. If you have any questions about those services, which alarm systems are compatible, or how to connect these locks, feel free to reach out to us, and we'll be happy to help. Today, though, we are going to include this Kwikset 916 onto our IQ2 panel. Before you include any Z-Wave devices, it's always recommended to exclude them first, as that clears out any programming that's in the lock itself. Today, we've already done a default on this lock, so I know for a fact that it is ready to be included into the alarm system. So I'm not going to run through the exclude first. We're just going to include it and then try to get it to work. So on the Kwikset lock, it's really simple to include this device. All you have to do is hit one button on it to learn into the system after you get the system into learn mode for the Z-Wave. The button for the lock is right in the back, so I'm just going to turn it around. I've already removed the two screws for the back plate. So this slips right off. And this button right there is our Learn button for Z-Wave controllers. So I'm just going to jump in the Z-Wave learning mode on our IQ2 2. I'm going to slide down from the top, hit Settings, hit Advanced Settings. Enter user code. Enter 2-2-2-2, which is the default code. Do Installation, Devices, Z-Wave Devices, and then Add Device. From here, I'm going to click on Include. And now the device is in learning mode. It's waiting for me to hit the Learn button on the lock. So now on the lock, I'm going to hit the Learn button. And as you can see, the controller did pick up the lock. It gives us an ID, type, and a name. So I'm going to click Add. I have to change the name, as we're already using front door. So I'll just do back door. And then click Add The backdoor is added to network successfully. So now we added the lock to the system. And we should be able to control the lock through the IQ2 controller. So I'm just going to put the back plate on the lock. And I'm going to turn it around so you can see the front. So I'm just going to jump back to the main menu. I'm going to slide over once, and then I'm going to slide down to get to our lock. And as you can see, it shows that the back door is unlocked. So if I do Lock on this screen, our Kwikset lock should lock. So I'm going to hit the Lock button. [MECHANICAL WHIR] Back door locked. And as you can see, the lock is working successfully with the IQ2. That's how to include a Kwikset Smart Code 916 lock into a Z-Wave controller. Again, if you do have any questions about this, compatibility with the Z-Wave locks, or if you have any trouble including them onto whatever controller you're using, feel free to reach out to us. You can get us on our website-- www.alarmgrid.com-- send us an email to support@alarmgrid.com or give us a call at 888-818-7728. If you did enjoy the video, feel free to subscribe. And if you want to be notified when we post future videos, hit the Notification button below, and we'll send you an update when we do so. Thanks for watching, and have a great day.
- Uploaded
