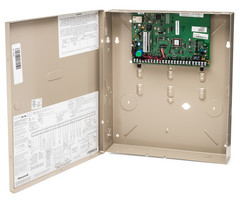
Updating the Firmware on a Vista-P Alarm System
Related Products


Related Categories
- Wired Security Systems
- Small Business Security Systems
- Monitored Home Security Systems
- Home Security Systems
- DIY Wired Security Systems
- Business Security Systems
Description
In this video, Joe shows users how to update the Firmware on a Honeywell VISTA Security System. Updating the firmware on a VISTA is actually done by removing the existing PROM chip and replacing it with a newer version. The Honeywell VISTA Panel must be powered down when doing this to avoid damage.
There are many situations where a user might want to upgrade their Honeywell VISTA System by replacing the PROM chip. The most common reason is to unlock new features and capabilities on the alarm system. Certain features and functions require a minimum PROM chip version. If your panel's PROM chip version is not high enough, then you will need to replace it with a new one. One of the biggest reason for a user to replace the existing PROM chip
One very important thing to keep in mind is that some of the earliest VISTA P-Series Panels cannot be PROM chip upgrade. These systems can be identified, ironically, through the PROM chip Revision. If the Rev. is below 2, then it cannot be upgraded through a PROM chip replacement. In fact, you will need to replace that panel entirely. But if the revision is at least 2, then the PROM chip can be removed and replaced with a new one.
If you do determine that a PROM chip replacement is necessary, you can certainly replace it yourself. But you should be very careful when doing so. Make sure the system is powered completely before beginning. This means disconnecting the backup battery and unplugging the transformer. The keypad should be completely blank, and there should be no lights on the system. You should locate the old PROM chip and carefully pry it off using a binder clip or similar object. You can then apply the new PROM chip and lock it into place. Finally, power the system back on.
http://alrm.gd/get-monitored
Transcript
Hi, DIYers. Joe from Alarm Grid, and today we're going to talk about swapping out a PROM chip on a VISTA-P panel. Now in most instances, you would swap the PROM chip out on a VISTA-15P or a VISTA-20P. But sometimes you could swap it out on a VISTA-21IP. Most cases, this is going to be used so that you can get certain features on the system. And in most cases, it'll be for Total Connect 2.0. Also, upgrading the PROM chip to a certain revision can allow your alarm provider to remotely access the panel with a certain downloading software. Depending on what your panel prompt chip is currently at, though, they may have that ability. When you do get activated, or if you do activate the system with an alarm provider or an alarm company, they're likely going to ask what PROM chip you have. And there may be an instance where you do need to upgrade the PROM chip. It's not that difficult to do. Now if you have a VISTA panel-- such as a VISTA-40, 50, 128, or 250-- installed, those have a bit of a different process to upgrade the PROM chip. And you'll actually have to deal with Tech Support for that issue. In those cases, you're likely going to want to work with an alarm company to resolve that. But in most residential situations and even in most basic commercial situations, you're going to have a 15, 20, or 21IP installed. Now to swap the PROM out, it's a pretty simple process. We're going to show you what this looks like on a 21IP today. And what we found is, if you don't have a chip puller available, the cheap way to do this is to actually use a binder clip. Something basic just like this. Now what you're going to do with the clip is, you're going to take one of the clip portions out-- just like that. And then on our panel, we're going to have to fully power this panel down. So I'm going to undo the main power plug. And I'm going to undo all of the backup battery leads. So as you can see, all the lights have turned off and the panel is fully powered down. Now this little black chip right here is the PROM chip on the system. So to remove it, the best way to do this is to shimmy it out using both of these slots right here. So I'm going to take one end of my binder clip. I'm going to insert here, get it under the PROM chip, and then pull up. After I do that, I'm going to go to the other side. Insert it in this slot, and then pull up so it comes out in a uniform fashion. Now if you go back and forth, the PROM chip should come out nice and even. You just want to pull it out straight, so that you don't damage any of the pins. After you have it removed, get your new PROM chip. Put it square into the socket, and then press down with a uniform pressure. After you feel it securely in, you should be able to power your panel back up, and the firmware will be upgraded. So the process for upgrading the PROM chip is very simple. And again, this is going to be used so that you can get certain features on your system. There are some panels that aren't able to be PROM chip upgraded. In most cases, if you're existing PROM chip says WA15-2 point whatever, or WA20P or 20-2 point whatever, it will be eligible for a PROM chip upgrade. If it's below that revision-- below the two point whatever number it is-- it's likely an older panel. And it's not going to be able to be PROM chip upgraded. In those cases you may be looking at swapping out the board entirely to get those new features that you may be looking for, such as remote downloading and Total Connect 2.0. If you do have any questions about this process-- as it can be a little scary swapping out the PROM chip on the board-- feel free to give us a call at 888-818-7728. Send us an email to support@alarmgrid.com, or head over to our website, www.AlarmGrid.com. If you enjoyed the video, feel free to subscribe. If you want to be notified about future videos, hit the notification button below. And we'll send you an update when we do so. Thanks for watching, and have a great day.
- Uploaded


