How Do I Add a Siren to a Honeywell VISTA System Using a Power Supply?
You can add a siren to a Honeywell VISTA System using a power supply by connecting panel terminals 3 and 4 to a power relay. You will connect your power supply to the relay. The sirens will be daisy-chained together. The first siren in the line will connect with the relay and power supply.

You only need to use a power supply when adding a siren to a VISTA System if the total power draw for the siren(s) will exceed the panel's maximum alarm output of 2A at 10.5 to 13.8VDC. Most VISTA System users will not exceed this maximum output when adding sirens. It is much easier to add sirens without a power supply, and there is much less equipment involved. You can read this helpful FAQ if you want to add a siren without using a power supply.
If you determine that a power supply is necessary, then you will need to purchase a variety of different equipment. This includes a relay, a power supply, and a plug-in transformer and backup battery for the supply. You may also want a metal cabinet enclosure to contain everything. We recommend using an Altronix RB5 Relay, a Honeywell AD12612 Auxiliary Power Supply, a Honeywell 1361 Transformer, and an UltraTech 1240 Battery. For the purpose of this FAQ, that is what we will be working with.
Please note that you will also need to supply your own cabling. We recommend using 18-gauge, 2-conductor wire for this purpose. However, similar gauges will work just fine if that is what you have around. Also note that the Altronix RB5 Relay has its own current draw of 120mA, which must be taken into consideration when calculating the total current draw for your panel's equipment. If you use a different relay, then use its current draw instead.
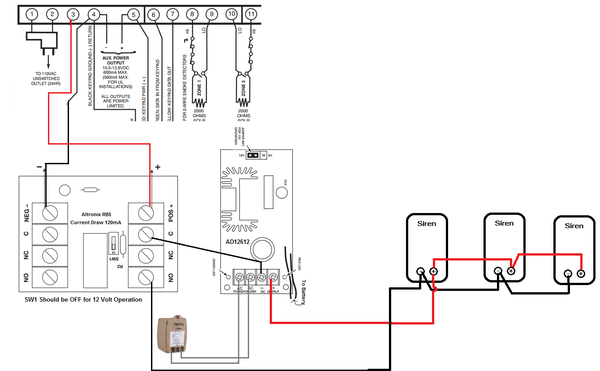
When adding the siren(s), you can follow the diagram below to help you complete the process:

Complete the following steps to add a siren to a VISTA System using an added power supply:
1. Power down the system. You will need to power down your panel completely before you attempt to add a siren. Disconnect the backup battery, and unplug the transformer. The system should power down. There should be no lights on the system, and all keypads should be blank.
2. Make the connections. You will now begin making the necessary connections for your siren to work. You can follow along using the diagram above for a clear picture. Make the following connections:
- Terminal 3 on the VISTA Panel to POS (+) on the Altronix RB5 Relay.
- Terminal 4 on the VISTA Panel to NEG (-) on the Altronix RB5 Relay.
- Common (C) on the Altronix RB5 Relay to NEG (-) on the Honeywell AD12612 Power Supply.
- Normally Open (NO) on the Altronix RB5 Relay to NEG (-) on the first siren in the sequence.
- POS (+) on the Honeywell AD12612 Power Supply to POS (+) on the first siren in the sequence.
- Connect POS (+) on any additional siren in the sequence to POS (+) on the previous siren in the sequence. Repeat for all sirens until you reach the last one in the line.
- Connect NEG (-) on any additional siren in the sequence to NEG (-) on the previous siren in the sequence. Repeat for all sirens until you reach the last one in the line.
- Connect two wires from the AC Transformer Terminals on the Honeywell AD12612 to the 1361 Transformer. Polarity does not matter here.
- Connect the UltraTech 1240 Battery to the Honeywell AD12612 Power Supply where indicated.
- Set SW1 OFF on the Altronix RB5 Relay for 12V operation.
- Have the jumper in-place on the Honeywell AD12612 Power Supply for 12V operation.
3. Power system back on. You can now power your VISTA System back on. Plug in the transformer before reconnecting the backup battery. Make sure the transformer for the AD12612 is also connected. The panel and the power supply cannot share a transformer.
4. Test the siren(s). Make sure to put your system on test mode with the central station before testing your sirens. You can test your sirens by activating an audible system alarm. The easiest way to do this is to activate a Perimeter Zone while your system is in its Exit Delay countdown after Arming Away. You can Arm Away with the command [Master Code] + [2]. All your sirens should activate after activating a Perimeter Zone while the system is Arming Away. If they do not, check the wiring and try again. You can take your system off of test mode after a successful test.
NOTE: These instructions and the wiring diagram shown do not include any sirens that are connected directly to the alarm panel. This is done for the sake of simplicity. It is assumed that one or more sirens will be connected to Terminals 3 and 4 at the panel, in addition to the Altronix RB5 Relay. Just make sure that the total current of all devices connected to the VISTA Panel Terminals 3 and 4 does not exceed 2 Amps.
Did you find this answer useful?
We offer alarm monitoring as low as $10 / month
Click Here to Learn MoreRelated Products
Related Categories
- Answered


