How Do I Add a Wired Zone to A PROA7 or PROA7PLUS Panel?
To use wired sensors on your PROA7 or PROA7PLUS you must either use a hardwired option built into a wireless sensor or use a wired to wireless converter. The PROSIXCT is an example of the former the PROSIXC2W of the latter. The PROSIXCT has 1 hardwired zone, while the PROSIXC2W supports up to eight (8).
The Honeywell Home PROA7 and Resideo PROA7C are basically the same panels, and the Honeywell Home PROA7PLUS and Resideo PROA7PLUSC are the same. The only difference between them is the branding on the front of the panel. Any of these panels will support hardwired zones only through a wireless sensor or wired to wireless converter. Any of these panels can support a max of 127 SIX or PROSIX encrypted devices and up to 123 unidirectional legacy RF sensors, for a total of 250 protection zones. Together, these panels are referred to as the ProSeries panels. There are some major differences between the PLUS and Non-PLUS versions of the panels, you can read more about that here.

The PROSIXC2W is a popular option when you are connecting multiple hardwired zones. This is a common practice when replacing an older hardwired panel with a new all-in-one model. These wired to wireless converter modules will allow you to use up to eight (8) zones per module. The hardwired connections on the PROSIXC2W wired zone inputs can be configured for normally closed or normally open. It is important to note that fire, heat, and carbon monoxide sensors are not supported when using this module.

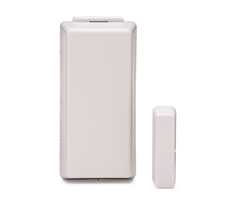
If only a single zone needs to be converted, then you may opt to use a PROSIXCT instead of the 8-zone converter. This sensor will allow you to use built-in hardwired terminals as well as the included magnet and reed switch as two (2) separate zones. The PROSIXCT sensor's hardwired terminals only accept normally closed hardwired contacts, though with no end-of-line resistor supervision.

Earlier we referred to legacy wireless sensors. This term refers to sensors that are not Resideo's latest encrypted wireless PROSIX Sensors and SIX Sensors. To use legacy sensors with your new ProSeries panel, you must add a PROTAKEOVER module. A PROTAKEOVER module is used if you already have wireless zones installed from a previous Honeywell panel or from a different manufacturer. There is no need to replace perfectly working wireless sensors if the PROTAKEOVER can support their frequency. The PROTAKEOVER allows you to use a maximum of 123 legacy wireless zones from a handful of manufacturers. You can choose to use sensors from Honeywell 5800, 2GIG, DSC, Qolsys/Interlogix/GE, or Bosch. The caveat is that you can only choose one of these manufacturers. You have to set the selection dial on the PROTAKEOVER to the desired option, as described below.
|
PROTAKEOVER Setting |
Supported Frequency - Sensors |
| 0 |
345 MHz - Honeywell 5800 |
| 1 | 345 MHz - 2GIG |
| 2 | 433 MHz - DSC |
| 3 | 319.5 MHz - Qolsys, Interlogix, GE |
| 4 | 433.4 MHz - Bosch |
| 5 thru 9 | Not Used w/ ProSeries Panels |
0 - 345 MHz (Honeywell 5800) - For Honeywell 5800 sensors, your options include the 5815, 5816, 5817XT, and the 5817CBXT. The 5817XT and the 5817CBXT deserve special attention. The primary loop on the 5817XT is selectable to accept a Normally Open or Normally Closed wired contact. The 5817CBXT will allow Normally Open contacts connected with EOLR supervision. This will allow for non-powered fire sensors, such as two-wire heat sensors. The rest of the legacy sensor options are as follows:
1 - 345 MHz (Legacy 2GIG) - For 2gig you can use DW10 to connect normally closed wired sensors with no EOLR supervision.
2 - 433 MHz (Legacy DSC) - For DSC you can use WS4945 and WS4985 for normally closed hardwired contacts.
3 - 319.5 MHz (Qolsys/Interlogix/GE) - For Interlogix the 60-362N-10-319.5 will accept a normally closed sensor, but on this sensor you must choose between the external magnet or the internal hardwired contact, you cannot use both.
4 - 433.4 MHz (Bosch) - For Bosch the Radion RFUN-A will accept a normally closed hardwired sensor.

Once you have your sensor or wired to wireless converter of choice, it's time to make the connections. Please follow the steps below to set up and configure these zones.
1. Make the hardwired connection. Connect the hardwired sensor based on the install guide for the sensor and the wiring configuration initially used. Most of these devices will only accept a Normally Closed hardwired sensor. For those few that will allow the use of a Normally Open sensor, be sure to properly wire the end-of-line resistor, if used. Normally Closed hardwired zones use a resistor in series connected to only one side of the sensor's terminals. For Normally Open, the resistor gets wired in parallel across the sensor's terminals. Each wireless sensor will specify which acceptable resistor(s) to use.
If you are going with the PROSIXC2W, then you must make sure every hardwired zone has a resistor. The PROSIXC2W supports any resistor value from 1k to 10k Ohms. Verify if there is an existing resistor in that falls within that range, if not, add the required value. For hardwired zones that have been installed with no EOLR, the PROSIXC2W comes with eight (8) 2.2k resistors. Next, you must calibrate the module after all zones you will be using, are wired with resistors. Zones must be in a normal or restored condition before calibration. If a zone gets added or removed, or if you change the resistor, this requires re-calibration. Calibration occurs by pressing and releasing the calibration button on the module's circuit board. Please see our complete guide on installing a PROSIXC2W.
2. Enter System Enrollment Mode. This process is the same as adding a wireless sensor. Click the three (3) horizontal bars, aka the hamburger menu button, at the bottom center of the screen. Next, scroll down on the black pop-up window and choose Tools. Enter the Installer Code for the system (default 4112). Select Programming. Click on Peripherals. Then press the plus (+) icon in the upper-right. The panel will enter its "Add a Peripheral" Mode so that a new sensor can be enrolled.
3. Enroll the sensor. Fault and restore each contact as you enroll them. It is always best to fault the sensor in the way it will normally operate. So, open and close the door or window, walk past the motion. If using a sensor such as a glass break, you may need to manually input the correct serial number and loop number or service. The loop/service depends on the wireless sensor you are using. For instance, the PROSIXCT uses Terminal Block service, whereas the 5816's internal wired connection uses Loop 1. The PROSIXC2W will show Loop # / Services 1 - Contact for the first input, 2 - Contact, for the second input, 3 - Contact for the third, and so on up to eight (8) Loop # / Services.
4. Save. This is a very important step, unless you want the practice of repeating your previous steps. If you are adding additional zones, you can select "Save & Add Another" or "Save" after you have finished adding the last zone. When all finished with adding sensors, hit the back button at the top left of the screen, until you exit programming completely.
5. Test. Always check your work by ensuring the sensor faults and restores properly outside of programming. If you would like to test the alarm signal all the way to the monitoring station, please put your account on test first, to prevent a possible accidental dispatch. Next, you can arm the panel and trigger a full alarm.
When upgrading to a PROA7 or PROA7PLUS panel from a hardwired system, there is no need to replace all working wired zones with wireless sensors. Convert them to wireless instead. Utilizing the existing wired contacts at the premises can save a lot of money in the end. The ProSeries panels are the latest releases by Resideo, also known as Honeywell Home, or just plain Honeywell. Though the name has changed, the people haven't. They are still committed to bringing you some of the best products on the market.
Did you find this answer useful?
We offer alarm monitoring as low as $10 / month
Click Here to Learn MoreRelated Products

Related Categories
- Apartment Security Systems
- Home Automation Controllers
- Wireless Touchscreen Alarm Panels
- DIY Wireless Security Systems
- Monitored Home Security Systems
- Small Business Security Systems
- Wired to Wireless Security System Converters
- Answered
- Answered By
- Freddie Daniels


