How Do I Add an Alarm.com Video Camera Using My Android Device?
You can add an Alarm.com Video Camera using your Android device by logging into your Alarm.com account through the Alarm.com Mobile App and then following the steps to add a new camera. After adding the new camera, you should make sure to set up any Video Analytics for the device.
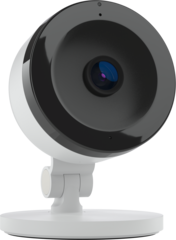
By default, an Alarm.com Video Monitoring Plan provides support for up to four (4) Alarm.com Security Cameras, plus monthly and total clip storage limits of 1,000 clips each. Upgrading the Alarm.com account to support Video Analytics will automatically increase the monthly and total clip storage limits to 3,000 clips. And if your monitoring company adds a video expansion pack to your account, then the maximum number of supported cameras will increase by 4, and the maximum number of supported clips will increase by 5,000. For example, if you have an Alarm.com account with Video Analytics and one (1) video expansion pack added, then the total number of cameras you can add to the account is eight (8), and the clip limits (monthly and total) will be 8,000. For more information on what is included with an Alarm.com Video Monitoring Plan, please see this FAQ.
Before adding a camera to your Alarm.com account, it should be powered on. This may involve running an ethernet cable to the camera for Power Over Ethernet (PoE) connectivity. Also, if the camera is connecting across WIFI, then your Android device should be connected with the same WIFI network you intend on using with the camera. For this FAQ, we will assume that the camera is already powered on, and that the Android device is already connected with the desired WIFI network. We will also assume that you already have an Alarm.com account for video surveillance.
Complete the following steps to add an Alarm.com Video Camera using your Android device:
1. Login to Alarm.com. Open the Alarm.com Mobile App on your Android device, and login using your credentials. If you do not already have the Alarm.com Mobile App, then you can download the app for your Android device from the Google Play Store.
2. Begin adding video device. From the main screen of the Alarm.com Mobile App after logging in, click the menu button in the upper-left corner. Then choose Video. Then select the settings icon (the gear) in the upper-right corner. Then choose Add Video Device to begin adding a video device.


3. Locate the camera. Most Alarm.com Cameras can be automatically discovered by the network, and you can simply click the blue Install button to begin adding the camera to the network. If the camera isn't automatically found, then you can manually enter the camera's MAC address at the bottom of the screen. In our example, Alarm.com automatically found the Alarm.com ADC-V522IR Camera that we wanted to add, so we simply clicked Install.


4. Name the camera. Once Alarm.com has identified the camera you want to add, you will be asked to name the camera. In our example, we named our camera "Test Camera". From there, you can click the next button on the keypad for your Android device to continue.

5. Wait for installation. Alarm.com will then begin the process of adding the camera to the network. This may take several minutes to complete. Once it does, you can press the blue Next button to continue.


6. Test and finish. Alarm.com will then allow you to test the camera so that you can position it to your liking. If prompted to "Allow Alarm.com to Record Audio/Video", choose "Allow". Then check the image for your camera to make sure it is to your liking. Once you have finished, click the "Done" button in the upper-right corner to complete the process.


Did you find this answer useful?
We offer alarm monitoring as low as $10 / month
Click Here to Learn MoreRelated Products


Related Categories
- Security Cameras
- Security Cameras
- HD Security Cameras
- HD Security Cameras
- 1080P Security Cameras
- 720P Security Cameras
- Answered
