How Do I Connect a VISTA-20p to Wireless Internet?
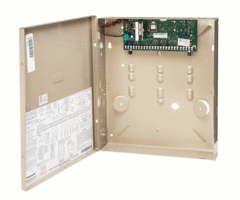
You can connect a VISTA-20p to wireless internet by adding an IP communicator to the system and then using an ethernet to WIFI bridge module to get the system connected to the internet wirelessly. This is the only way to get a Honeywell VISTA System connected to a local WIFI network.

UPDATE! Resideo and Honeywell Home have released new communicators in the form of the LTEM-PA AT&T LTE Communicator and the LTEM-PV Verizon LTE Communicator. These two new communicators are a part of the ProSereis lineup, and have a built-in Ethernet port, but can also support either the Honeywell Home PROWIFI, or PROWIFIZW WIFI communicators. You can read about how to install the LTEM-PX communicators in this FAQ. For information on installing either WIFI module into the LTEM-P Series communicator, click here.
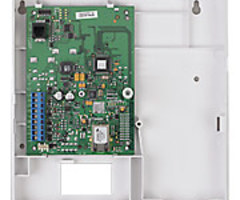
The Honeywell VISTA-20P System has multiple IP communicator options available. The Honeywell 7847i is a standalone IP communicator. And both the Honeywell LTE-IA and Honeywell LTE-IV are compatible dual-path communicators that provide cellular connectivity in addition to IP connectivity. Unfortunately, none of these modules allow for wireless connectivity out of the box. Each one is built for IP connectivity using a hardwired ethernet connection. But that doesn't mean that you can't get a VISTA-20P connected to wireless internet. If you use an ethernet to WIFI bridge, then you can have your VISTA-20P connect to the internet, without needing to run an ethernet cable all the way from your IP router to the panel.
Please note that you will need a monitoring plan to activate any of the aforementioned modules. For the Honeywell 7847i, you only need a monitoring plan that includes IP connectivity. But for an LTE-IA or LTE-IV, you will need a cellular monitoring plan if you intend to activate the cellular portion of the communicator. You can technically use an LTE-IA or LTE-IV for IP-only monitoring service by simply leaving the cellular portion of the communicator inactive. However, most LTE-IA and LTE-IV owners purchase these modules with the intention of using them for dual-path service with both IP and cellular. If you are planning to get monitoring service with Alarm Grid, then you should be aware that dual-path connectivity is included with our Gold and Platinum Level Plans (Self and Full). Our lower-level Bronze and Silver Plans only include IP connectivity, not cellular or dual-path connectivity. Please review our monitoring page for more information.
Once you have added a compatible IP communicator or dual-path communicator, you can then use an ethernet to WIFI bridge to get your VISTA-20P System connected to the internet wirelessly. But you should understand that an electrical outage will take your ethernet to WIFI bridge offline if no backup power option is provided. And with the ethernet to WIFI bridge offline, the VISTA-20P Panel will lose IP connectivity. Therefore, if you are using an IP-only communicator like the Honeywell 7847i, it is strongly recommended that you provide a battery backup for both your ethernet to WIFI bridge and your IP router. This will ensure that your panel remains online when the power goes out. Alternatively, you can also use an LTE-IA or LTE-IV and have the panel rely on cellular-only connectivity during power outages. That is generally the easiest option, as your panel can continue to maintain reliable connectivity with the Resideo AlarmNet360 Servers and Total Connect 2.0 using cellular communication.
Complete the following steps to get your VISTA-20P System connected to wireless internet:
1. Power down the panel. Since you will be making hardware changes to the panel, you must first power it down if you haven't already. Disconnect the backup battery, and unplug the transformer to power down the system. Make sure it is completely powered down before continuing.
2. Add an IP communicator. You will need to add an IP Communicator to your VISTA-20P Panel. This can be an IP-only communicator like the Honeywell 7847i, or it can be a dual-path communicator like the Honeywell LTE-IA or LTE-IV. For information on installing these communicators, please review one of the FAQs listed below:
- How Do I Install a Honeywell 7847i for a VISTA P-Series Panel?
- How Do I Install the Resideo LTE-IA On My VISTA P-Series System?
- How Do I Install the Resideo LTE-IV On My VISTA P-Series System?
3. Add a WIFI bridge. Now that a communicator has been added to your VISTA-20P System, you must add an ethernet to WIFI bridge module. You will need to run an ethernet cable from the new communicator to the ethernet to WIFI bridge module. Then follow the instructions for the ethernet to WIFI bridge to get it connected to a local WIFI network. This will usually involve pressing a WPS button on your IP router and then pressing a corresponding WPS button on the ethernet to WIFI bridge. But the instructions may vary depending on the ethernet to WIFI bridge module you are using. If you are looking for a good ethernet to WIFI bridge device to use, we recommend the Alarm.com ADC-W110. If you are wanting to provide backup power options for your ethernet to WIFI bridge and IP router, now would be a good time to do so.
4. Power on the panel. Once everything is wired and configured, you can power your system back on. Connect the transformer first, and then connect the backup battery. The panel should power on upon reconnecting the transformer.
5. Activate the communicator. Your communicator should now be connected to the local WIFI network. But it won't be actively communicating with the AlarmNet360 Servers until it has been activated. You must contact your monitoring company and have them activate the module. If you are wanting service with Alarm Grid, then you can sign up for an activation slot by choosing a monitoring plan on our activation page, which was linked earlier in this FAQ. If you need any added support or help, you can email us at support@alarmgrid.com. Keep in mind that we only respond to support emails during our regular business hours of 9am to 8pm ET M-F.
Did you find this answer useful?
We offer alarm monitoring as low as $10 / month
Click Here to Learn MoreRelated Products

Related Videos
Related Categories
- Answered


