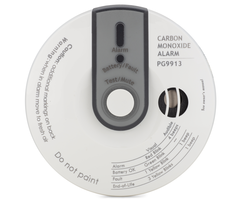
How Do I Enroll a PowerG CO Detector to a Qolsys IQ Panel 2 Plus?
You can enroll a PowerG CO Detector to a Qolsys IQ Panel 2 Plus by putting the panel into its auto-enrollment mode and then powering the PowerG CO Detector by inserting its battery or removing the battery tab. You can then configure the zone settings. Make sure to test after enrollment.

Please note that there was previously a firmware issue that prevented any DSC PG9933 Carbon Monoxide Sensor manufactured before March 26, 2019 from working with an IQ Panel 2 Plus w/ PowerG Modem Firmware Version 80.17. This was fixed with PowerG Modem Firmware Version 80.25, which was included with Qolsys IQ Panel 2 Firmware 2.4.0. You can learn more about FW Version 2.4.0 here.
You can use a PowerG CO Detector with any variation of the Qolsys IQ Panel 2 Plus. The process below applies to both the DSC PowerG PG9913 and the DSC PowerG PG9933. Complete the following steps to enroll a PowerG CO Detector with a Qolsys IQ Panel 2 Plus:
1. Access enrollment mode. The first thing you will want to do is put the Qolsys IQ Panel 2 Plus into enrollment mode. Start from the main system screen. Click the small grey bar at the top of the screen. Then choose Settings > Advanced Settings > enter Installer Code (default 1111) > Installation > Devices > Security Sensors > Auto Learn Sensor. The panel will now be in its enrollment mode for learning in sensors.
2. Open the CO detector. You should now open up the CO detector. You can do this by pressing the sensor against its back cover and rotating it counterclockwise. The back cover is also sometimes called the mounting bracket. You should be able to separate the sensor from the back cover to open it up.
3. Power on the sensor. If the sensor is brand-new, it may have a battery tab. Remove this to power it on. If there is no battery tab, then insert a fresh battery to power it on. If the sensor already has a battery inserted, then remove it, wait ten (10) seconds, and re-insert it. The device will send an enrollment signal to the panel once it has been powered on. Please note that the PG9913 uses a 9-Volt Battery, while the PG9933 uses a CR123A "Camera" Battery.
4. Confirm enrollment. You should see a message on the IQ Panel 2 Plus asking you if you want to enroll the device. Make sure the displayed Serial Number is correct. Click OK to confirm enrollment.
The Sensor DL ID can be found on the CO detector itself, and on the box it comes in:


5. Configure the zone settings. You will now adjust the zone settings. The Sensor DL ID should be filled-in already since you auto-enrolled the sensor. The Sensor Type should be CO Detector. The Sensor Group should be set to 34. Choose a Sensor Name that will help you easily identify the device. You do not need a Chime Type for this sensor, as activating will put the system into alarm. The same applies to Voice Prompts. The Source should be already set as PowerG since you auto-enrolled the device. Click the save button when finished.
6. Test the sensor. If you have service with a central monitoring station, make sure to put your system on test mode first. There should be a test button on the CO detector. Press and hold this button. The system should go into alarm. You can then clear the alarm using your Master Code. This will prove that the sensor is transmitting to the system successfully. If you want to test for CO detection, you will need canned CO.
NOTE: The expiry date for the detector is stamped on the device. Do not use the detector past this date, and do not wait for an end-of-life indication before replacing it. Frequent testing of CO detectors is recommended. In addition, it is recommended by the manufacturer to use a vacuum cleaner once a month to keep the detector's air vents free of dust.
Did you find this answer useful?
We offer alarm monitoring as low as $10 / month
Click Here to Learn MoreRelated Products

Related Videos
Related Categories
- Answered


