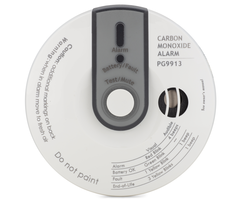
How Do I Properly Test My PowerG CO Detector?
You can properly test your PowerG CO Detector by enrolling the device with the panel, putting your system on test mode, and then using canned CO gas or the device's test button to test the sensor. Once you have completed the test, you can then clear the CO alarm with a valid code.

You should perform tests on your carbon monoxide sensors very regularly. This is because they are life-safety devices, and a faulty CO detector could have lethal consequences. Carbon monoxide gas is both odorless and tasteless, and it is virtually impossible to detect without a properly configured sensor. It is recommended that you test these devices at least once per month to ensure that they are working correctly. This is especially important during the winter months when you are more likely to be using a heater to keep your home comfortable.
Additionally, if you receive a certificate of alarm (CoA), you will need to perform an annual test to update your CoA. This test involves activating your CO detector and making sure that your system can successfully report a CO alarm to the central station. An updated CoA will be made available after a successful test has been completed. You can then present the updated CoA to your homeowner's insurance provider to see if you can get a premium discount.
Please note that this testing process applies to both the PowerG PG9913 and PowerG PG9933 Carbon Monoxide Sensors. Complete the following steps to properly test your PowerG CO Detector:
1. Enroll to panel. Your PowerG CO Detector must be enrolled with your panel before you can perform a test. You can auto-enroll a PowerG CO Detector on a Qolsys IQ Panel 2 Plus or a DSC PowerSeries NEO System by putting the system into its wireless enrollment mode and then applying power to the PowerG CO Sensor by inserting a fresh battery. The system should recognize the sensor and allow you to auto-enroll it. If auto-enrollment fails, you can try manually entering the 7-digit Serial Number for the PowerG CO Detector.
If you have a DSC Iotega System, then you will need to contact your alarm monitoring company to help you enroll the sensor. This is because the DSC Iotega does not allow for local programming. Your monitoring company will be able to ensure that your PowerG CO Detector is successfully paired with the Iotega System. Only continue to the next step once you are sure that your PowerG Carbon Monoxide Senor is enrolled with your system. The test will fail if the sensor is not properly enrolled.
2. Access test mode. You must now put your system into test mode. You only need to do this if you have active service with a central monitoring station. If the central station receives a CO alarm, they will send help immediately. This will result in unnecessary emergency dispatch and possibly a heavy fine from your local jurisdiction. Always put your system on test mode when testing sensors.
The best way for Alarm Grid customers to put their systems on test mode is to contact our monitoring partner. Our monitoring partner is Criticom Monitoring Services, also known as CMS. Alarm Grid customers can also put their systems on test mode using the MyAlarms.com feature or by emailing us at support@alarmgrid.com. If you decide to put your system on test mode by emailing us, make sure you get a proper response confirming that your system is now on test mode. If you have not received a response, then it's very likely that we have not received your email yet, and your system is still not on test mode.
3. Perform the test. You can test a PowerG CO Detector either by using the test button on the sensor, or by using canned CO gas. The test button will only test to see if the sensor is reporting to the panel properly. You can perform that test by pressing and holding the test button until an alarm occurs. The test buttons on the PG9913 and PG9933 Sensors are not recessed, so you won't need a screwdriver or other thin object to press these buttons.
To test the actual function of the sensor, you will need to use canned CO gas. Simply point the nozzle into the vents on the CO detector, and direct the CO gas into the sensor. Remember that carbon monoxide gas is extremely dangerous, and you must be very careful not to breathe in the gas! The alarm should occur shortly after you begin applying the CO gas.
4. Confirm the alarm. If the test was successful, then a CO alarm should occur on your system. You can clear the alarm by entering your Master Code. Remember, the Master Code should be the code you use to arm and disarm your system on a regular basis. If no alarm occurs, then something is wrong. One possibility is that the sensor is not programmed correctly. Check the programming, and try again. You may also need to clean the sensor. You can use a vacuum cleaner hose to keep the vents free of dust and other debris. Try to perform the test again with the vents clean. If the test still fails and you do not get an alarm, then it is possible that the sensor has malfunctioned. You may need to replace the PowerG CO Detector with a new one.
Did you find this answer useful?
We offer alarm monitoring as low as $10 / month
Click Here to Learn MoreRelated Products

Related Videos
Related Categories
- Answered


