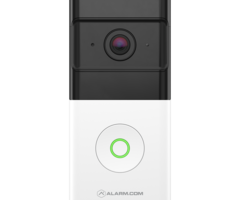
How Do I Setup the ADC-VDB780B Wireless Video Doorbell?
The Alarm.com ADC-VDB780B wireless video doorbell requires a gateway to connect to WIFI and the Alarm.com account. The SG130, W115C, IQ WIFI 6, or an IQ4 panel can be used. However, the gateway used will affect battery life and some other features. In this guide, we'll discuss how to connect.
The ADC-VDB780B is an Alarm.com video doorbell. Its true benefit lies in its versatility and convenience. It's an excellent option if your existing doorbell has a broken wire or if you want to install a doorbell in a location where there is no existing wired doorbell. The ADC-VDB780B makes installation simple and easy with battery power and a truly wireless installation.
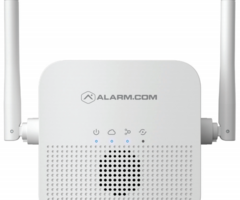
There are a few installation options for the ADC-VDB780B. At its release, the wireless doorbell required the use of an ADC-W115C Wireless Chime. The chime connects to the network and the video doorbell connects to the chime using WPS. The ADC-W115C acts as both a chime and a 2.4GHz WIFI extender. This can be helpful since the wireless video doorbell is often installed at a distance from the WIFI router. We'll cover each of the alternative (non ADC-W115C) installation options below. There is a bundle available that includes both the ADC-VDB780B and an ADC-W115C chime module.
This FAQ assumes that the ADC-VDB780B has been physically installed. Refer to the installation guide for detailed instructions regarding the physical installation. Although the ADC-VDB780B can be installed using an IQ4 panel (IQ Panel 4, IQ4 Hub, or IQ4 NS) as the access point, installation using this method can seriously reduce the doorbell's battery life. Per Alarm.com, battery life can be reduced by as much as two-thirds. Still, it is likely the battery will last at least one (1) month before needing a charge when installed using this method.
Choose The Best Installation Method For Your Situation
Different installation methods work best for different situations. Below are some installation considerations and the best installation options for each:
| Consideration | W115C | SG130 | IQ4 Panel | IQ WIFI 6 |
|---|---|---|---|---|
| Supports Longer Battery Life | Yes | Yes | No | No |
| Heavy Traffic Expected in Camera's Field of View | Yes | Yes | No | No |
| Good if Customer Has Poor Overall WIFI Signal | Yes | Yes | No | Yes |
| Customer Wants Custom Chime and Recording Settings |
Yes | No | No | No |
| Customer Doesn't Want Additional Hardware | No | No | Yes | No |
| 1 - 3 Month Battery Life is OK | No | No | Yes | Yes |
| Customer Wants A Video Doorbell and Automation | No | No | Yes | No |
| An ADC Access Point Is Needed for Other Devices | Yes | Yes | No | Yes |
Installation and configuration using an ADC-W115C chime module is well covered in the ADC-VDB780B Installation Guide (linked above) so we're not going to include information on that in this FAQ. Refer to the installation instructions for that process. It is nearly identical to the ADC-SG130 process.
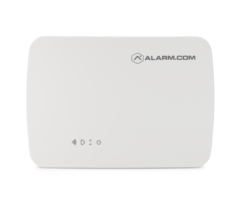
Enroll the ADC-VDB780B Using the ADC-SG130:
-
Add the ADC-SG130 to the Alarm.com account. The ADC-SG130 comes with a power cord and an ethernet cable. You'll need an open outlet for power, an existing router with an internet connection, and an open RJ45 ethernet port.
- Plug the provided Ethernet cable into an open port on your existing router. If the cable is too short, use a different cable that you provide.
- Connect the DC power adapter to the ADC-SG130 and then to the power outlet. Allow the ADC-SG130 to boot completely up. The power LED will be lit solid once the device is powered on and the boot sequence is complete.
- Using a computer or smart device that is connected to the same network you just plugged the ADC-SG130 into, open a web browser and enter the URL www.alarm.com/addcamera. This device can be connected using WIFI, it doesn't require an ethernet connection.
- Log in using your Alarm.com account credentials.
- Either choose the SG130 from the list of available video devices, or enter its MAC address to begin adding it to the account. The MAC is located on the bottom of the SG130 and also on its packaging.
- Follow the onscreen instructions to complete the setup.
-
Connect the doorbell Using WPS. This is the only connection method accessible to the end-user. It's a good idea to have the doorbell and the ADC-SG130 close to each other while performing this step. That may require that you dismount the doorbell and bring it inside.
- Press and hold the doorbell button on the ADC-VDB780B for 30 seconds or more until the doorbell button LED begins to flash blue. This indicates the doorbell is in WPS mode.

- Press the WPS button on the ADC-SG130 for 1 - 3 seconds until the WIFI LED begins to slowly flash. This indicates the gateway is in WPS mode. It will stay in this mode for two (2) minutes.

- Allow up to two (2) minutes for the two devices to connect. If the pairing is successful, the ADC-VDB780Bs doorbell LED will turn briefly red, then solid green. If the pairing is unsuccessful start the process over to try again.
- Press and hold the doorbell button on the ADC-VDB780B for 30 seconds or more until the doorbell button LED begins to flash blue. This indicates the doorbell is in WPS mode.
-
Connect ADC-VDB780B to the account. Once the doorbell is connected to the ADC-SG130 you can add it to the Alarm.com account. The easiest way to do this is in the same way you added the ADC-SG130 to the account.
- On a computer or smart device that is connected to the same network as the ADC-SG130 open a browser and go to www.alarm.com/addcamera. This device can be connected to the network using WIFI, an ethernet connection is not required.
- Log into the account using your Alarm.com customer credentials.
- Choose the ADC-VDB780B from the list of available video devices, or enter the MAC address of the camera to begin.
- Follow the onscreen prompts to complete the installation. A firmware update may be available for the doorbell camera. If so, downloading and installing the firmware may take a while, so be patient.


Connect Using The IQ WIFI 6
The IQ WIFI 6 must be added to the Alarm.com account by the alarm dealer through either the Alarm.com Partner Portal or the MobileTech App*. There are two (2) ways to connect the doorbell to the IQ WIFI 6, AP Mode or WPS Mode. However, only WPS mode is recommended for the end-user. The steps here assume the IQ WIFI 6 has already been added to the customer's Alarm.com account by a dealer like Alarm Grid.
-
Enter WPS Mode on the ADC-VDB780B. It's a good idea to perform this process with the doorbell close to the IQ WIFI 6. If necessary, dismount the ADC-VDB780B and bring it to the IQ WIFI 6. Press and hold the doorbell button for 30+ seconds, until the doorbell button begins flashing blue. It's now in WPS Mode.
-
Enter WPS Mode on the IQ WIFI 6. Find the WPS Button located on the back of the IQ WIFI 6. Press the button for one (1) to three (3) seconds. The WAN Status LED will begin blinking. The IQ WIFI 6 is now in WPS pairing mode. The WPS pairing process can take up to two (2) minutes. The ADC-VDB780B doorbell button LED will go red briefly and then turn solid green. This indicates successful WPS pairing. If pairing fails, start at Step 1 and try again.


-
Connect the ADC-VDB780B to the account. Once the doorbell is connected to the IQ WIFI 6 via WPS, add it to the Alarm.com account.
- On a computer or smart device also connected to the IQ WIFI 6 network open a browser and go to www.alarm.com/addcamera.
- Log into the account using your Alarm.com primary user credentials.
- Unless your computer or smart device is connected to the same network as the ADC-VDB780B, you won't be able to choose the doorbell camera from a list. In that case, enter the MAC address of the ADC-VDB780B to begin adding the camera to the account.
- Follow the onscreen prompts to complete the installation. A firmware update may be available for the doorbell camera. If so, downloading and installing the firmware could take a while, so please be patient.
-
Move the ADC-VDB780B to the Security WIFI partition. The IQ WIFI 6 offers three (3) separate WIFI partitions called Main, Security, and Guest. The end-user controls the Main and Guest partitions, and the alarm dealer controls Security. This allows the alarm dealer to better support security-related devices. The end-user can move devices to the Security partition, all other administration of this partition is handled by the alarm dealer.
- Log into Alarm.com using the primary user's credentials.
- Click Video.
- Click Settings.
- Select the ADC-VDB780B from the dropdown list of cameras.
- Click Wireless Network.
- Click Access Point.
- Select the IQ WIFI 6 Security Network.
- Click Continue. The change will be completed.


*An IQ WIFI 6 can be used completely outside of Alarm.com by downloading an app from the iTunes/App Store. That will not be the case when adding an ADC-VDB780B.
Connect Using an IQ4 Panel (IQ Panel 4, IQ4 Hub, IQ4 NS)
When using this connection method, the panel doesn't actually use the panel as an access point. But, the doorbell and the panel must be connected to the same WIFI network. To make this connection you'll use the ADC-VDB780B in AP mode.
-
Verify the panel's SSID. You must connect the video doorbell to the same network the IQ4 Panel is connected to. If you need to verify which network that is, on the panel, swipe left or right until you get to the final screen where WIFI, Software Update, BlueTooth, and other status information can be seen. Tap WIFI Details to see the SSID the panel is connected to.


- Put the doorbell in AP mode. It may be best to perform this step with the doorbell dismounted and inside the building. Press and hold the doorbell button for between 46 and 60 seconds. The button LED will begin blinking white. The LED may blink other colors before this, but you must keep holding the button down until the LED turns to flashing white. The ADC-VDB780B is now in its Access Point Mode.
- Connect your device to the doorbell. Using a WIFI capable computer or smart device join the doorbell's access point. Go to WIFI settings and choose the network with an SSID name of ADC-VDB780B (XX:YY:ZZ), where (XX:YY:ZZ) is the last six characters of the doorbell's MAC address.
- Begin the installation. On the same device from the previous step, open a browser and go to either http://vdb780binstall or 192.168.1.1. Follow the onscreen prompts to add the ADC-VDB780B to the same network as the IQ4 Panel. When the process is complete the doorbell button LED will turn solid green and the computer or smart device will revert to its original WIFI network.
-
Connect the ADC-VDB780B to the account. Once the doorbell is connected to the same network as the IQ4 Panel you can add it to the Alarm.com account.
- On a computer or smart device connected to the same network as the panel and doorbell, open a browser and go to www.alarm.com/addcamera.
- Log into the account using the Alarm.com customer credentials.
- Choose the ADC-VDB780B from the list of available video devices, or enter the MAC address of the camera where indicated.
- Follow the onscreen prompts to complete the installation. A firmware update may be available for the doorbell camera. If so, downloading and installing it may take a while, so please be patient.


Did you find this answer useful?
We offer alarm monitoring as low as $10 / month
Click Here to Learn MoreRelated Products


Related Categories
- Answered
- Answered By
- Julia Ross