How Do I Disarm a PROA7 or PROA7PLUS At the Alarm Panel?
Disarming a PROA7 or a PROA7PLUS alarm system requires the entry of a valid 4-digit code (default is 1234) at a keypad or the main panel. As long as you have a valid user code programmed in the system, you will be able to arm or disarm at any touchscreen by following the clear and easy prompts.

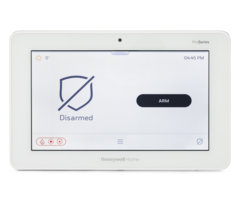
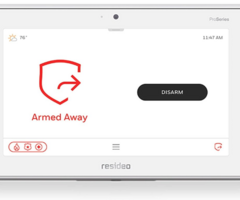
The Resideo and Honeywell Home ProSeries panels include the Honeywell Home PROA7 and PROA7PLUS, and the Resideo PROA7C and PROA7PLUSC. The PROA7 and PROA7C are basically identical, with the PROA7PLUS and PROA7PLUSC being identical as well. The only difference between them is the brand name on the front of each system. The PROA7C and PROA7PLUSC carry the Resideo brand while the PROA7 and PROA7PLUS carry the Honeywell Home brand (as seen above). Aside from branding, these panels are exactly alike.
There are some major differences between the Non-PLUS and PLUS versions of these panels. The PLUS version comes with the PROWIFIZW installed from the factory, while the Non-PLUS panel can have either WIFI, in the form of the PROWIFI, or both WIFI and Z-Wave, in the form of the PROWIFIZW, added. In addition, the PLUS panels offer Bluetooth Disarming, a front-facing camera for disarm photos, and the ability to view Total Connect 2.0 compatible HD cameras from both the panel and the touchscreen keypad. The PLUS panels also support the PROINDMV motion viewer devices, and come with Amazon Alexa built-in. Bluetooth, PROINDMV and video support, Amazon Alexa, and a disarm camera are features that cannot be added to a Non-PLUS panel. None of these differences affect the process of disarming from the panel, though.
There are a few different ways to disarm the system, the most common way is from the panel itself.
To disarm at the PROA7 or PROA7PLUS when using a single partition
1. Proceed to the main alarm touchscreen panel. Get in front of the panel. When the security system is armed, the screen will show a black disarm button. There will also be a red LED above the display screen. (See table below for LEDs and their meaning.)
2. Click the disarm button on the screen. Touch the black "disarm" button, on the screen once, to disarm.
3. Enter your 4-digit user code. The screen will prompt for a valid 4-digit user code (default is 1234). This is the code that was previously programmed into the system and given to you to use. Touch all 4 numbers in sequence to complete the disarm.
To disarm at the PROA7 or PROA7PLUS when using multiple partitions
1. Proceed to the main alarm touchscreen panel. Get in front of the panel. When the security system is armed, the screen will show a black disarm button. There will also be a red LED above the display screen.
2. Select the desired partition to disarm. On the left side of the main alarm touchscreen, immediately above the shield, there will be a dropdown. Touch the dropdown to select any of up to 4 available partitions. If partitions do not appear on this screen, it means that multiple partitions are not currently enabled. After selecting the desired partition to disarm, the system will prompt for a valid code to disarm that partition.
3. Enter your 4-digit user code. After clicking the desired partition, you will be prompted for a valid code (default is 1234) for each partition selected. Please be sure to use a code authorized in the partition or partitions you have selected. Touch all 4 numbers of the code in sequence to complete the disarm.
Once a successful disarm has occurred on the PROA7 or PROA7PLUS, the screen will show that the system is disarmed. A disarmed panel will display a large shield with a diagonal line through the center of it. Below that shield will show the word, "Disarmed." There is also a status LED above the display. The LED will now be green if the system is ready to arm, or amber if there is a trouble condition present. Once disarmed, the panel will not sound the alarm when doors and windows are opened. This allows you to enter, exit, and roam about the interior of the protected premises, without the fear of setting off the alarm system. The below table shows the various LED colors and their meaning.
LED Meanings
The table below explains what the LEDs and their various behaviors mean:***
| LED | STATUS | MEANING |
|---|---|---|
| Power (Left) | Green - Steady | AC Connected/Battery Charged |
| Off | No AC Power | |
| Status (Right) | Green - Steady | System Ready to Arm |
| Amber - Steady | System Trouble | |
| Red - Steady | System Armed | |
| Red - Flashing | Alarm or Alarm Memory | |
| Red/Green - Flashing | System in Programming Mode | |
| Off | Not ready to arm |
***Chart is taken from PROA7 Installation and Setup Guide
Disarming the PROA7 can also be accomplished in other ways and by using other peripherals, below are FAQs that explain how to perform disarm in ways other than at the panel.
Did you find this answer useful?
We offer alarm monitoring as low as $10 / month
Click Here to Learn MoreRelated Products


Related Categories
- Apartment Security Systems
- Home Automation Controllers
- Monitored Home Security Systems
- Small Business Security Systems
- DIY Wireless Security Systems
- Touchscreen Alarm Panels
- Touchscreen Alarm Panels
- Answered
- Answered By
- Fred Daniels


