How To Enable Alarm.com Alarm Triggered Warning Sounds?
The Alarm Triggered Warning Sounds (ATWS) feature from Alarm.com piggy-backs off the Manually Triggered Warning Sounds (MTWS). Trigger the ATWS feature by creating a new automation rule. When triggered, the sound will last for five (5) minutes or until canceled. Cancel with a system disarm.
Requirements:
- A security service package with Panel/InApp panics enabled by your alarm dealer.
- A video service package with the Audio for Non-doorbell Cameras add-on enabled by your alarm dealer.
- At least one camera compatible with the MTWS feature. (See the list in the table below.)
- A Qolsys IQ4 Panel (IQ Panel 4, IQ4 Hub, IQ4 NS) that supports alarm events. You can't do this with a video-only account.
Compatible Cameras
| Camera Model | Firmware Required | Notes |
|---|---|---|
| ADC-V515 | Firmware Version 0.0.5.476+ | While most cameras that support MTWS also support Two-Way Audio, the ADC-V515 does not support Two-Way Audio through the customer website. |
| ADC-V523/523X | Firmware Version 0.6.7.852+ | N/A |
| ADC-V724/724X | Firmware Version 0.6.7.852+ | N/A |
| ADC-VC728PF | Firmware Version 0.6.7.852+ | N/A |
| ADC-VC727P | Firmware Version 0.6.7.852+ | N/A |
| Enabling the "Non-Doorbell Audio" add-on does not disable a doorbell audio one. Alarm.com Video Doorbells can also be used on an account with this feature enabled, but video doorbells do NOT support Manually Triggered Warning Sounds. |
||
Supported Alarm Event Types:
- Alarm
- Police Panic
- In App Police Panic
- Police Panic Pending Alarm
- Tamper Alarm (A tamper that occurs while the system is armed)
- Tamper Pending Alarm
- Keypad Tamper Alarm
- Aux Panic Pending Alarm
ATWS Behaviors:
| Alarm Phase | Duration | Description | Camera Siren Behavior |
|---|---|---|---|
| Entry Delay | At least 30 Seconds | A delay zone has been opened and the system is waiting for a valid system disarm. | Camera remains silent. |
| Dialer Delay | By default, 30 Seconds when enabled | Occurs immediately following entry delay, if enabled. If the system is disarmed during the dialer delay, no alarm is sent to the monitoring station. | Camera remains silent. |
| Full Alarm | N/A | If the system is not properly disarmed during either of the previous delays a full alarm will occur. Bear in mind that not all zone types will provide an entry delay. | Camera begins sounding. |
| Canceled Alarm | N/A | When the customer disarms the system after a full alarm this is considered to be a canceled alarm. | Camera stops sounding. |
Configuring Alarm Triggered Warning Sounds via the Customer App:
- Log into the app. Log into the Alarm.com app as you normally do.
-
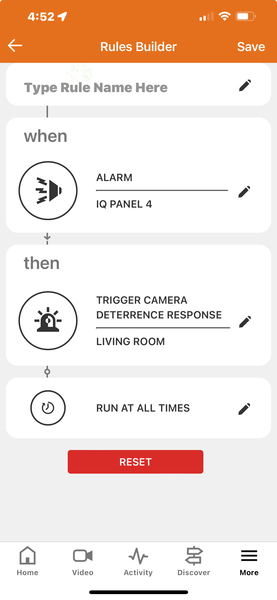
Navigate to Automation. Once you're logged in tap the More (≡) icon then from the list of options tap Automation. This brings you to the Rules page. In the upper right tap the Add (+) icon. You'll see the "Rules Builder" screen shown below:

-
Create the rule. In the section titled "When" tap "Select". From the list of available options, choose "Alarm". This will give you options to select individual sensors, specific partitions, or the system as a whole. Make your selections then tap "Done" in the upper right.
Important Note: Be sure that all partitions, zones, and cameras are named clearly. Doing so will make this portion of setup much easier.
In the section titled "Then" tap "Select". In this section, tap "Camera Deterrence". This will bring up a screen where you can select one or more compatible cameras to perform Alarm Triggered Warning Sounds. When selection is complete, click "Done" in the upper right.
At this point you can name the rule. Give it a name that helps you remember what its purpose is, in case you need to edit or disable it in the future.


In the rule shown below, when an alarm occurs on the IQ Panel 4, warning sounds are triggered on the Living Room camera. The rule is always on.
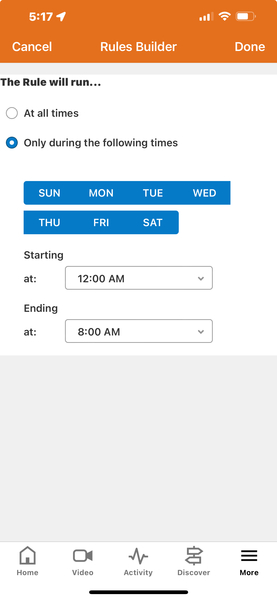
By default, the rule is set to run at all times. If you want to change this, tap the pencil icon next to "Run at All Times" and then choose "Only during the following times" and set the days and time windows during which you want this rule to be active. If you have different time windows, you'll have to make a separate rule for each one.
Configuring Alarm Triggered Warning Sounds via the Customer Website:
- Log in. Log into the Alarm.com customer website as you normally do.
-
Go to New Rules Builder. Once you're logged in, in the menu bar at the left choose Automation > Rules > Add New Rule > New Rules Builder.

-
Configure the rule. Next to "When" click "Select". Choose "Alarm" from the available options. In the next screen choose the zones, partitions, or panel whose alarms you want to activate the camera warning sounds. In our example, we chose the alarm panel itself since our panel doesn't have multiple partitions. Click "Done" when you have finished.
Important Note: Be sure to name all zones, cameras, and partitions accurately and completely. Doing so will make this portion of the setup much easier.


Next to "Then" click "Select". From the available options choose "Camera Deterrence" then click "Next". In "Select Devices" choose all compatible cameras that you want to sound when this rule is activated. If you only have a single camera, it will be selected by default. Click "Done" once you're finished.
Now, you can name the rule. Choose a descriptive name that you will recognize, in case you need to edit or disable this rule at some point. By default, the rule is set to run at all times. You can change this by clicking on the edit (pencil) icon to the right.
Select "Only during the following times" then select the days of the week and create a time window during which you want this rule to be active. If you need different time windows on different days, you'll have to create a new rule for each time window. Click "Done" when finished.
Once you have all the parameters set, be sure to click "Save" in the lower right. Otherwise, your work will be lost and you'll have to start over.


Important! If you plan to test the new rule, be sure your system is on test with the monitoring station first. Not doing so could cause an accidental dispatch for customers with a full monitoring plan.
The easiest way to test your new rule is by activating an InApp Police Panic alarm from within the customer app. You can also set off a panic via the panel or arm the system and activate an alarm on a sensor you selected during setup. Just be sure you put your system on test first with the monitoring station if you are a monitored customer. Once activated, ATWS will sound on the cameras for five (5) minutes or until the system is disarmed, whichever comes first.
Did you find this answer useful?
We offer alarm monitoring as low as $10 / month
Click Here to Learn MoreRelated Products


- Answered
- Answered By
- Julia Ross