How Do I Set Up a Qolsys IQ Lock-PG Automated Lock?
To set up the Qolsys IQ Lock-PG PowerG automated deadbolt, remove any existing lock hardware, and then install the new lock hardware as instructed. Put your IQ4 Series panel into Auto-learn Mode, then power up the lock by inserting the batteries. Follow the onscreen prompts to complete.


In this FAQ, we will concentrate on programming, not hardware installation. However, there are some notes about the hardware installation that we want to point out:
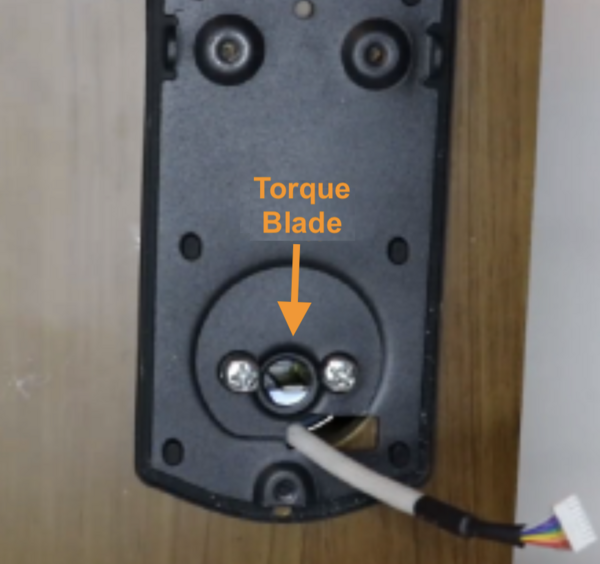
- Attach the wiring harness to the interior lock assembly, then mount the interior assembly to the interior mounting plate. Be sure the blue plastic piece on the interior assembly slides around the torque blade. You will likely have to feed excess wire from the wiring harness back into the hole in the door in order to get the interior assembly to mount flush. Use three (3) small screws provided to attach the interior assembly to the mounting plate.
- Turn the thumb latch on the interior assembly and verify that the deadbolt moves smoothly and that it locks and unlocks properly.
- In the case of our installation, the strike plate provided with the lock was slightly smaller than our original strike plate and the screw holes would not have lined up. There is an interior, more heavy-duty strike plate, then a decorative one that mounts over top of it provided with the IQ Lock-PG. We just kept our original one, as it was heavy, and worked fine.
The heavy-duty strike plate is shown on the left, it gets mounted to the frame using the larger screw holes to the right, then the decorative plate goes over the top and lines up with the smaller screw holes toward the center. Our original strike plate is shown beneath. It worked just fine, so we kept it.
Once you have the hardware installed, follow these steps to program the lock with the IQ4 Panel. These same instructions will apply to both the Qolsys IQ Panel 4 and the IQ4 Hub.
- Check panel version. The panel must be on firmware version 4.4.0 in order to support the use of the Qolsys IQ Lock-PG. To verify your panel's firmware, you can press the gray menu bar at the top-center of the main screen, then tap Settings > Advanced Settings > Enter the Installer or Dealer Code (1111, or 2222 respectively, by default) then tap About > Software. For instructions on how to update the panel's firmware via WIFI, check out the Release Notes.
-
Enter Auto-Learn Mode. It is recommended to use Auto Learn to enroll the lock. That is the method we will cover here. Once the panel is on the required firmware, tap the menu bar, then Settings > Advanced Settings > Enter Installer or Dealer Code (1111 or 2222 by default) > Installation > Devices > Automation > Auto Learn Devices.

Insert 4 AA batteries (included) into the IQ Lock-PG. Do this with the door open, as when it first powers up, the lock should go through the handing process to determine if it is installed on a left or right-swinging door*. The lock will attempt to enroll with the panel and a pop-up window will show that the lock is requesting to be added to the system. Press OK.
If you want to verify the Sensor ID, you can do so by checking the lock itself. The Sensor ID and the PIN are located on a sticker just above the batteries, as shown below. We've altered the numbers for our lock for security. We'll discuss the PIN CODE in just a moment.
At the panel, once you press OK, you'll be taken to the screen where you can configure the parameters of the lock.- Sensor ID: Filled in automatically, based on the Auto Learn information provided by the lock.
- Sensor Type: Also filled automatically.
- Sensor Name: By default, a Sensor Name Front Door is selected, but you can choose from a list of pre-configured names, or create a custom name.
-
Pin Code: This is optional, but can be entered for an extra level of security. For example, if you are learning more than one IQ Lock-PG into your system, using the Pin Code can prevent you from mixing them up. Just be mindful, that if you choose to enter anything in the Pin Code field, be sure that it is the appropriate code for the lock based on the Sensor ID and the sticker for that lock. If you enter anything in this field, and it doesn't match the Pin Code on the lock, the lock will appear to learn-in properly, but it will not work.

- Doorlock Volume: This setting is ON by default. If you want to hear confirmation beeps from the lock, choose ON. If you don't, set it to OFF.
- Re-Lock Timer: This option is set to Disabled by default. It has the option for a 30, 60, 120, or 180 seconds Re-Lock Timer. If set, when the lock is unlocked, it will re-lock automatically after the time period selected.
- Pair: After configuring all parameters, be sure to press the PAIR button.
-
Configure lock users. You cannot configure user access to the lock through the panel, you must do so via Alarm.com. Log into either the Alarm.com webpage or the customer app. The screenshots below show this process via the app. Go to More (≡) > Users > Select User > Click on the Lock icon (by default, it should say "No Access") > Toggle Access to the ON position. Be sure to tap "Save" at the top right of the screen. Once the site and the panel sync, the users that have been enabled will have access to the lock with their panel user code.

- Test the lock. Once the lock is installed, programmed, and the user codes have been configured, wait a few minutes then test the lock's operation. To lock from outside, press and hold the IQ Lock button for two (2) seconds. Test this with the door open so you can verify operation. Once locked, enter the user code, then press the IQ Lock button again to unlock the door. When it is dark, press and quickly release the IQ Lock button to illuminate the numbers.
* Important Note: If the lock does not go through the handing process upon power up, it needs to be master reset. To master reset the lock, use the provided reset tool. Press and hold the recessed reset button located below the battery compartment on the right side of the lock. Press the button for approximately five (5) seconds, until you hear a long beep, then release it. This should initiate the handing procedure. To trigger the lock to manually begin the enrollment process, use the reset tool and press the reset button quickly twice.
Below, the IQ Lock-PG reset button is outlined on the left, and the included reset tool is shown on the right (not actual size):

Did you find this answer useful?
We offer alarm monitoring as low as $10 / month
Click Here to Learn MoreRelated Products

Related Videos
- Answered
- Answered By
- Julia Ross


