Controlling Lights w/ a Qolsys IQ Panel 2
Related Products



Related Categories
- Small Business Security Systems
- Monitored Home Security Systems
- DIY Wireless Security Systems
- Apartment Security Systems
Description
In this video, Jorge from Alarm Grid explains how you can use a Qolsys IQ Panel 2 or a Qolsys IQ Panel 2 Plus to control smart lights. Both systems include a built-in Z-Wave Plus controller that allows you to pair various Z-Wave smart home automation devices. This includes Z-Wave lighting equipment.
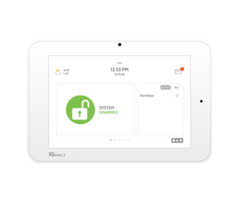
The Qolsys IQ Panel 2 can support both classic Z-Wave and Z-Wave Plus lights. Once you pair a Z-Wave light with a Qolsys IQ Panel 2, the light will appear on the system's lighting menu, which can be accessed from the main screen. You just need to swipe right or left on the IQ Panel 2 main screen until the enrolled lights are displayed. You can click on any light to turn it ON or OFF. You also have the option of turning all the lights ON or OFF at once. This is very convenient if you want to control your lights from the main panel. Additionally, you can also control the lights in the same manner using any paired Qolsys IQ Remote Touchscreen Keypad.
If you want to control your paired lights while you are away from home, then you can do so using the Alarm.com Mobile App on your phone. This will require that your Qolsys IQ Panel 2 is monitored with an alarm monitoring plan that includes access to the Alarm.com platform. Once you have logged into your Alarm.com account, you can control any lights paired with your Qolsys IQ Panel 2, as well as any other enrolled Z-Wave devices. Additionally, you can have your lights and other Z-Wave devices activate automatically based on a schedule or with certain system events. This is made possible by setting up smart scenes on Alarm.com. Being able to control your lights remotely from Alarm.com is a super convenient feature that you will surely want to take advantage of!https://www.alarmgrid.com/faq/how-do-i-control-lights-w-slash-a-qolsys-iq-panel-2
http://alrm.gd/get-monitored
Transcript
Hi, DIYers. I'm George from Alarm Grid. Today I'm going to be showing you guys how you can control any of your Z-Wave or Z-Wave Plus lights with a Qolsys IQ Panel 2. Now, in today's video, we have the IQ 2. This actually has the PowerG daughterboard card built in. So it's technically an IQ 2 Plus it's the same process still. The only difference between an IQ 2 and an IQ 2 Plus is the PowerG daughterboard card. But anyways, going back to the actual Z-Wave lights. So this system can actually support up to 80 Z-Wave lights. They could be the normal lights where they just toggle on and off, or if you have any Z-Wave light bulbs that are dim. So you can actually control the dimness from the system itself as well. Now, whenever you're learning in any Z-Wave light bulbs or anything like that, or any Z-Wave devices in general, you want to make sure that you're always excluding the device first. And then you include it after. In today's video, I actually have a Z-Wave plug-in module that's already learned in. It actually acts as a light. And I have my light here. Now, whenever you guys learn in Z-Wave devices, they're actually going to appear on your Qolsys main screen. You'll see here I have about 1, 2, 3, 4-- I have five different pages. So it could be my thermostat. It could be my video cameras, my light bulbs. It could be any Z-Wave devices you guys have learned in. The system actually gives it its own separate page so you can control it. So I'm going to go back to the main screen. And my lights just happened to be the very next page. So like I said, this is actually a Z-Wave plug module, which comes up as a light. But it makes sense, because we are using a light today, using it to turn on a light today. So first thing we need to do is, on the actual system, you just going to highlight the light you want to use. So if you have multiple lights, you'll see all of them come up here. And you can actually name them so that they're not all light. You may want to put living room, bedroom, hallway, stairway, front door, porch. Whatever you guys want to name it as, you can go ahead and do that. Mine's just defaulted as light. I select it. And then I'm going to go ahead and select On, because right now it's in the Off. But once I select On, the light will come on. And you also see that the little icon turned yellow to signify that the light is on. And then again, if you have multiple lights, you can actually select multiple of them and turn them all on. If you want to turn all of them on, you can just, instead of tapping one by one, you could just do Select All. And if you want to turn them all off, I would just do Off. But yeah, right now, like I said today, I'm just using one light. It makes sense if you guys are using a whole bunch of lights, you select all of them. You can select which ones you want on or off. You can create scenes. Whenever you arm the system, well, wait, turn these lights on. Whenever you disarm the system, turn these lights on or turn them off. So it's a lot of different things you could do. So this is actually how you can control it from the actual panel. You can just select it. Select On or Off. But let's say, what if you're not home? What if you want to turn on a light? Or what if you want to turn off a light that you may have left on? And you're not home. You don't want to turn back around. You're late for work. You're at work. Well, good thing is, if you have the alarm.com service, meaning your panel is being monitored, or even if you're on a self-monitoring plan that you just have the app, you can use the alarm.com app to turn off your lights. And I'm going to show that today using an iPad. I have my alarm.com account. Let me go ahead and get the iPad ready for you. All right, so I have my iPad here. I'm going to go ahead and open up my alarm.com app. It automatically logs me in just because I was logged in previously. And you can select Keep Me Logged In. That way you don't have to log in every single time you close the app. So I have it to selected as Keep Me Logged In. When you open yours, if you have to log in, just enter in your username and your password. And it'll take you to the main screen. If you go to the main screen, on the left-hand side, you should see a little light bulb icon. That'll take you to the lights. Or on the main home screen, if you just scroll down, you should see your lights there as well. Now, if I select the lights, that little arrow icon, it'll take me-- woo-- it'll take me to the Light tab. So you can either use the main screen or use the little gray tab on the left-hand side. Now once you're there, you'll see that the light is actually showing off. That's why the little light bulb here that's white and black, it's letting me know that the lights are off. If I want it on, I'll just select the yellow icon. It'll highlight it yellow. And my light turned on. If I want to turn it back off, I will go ahead and hit the little black and white icon. Give me a second. And it turns off. So this is very convenient for those of you who want to be able to Control Z-Wave devices from the application. Not only does it do lights, it does thermostats. It does locks, garage door controllers. Pretty much anything that Z-wave or Z-Wave Plus, if you learn it into the system, it'll go up to the alarm.com app. And you can control it from the application as well. If you guys have any questions about how to get service set up, we do offer monitoring plans and the alarm.com service. If you have any questions about integrating Z-Wave devices lights into your IQ 2 or IQ 2 Plus, send us an email to support@alarmgrid.com. If you found the video helpful, make sure you hit Like underneath. Subscribe to the YouTube channel. And hit the little bell icon so when we upload new videos, you guys get notified. I'm George, and I'll see you guys next time.
- Uploaded
