May 2019 Archives

Posted By

Hi DIYers! Last week was interesting for us, as we scrambled to get up some new content by the end of the week. We managed to upload seven new videos. This includes five from Joe, who was this week's MVP. We hope that you enjoy our latest videos and how they help you use your equipment.

Viewing an ADC-SVR122 Remotely

Joe explains how users can view video footage stored on an Alarm.com ADC-SVR122 Stream Video Recorder remotely. The ADC-SVR122 stores footage so that it can be viewed on Alarm.com. The footage can be viewed from Alarm.com, both through the website and through the mobile app. The ADC-SVR122 will need to be integrated with the user's Alarm.com account for this to work. The integration must be done from the Alarm.com website by choosing the option "Add Video Device". Up to eight (8) Alarm.com Cameras can be used with a single ADC-SVR122.


Excluding a Kwikset Z-Wave Lock

Joe teaches users how to exclude a Kwikset Z-Wave Lock from a Z-Wave network. There are a few different instances when you may want to exclude a Z-Wave lock. This step is important to perform before trying to the device to the network. Even if the lock is brand-new, it may have been previously paired with a network for factory testing purposes. You might also try excluding a lock and then re-adding it to the network as a possible troubleshooting step.


Factory Defaulting a Kwikset Z-Wave Lock

Joe demonstrates how to factory default a Kwikset Z-Wave Lock. Performing a factory reset is normally performed when a user inherits the lock from someone else and they want to start fresh with factory default settings. A user may also perform a factory default as a last ditch method for troubleshooting the device. Performing a factory default will clear all programmed user codes and remove all Z-Wave settings. The lock will need to be re-enrolled after performing the default.


Including a Kwikset Z-Wave Lock

Joe covers the process for including a Kwikset Z-Wave Lock into a Z-Wave network. This requires a Z-Wave controller or hub. By pairing a Z-Wave lock, you will be able to control it remotely from an interactive service platform on your smartphone. This is great if you ever need to let someone inside your home while they are away. You can then remotely lock the device after they leave. Z-Wave devices can also be set to activate based on a schedule or with certain predetermined events.


Glass Break Simulators

Joe talks about glass break simulators and how they are used. These devices will produce a sound that is specifically designed to activate glass break detectors. This is great for testing glass break sensors and making sure that they are detecting sounds and working properly. Most security equipment manufacturers have their own glass break simulators that they recommend for use with their equipment. Alarm Grid offers three (3) glass break simulators, which are the Honeywell FG701, the DSC AFT-100 and the Interlogix 5709C-W.


Carbon Monoxide Sensor Notifications from a Lyric via Apple HomeKit

Jorge discusses why a user will not receive specific carbon monoxide sensor notifications from Apple HomeKit when the CO sensor is used with their Lyric Alarm System. When HomeKit is used with the Lyric System, HomeKit will only provide specific notifications for burglary and intrusion zones. HomeKit will not provide specific alerts for life-safety zones. Instead, the user will only receive a General Lyric System Alert. That is why it is important to use Total Connect 2.0 alongside HomeKit. Unlike Apple HomeKit, Total Connect 2.0 will let you know exactly which zone was faulted, regardless of Response Type.


Programming Options Accessible Via Installer Code on the Lyric Alarm

In his triumphant return, Jarrett explains the programming options that can be accessed from the Installer Tools Menu on the Honeywell Lyric Controller. This menu is accessed using the system's Installer Code, which should be kept at its default of 4112. The Installer Tools Menu offers many options that allow the user to make changes to the system settings. This includes adding new sensors and configuring the communication path settings for the panel. You can also access Installer Tools to perform a factory default or to reset the Master Code to 1234.

Tags: , , , , ,

Comments


Posted By

Hi DIYers! We haven't made an Alarm Grid Tips post in while, so we figured now was a good time. The tip for today is to always take pictures when swapping out a hardwired alarm control panel with a new one. A few clear and detailed pictures can help you greatly with rewiring later on.

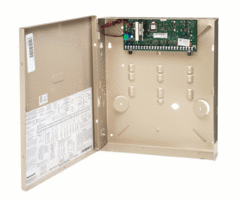
Honeywell vista 20p wired alarm control panel

If you have an older alarm system, there may be many benefits to upgrading to a newer model. A more advanced panel will allow for a greater number of zones and support for new functions and features. Many people upgrade so that they can access an interactive service platform like Total Connect 2.0 or Alarm.com. This will allow you to control your system and check its status remotely using a smartphone.

When a person makes a system upgrade, they will usually want to bring their existing sensors to their new setup if possible. Even if the panel itself is old and outdated, the sensors may still be perfectly suitable for regular use. It can be very expensive to buy a complete new set of sensors. And the user won't even need to move their sensors. They can remain in the same location and just wire-in with the new panel.

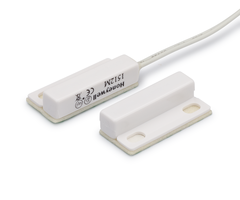
Honeywell 943wg mini magnetic contact

But if you have a complete hardwired system, then there are likely many sensors and other pieces of equipment running from various locations on the circuit board. Certain devices like sirens can require a surprisingly intricate setup, and it can be difficult to remember where everything goes. Even if you are just transferring sensors and other devices from one panel to another, the task can be surprisingly challenging without a visual aid.

For that reason, we recommend taking pictures before trying to bring over equipment from one panel to another. You don't need to take many, just enough to see where everything goes and where every connection ends up. In many cases, a new panel will follow a very similar wiring setup to the one it is replacing. By using your images as a guide, you will have a much easier time making a successful transition.

This same principle also applies if you are upgrading to a wireless system from a hardwired system. Wireless systems can support hardwired sensors by using wired to wireless converters. A wired to wireless converter works by connecting directly with hardwired sensors and sending out wireless signals to the panel on their behalf. The system will then recognize these wired sensors just like any regular wireless sensor.

Honeywell 5800c2w hardwire to wireless system 9 zone conversion moduleWiring sensors to a converter is actually very similar to wiring to a panel. The pictures of your old hardwired setup will be surprisingly helpful when connecting to a wired to wireless converter. You can check the pictures to see which wire goes to which terminal and even make sure the backup power supply is connected correctly. By placing the converter in the old location of the previous panel, all the sensors can remain in the same spot and easily connect with the converter(s).

So if you are ever upgrading from an older hardwired system, make sure to take some pictures first! We hope this basic tip was helpful to some DIY installers out there. Keep checking our blog for more Alarm Grid Tips in the future.

Tags: , , , ,

Comments


Posted By

Hi DIYers! It's hard to believe, but it's already May. Time sure flies doesn't it? Summer is quickly approaching and now is a great time to buy temperature sensors for your home. This way, you can be quickly notified if your home's AC system is ever not cooling the building properly.

Honeywell 5821 wireless temperature sensor and water sensor exte

Temperature sensors aren't just for letting you know about low-temperatures. They can also let you know about unusually high temperatures that would only occur if the AC went out. This is great for ensuring that the house you come home to is nice and comfortably. There's nothing worse than ending your day only to find that your AC went out and your home is uncomfortably hot! Our temperature sensors are also great for pairing with smart thermostats, which can often send you remote alerts when temperatures go outside certain thresholds.

Today, we're taking a look at three temperature sensors that you might consider adding to your system. We'll be focusing on the high-temperature sensing capabilities here, but we may brush over other features as well. Let's take a look!

Honeywell 5821

The Honeywell 5821 has two possible temperature settings. If programmed as Loop 2 with both DIP switches OFF, the sensor will alert the system when the temperature rises above 95°F for more than 10 minutes. You can also set it to SW1 DIP Switch ON and SW2 DIP Switch OFF on Loop 2 to have the sensor activate when the temperature rises above 75°F for more than 10 minutes.

The option to choose between a 95°F and a 75°F threshold is very useful, as some homes in different areas will certainly have different normal temperatures! The sensor also offers freeze detection and flood monitoring when paired with a water detection probe. An optional wired temperature probe is also available. The device operates at 345 MHz.

Qolsys IQ Temp

The Qolsys IQ Temp offers high-temperature detection at 100°F. The zone will then restore when the temperature falls below 95°F. Although this might be too high for many homes, there are some very hot areas that frequently exceed 110°F or even 120°F. This is a relatively simple device that can easily pair with nearly any 319.5 MHz alarm system. It also offers freeze detection at 40°F and restores once the temperature rises above 45°F. Like most temperature sensors, the high and low temperature zones will need to be configured separately.

2GIG FT6-345

The 2GIG FT6-345 Wireless Flood and Temperature Detector is a 345 MHz sensor designed with 2GIG Security Systems in mind. The sensor uses Loop 2 for high-temperature detection. It activates when a temperature of 95°F or higher is detected for three straight minutes. The sensor will restore when the temperature falls below 95°F for three straight minutes. The sensor can also be programmed with Loop 1 for freeze detection (41°F or lower for three straight minutes) or Loop 3 for water detection.

If you need help choosing a high-temperature detector for your home, please reach out to us! We can help you determine the best solution for your needs. The best way to reach us is to email support@alarmgrid.com. We will check your email at our earliest convenience and respond back as quickly as possible. We look forward to hearing from you!

Tags: , , , , , , ,

Comments


Posted By

Hi DIYers! We're a little late in reporting this news - in fact it happened a few weeks ago. But we forgot to mention that the Qolsys IQ Panel 2 Plus received the Most Valuable Product Award for Intrusion Detection at ISC West 2019. Congratulations to Qolsys and the IQ Panel 2 Plus System!


The 2019 Edition of ISC West brought us the 5th Annual Most Valuable Product (MVP) Awards, which are part of the larger SAMMY Awards. The MVP Awards are designed to highlight products that make particularly large impressions on the industry. The candidates were judged on innovation, functionality, competitive advantages, monitoring provider benefits, installer benefits and end user benefits.

We are very proud to say that the Qolsys IQ Panel 2 Plus was the winner of the MVP Award in the category of Intrusion Detection. The Alarm Grid Team actually had a great time at the Qolsys Booth during ISC West 2019. We had the opportunity to discuss the company's overview and general outlook, as well as their new commercial platform. You can check out these posts below:

The Qolsys IQ Panel 2 Plus is one of our favorite wireless all-in-one alarm systems. The system supports up to 128 wireless zones and top-of-the-line DSC PowerG Sensors. Each IQ Panel 2 Plus also comes equipped with a WIFI card, a built-in 5 megapixel camera, a 7-inch touchscreen display, an integrated glass break sensor and an LTE cellular communicator (AT&T or Verizon). The system also boasts advanced features like automatic Bluetooth disarming, facial recognition and partition support. Each system comes with a choice of legacy sensor frequency (319.5 MHz, 345 MHz or 433 MHz).

If you want to learn more about the IQ Panel 2 Plus for residential or commercial use, please reach out to us. We want to help you find the perfect system for your needs, and the IQ Panel 2 Plus is one of the best available. The best way to reach us is to email support@alarmgrid.com. One of our security planners will check your email at our earliest convenience and respond as soon as possible. You may also call us at (888) 818-7728 during our normal business hours of 9am to 8pm EST M-F. We look forward to hearing from you and helping you design a great home or business security system!

Tags: , , , , , , , , ,

Comments