Honeywell Lyric Security Systems Posts

Posted By

We are glad to announce that we have some new content coming soon to Alarm Grid. We are making unboxing videos for some of our most popular system kits. The videos will hopefully clear up any confusion as to what exactly is included in a kit, while also providing a closer look at our systems.


One of the most common questions we receive from customers is what exactly comes in a given security system kit from Alarm Grid. We try to make it as clear as possible by listing the components in the product description and by having a "kit includes" section a bit further down the page. But our new unboxing videos will hopefully eliminate any confusion once and for all. You will be able to see the entire kit unboxed, and each product will be carefully and thoroughly explained. You will know exactly what you are getting with each kit, and understand why each included product is important.

This project is being led almost entirely by our video producer and editor, James. If you are a keen reader of the Alarm Grid blog, then you may recall him in our spicy chicken wing eating challenge. In all seriousness, this has been a huge undertaking for him. James usually stays behind the camera, and he has never really immersed himself in the exciting world of alarm system knowledge before this. It has been just as big of an undertaking for him to learn the systems as it has been for him to actually put the videos together! We gotta say, we're extremely proud of the work he has put out, and we're excited that we will be able to share more unboxing videos of his real soon.

So far, only one unboxing video has been produced. Specifically, it's for the 3-1 Non-Encrypted Lyric Kit with AT&T LTE. The plan right now is for James to complete unboxing videos for all of the Honeywell Lyric System Kits first, before moving on to other systems later. Keep in mind that James is handling this project pretty much by himself, and there is a ton of work that goes into these. So don't expect these videos to just suddenly appear overnight. It's going to be a somewhat slow and lengthy process to really make it happen. But if you keep an eye on our Lyric Kits, you will undoubtedly be seeing some new product unboxing videos appearing on our website very soon.

For now, check out the debut video James put out, and let us know what you think in a comment below. Do you have anything in particular that you would like to see in future product unboxing videos? And also, what system do you think James should cover after he finishes up with the Lyric Kits? If there's anything you would like to see, please let us know, and we will do our best to accommodate. And as always, stay tuned to our blog for more news and updates coming very soon!

Tags: , , , , , , , , , , , , , , , , , ,

Comments


Posted By

Here at Alarm Grid, we try to help as many people as possible with their alarm system. Sure, we hope it will lead folks to choose us for their alarm monitoring needs. But it's also because we're simply helpful people. An alarm in your home or business should help quell fears, not cause them.

We've begun what I think of as "Silly Season". You may be familiar with this term from Nascar, but for us in the alarm industry, this is the time when a lot of home buying and selling occurs. During this time, we get a lot of calls that go something like this, "I just moved into a home with an existing alarm. We haven't been using it, but somehow it got armed, and now it's going off, and I don't know the code to disarm it. Please help!"

Moving into a new home is exciting, but it's also stressful and can be overwhelming at times. So, I've (Ms. Manners) put together this guide to help you, the person who moved out of the home in this scenario, to leave behind your alarm system in a way that's as stress-free as possible for all parties involved.

Ms. Manners Says: Notify Your Alarm Company

If your alarm system is monitored, be sure to notify your alarm company that you are moving out and that the system is staying behind. This may seem obvious, but many people assume that if they stop paying their monitoring fees, the alarm company will know they no longer want service and will cancel it on their own. This is not the case for a number of reasons! There may be contracts involved. There could be liability issues. So for many reasons - not the least of which is it's the polite thing to do - any time you wish to stop monitoring service to a particular address, you should notify the alarm monitoring company as soon as possible.

By notifying the alarm company, you do several things. You give them an opportunity to reach out to the new homeowner and introduce themselves. Hopefully, if you've had a good experience with your monitoring company, you will also put in a good word about them to the new homeowner. Both of these things give the company a leg-up when it comes to courting a potential new customer, and it also gives the new homeowner information based on your real-life experience, not just an advertisement in a new homeowner's mailer.

By notifying the monitoring company, you can also help to prevent any unnecessary dispatching of the authorities to this address. As bad as the scenario above is for the poor, uninformed new homeowner, it's worse for the police, fire, or EMS personnel who may respond to the alarm, which we know is false.

Remember, the person who signed up for the monitoring service at the address in the scenario above no longer lives there. That means the monitoring station is going to be calling people who have no idea what may be going on at this address (which is also an annoyance for the person receiving the call). In this situation, it is likely that the monitoring station MUST dispatch because if they don't (and there is some type of emergency) there may be repercussions for them. A monitoring station is always going to adhere to the adage, "Better safe than sorry." After all, safety is their business.

Ms. Manners Says: Default Users, But Not Zones

When you sell a house and the alarm system with it, you may think it's a good idea to set the alarm system back to factory default to allow the new homeowner a chance to program it as they see fit. Resist this urge! In most cases, what was your Front Door is now going to be their Front Door. What was your Kitchen Window is now going to be their Kitchen Window. John's Bedroom Window may become Jane's Bedroom Window, but this is a pretty simple thing to change and doesn't really call for the entire system to be set back to factory default.

When it comes to user codes, though, it is best to set these back to factory defaults. This will prevent the new homeowner from finding out what codes you used. After all, we are creatures of habit, and there's a good chance you'll use those same codes in your next system. Also, if you set the codes for the Installer and Master users back to their default, the new homeowner should easily be able to find out what they are by doing a quick search online. Then, if they find themselves in the messy scenario discussed above, they'll be able to get themselves out of it. Being able to get yourself out of a jam like this one can do wonders for your self-confidence.

System Manufacturers and their Default Codes

Panel Manufacturer Installer Code Master Code
Honeywell Vista (Non-polling) 4112 1234
Honeywell All-in-One 4112 1234
2GIG GC2 1561 1111
2GIG GC3 1561 1111
Qolsys 1111 1234
Interlogix Simon XT 4321 1234
Interlogix Simon XTi & XTi-5 4321 1234
DSC Impassa 5555 1234

Use the information in the table above to set the codes in your panel back to their default values. If you don't see your panel listed, you can likely find the information you need with a quick online search. Performing this process is the single most helpful thing you can do for the new homeowner when it comes to the alarm system!

Ms. Manners Says: Leave Behind Good Notes

Any information you know about your alarm system, such as the manufacturer and model, the default installer code, and the default master code - each of which hopefully you have programmed into your panel by this time - will be helpful for the new homeowner. A list of zone numbers and their descriptions is also very much appreciated by a new homeowner. Leave them a note, tucked behind the keypad, or on a kitchen counter. Give them the sequence of keys to enter to disarm the system, or better yet, if you have the opportunity, show it to them, and then leave them a note to back up your demonstration.

If you're willing, leave them your contact information so they can contact you in the event that something unforeseen comes up. This is particularly important if your system is somewhat complex and has multiple home automation features integrated with it. I promise the last thing the new homeowner wants to do is bother you if they can avoid it. Everyone at Alarm Grid has talked with a frantic new homeowner who never even considered contacting the prior homeowner. It's usually something we suggest if we're unable to assist.

Fortunately, in most cases, we are able to assist, and we are happy to do so. This is just one of the many ways we make new friends here at Alarm Grid! I hope that anyone who is preparing to move out of a home and leave behind an alarm system will read this and use these suggestions to prepare.

If you happen to be moving into a home that already has an alarm system, and perhaps the previous homeowner didn't read this post, feel free to reach out to us. We're here Monday - Friday from 9:00 am to 8:00 pm Eastern Time. You can reach us via email, or by calling 888-818-7728.

Tags: , , , , , , , , , , , , , , , , , , , ,

Comments


Posted By

Resideo has announced that 17 million shares of common stock will soon be available in a public offering. According to Resideo, the proceeds will be used to repay borrowings and to help fund growth and acquisitions. The news comes after Resideo posted abetter-than-expected Q3 for 2020.


Resideo trades on the New York Stock Exchange (NYSE) under the ticker REZI. The security, automation and comfort company had its initial public offering (IPO) in late 2018 after being spun-off from Honeywell. The news of the 17 million shares being available in a public offering resulted in a 14% decline in the company's stock price during Monday trading.

For the transaction of 17 million shares, Morgan Stanley and Evercore ISI will act as lead joint book-running managers. Additional bookrunners on the transaction include Bank of Ameria Securities and JPMorgan. Underwriters are being given the options to purchase an aggregate of up to 2.55 million additional Resideo common stock shares.

In the company's most recent earnings report, $1.36 billion in revenue was said to have been achieved in Q3 of this year. This greatly exceeded the consensus expert estimate of $1.15 billion. Year over year revenue for Resideo has increased by 10%. Resideo President and CEO Jay Geldmacher has recently expressed great optimism in demand trends for the security industry as the market enters into the final stretch of 2020.

Resideo is arguably best known for its state-of-the art Honeywell Lyric Alarm System, which boasts 128 wireless zones, encrypted sensor options, backwards compatibility with legacy Honeywell 5800 Sensors, integrated WIFI, built-in Z-Wave home automation, Apple HomeKit compatibility, a 7-inch touchscreen display, and local end user programming. The company also offers the new Honeywell Home PROA7PLUS Alarm Panel, the Honeywell LYNX Touch Panels, and the Honeywell VISTA Alarm Systems.

If you are interested in setting up a Resideo Security System in your home or business, then please feel free to email us at support@alarmgrid.com with any questions you might have. We check our email from 9am to 8pm ET M-F. Also remember to check out our monitoring page to learn more about the services we offer. We look forward to hearing from you!

Tags: , , , , , , , , , ,

Comments


Posted By

There has been some big news coming out of Apple from the World Wide Developers Conference 2020 regarding HomeKit. First it was the refreshed look for HomeKit in iOS 14. Then it was the facial recognition for HomeKit Cameras. Now we have learned about the HomeKit Control Panel in AppleTV.


Just like with the other recent HomeKit news, we have to be somewhat vague on the details, as we're not the authority when it comes to Apple HomeKit. But from what we can tell, the feature will be available with the AppleTV of iOS 14, otherwise known as tvOS 14. We do not have a firm timetable on the iOS 14 release, but we expect it to drop sometime in September.

According to an Apple user who has beta tested tvOS 14, the AppleTV interface will have a new control panel that essentially serves as a HomeKit controller for compatible devices. This control panel will let users quickly perform HomeKit Scenes, as well as view the live feed for a HomeKit Camera. The Honeywell Lyric supports an awesome HomeKit integration and can be used with HomeKit Scenes. You can learn more about the Lyric-HomeKit integration in this prior blog post.

Again, we're sorry we cannot offer more details on the soon-to-be-available HomeKit Panel inside of AppleTV. We advise reaching out to Apple for more information. But the AppleTV Gen 4 or higher makes for a great HomeKit Hub for use with your Lyric System. Using a dedicated HomeKit Hub with your Lyric will let you control the system through Siri Voice Commands from pretty much anywhere in the world.

If you haven't gotten started with the Honeywell Lyric and Apple HomeKit yet, then we can certainly help with that! We offer the Lyric System on our website, and we will be happy to help you set it up for alarm monitoring service. You need monitoring to activate HomeKit on the system and integrate it with your HomeKit network. To learn more about our monitoring services, please email us at support@alarmgrid.com. We check email from 9am to 8pm ET M-F. We look forward to hearing from you!

Tags: , , , , , ,

Comments


Posted By

Alarm Grid is now offering bundled versions of the Honeywell Lyric Alarm System that include the panel and a compatible LTE cellular communicator. The LYRICUPGRADE-A will have the LYRICLTE-A AT&T LTE Communicator, and theLYRICUPGRADE-V will feature the LYRICLTE-V Verizon LTE Communicator.

Honeywell lyric controller encrypted wireless security system

If you hang around our website regularly, then you probably already know that Lyric System Kits are nothing new for us. But these are fairly unique in that they offer just the system and communicator, without any new sensors. You might want to get one of these kits if you are upgrading from an older LYNX Touch System that can't receive a firmware update, such as a Honeywell L5100 System. The Lyric can support the vast majority of the Honeywell 5800 Sensors used with the older LYNX Touch Systems.

The reason why we decided to release these new Lyric Upgrade Kits is due to the 3G sunset that will be happening in 2022. Older cellular networks are being shut down, and many users are scrambling to find LTE options for their systems. With one of these new kits, you will be getting a Lyric System that is dual-path ready with both WIFI and LTE cellular connectivity. This is the best way to ensure that your panel stays reliably monitored, keeping any potential downtime to an absolute minimum.

The Lyric System offers some great features, such as a 7-inch touchscreen display, support for encrypted Honeywell SiX Series Sensors, connectivity with Total Connect 2.0, the ability to interface with Apple HomeKit, built-in Z-Wave functionality, a 2MP camera for taking disarm photos, and so much more. It truly is a state-of-the-art security system, and it can make a great addition to your home or business.

If you are interested in learning more about the Honeywell LYRICUPGRADE-A or Honeywell LYRICUPGRADE-V, or if you want to know more about monitoring service in general, please email us at support@alarmgrid.com. We check new email from 9am to 8pm M-F, and we always do our best to respond as quickly as possible. We look forward to hearing from you!

Tags: , , , , , , , , ,

Comments


Posted By

Apple HomeKit will soon be getting a new look to go along with the upcoming Apple iOS 14. This new, refreshed look brings a side-bar to the left-hand side of Apple HomeKit. The functionality should remain largely the same as the current version. But you're sure to love this sleek, new look!


As you know, we are big fans of Apple HomeKit when paired with the Honeywell Lyric Alarm System. By pairing your Lyric System with your Apple HomeKit Network you can control the system from pretty much anywhere using Siri Voice Commands. We have a guide to setting up the Lyric with HomeKit, which you can view here. We also recommend checking out this other guide to setting up HomeKit Automations.

As you can see above, the new look for Apple HomeKit will feature a new side-bar on the left-hand side to make navigation a bit easier. This layout will better utilize the space available on the iPad. However, we still expect the general principles to using Apple HomeKit to remain the same. It's nice to see that Apple hasn't totally overhauled Apple HomeKit, but they are changing it up enough to keep things fresh. From the picture shown at the top of this post, it looks great!

This new HomeKit look won't be arriving until Apple iOS 14 is available. Unfortunately, we don't have a firm release date available quite yet. It is our understanding that it will come out sometime in September. You would need to check with Apple for more info. However, we can assure you that the Apple Home App will automatically update once iOS 14 is installed on your Apple device. Until iOS 14 is out, you'll just have to wait patiently for the time being.

Like we said, we really don't know too much about what Apple is planning for their iOS 14 release. But we can say that we are really excited about the new "change" coming to HomeKit. If you want to learn more about using the Lyric with HomeKit, or if you are interested in our monitoring services, please email us at support@alarmgrid.com. We check email from 9am to 8pm ET M-F. We look forward to hearing from you!

Note: We have learned that this new look for HomeKit for Apple iOS 14 will only be visible for the Apple iPad. The Apple iPhone version of HomeKit will not be getting the same makeover.

Tags: , , , , ,

Comments


Posted By

If you have a Honeywell System with access to Total Connect 2.0, then you will probably want to set up some TC2 notifications. These are used for sending you text and email alerts regarding activity on your alarm system. You will have no trouble setting them up once you know how they work.


Before fully diving into the process of setting up notifications, it's important to understand exactly how TC2 notifications are organized. Notifications are sent out when predetermined system activity events occur, such as arming, disarming, AC power loss, a system alarm, or even just a faulted zone. The recipients of any given notification are determined based on the assigned notification group. Each notification group will have at least one assigned user, and each user can have multiple email addresses and phone numbers set up on their profile.

To break it down, a user must be assigned to a notification group, and that notification group must be associated with the particular event or events that they want to be notified about. Once the event occurs, every user within the assigned notification group will receive the alert. Each user can assign email addresses for email alerts and/or phone numbers for text alerts. Every assigned email and phone number will ultimately be used for notifications, provided that everything has been set up correctly.

Where some people can have trouble with TC2 notifications is when trying to set them up for multiple users. This is usually the case for families, where multiple people in the household want to each receive their own set of notifications. The solution is often to set up a unique user profile for every person who will be using the system and receiving notifications. Each user will need to choose a user code for controlling the system locally. If you want to limit the number of codes on your system, then the other option is to assign multiple email addresses and/or phone numbers to a single user profile. But the downside to doing that is that you won't have any real way of setting who receives what. The point here is that there are multiple ways to ensure that everyone using the system can receive notifications.

Total Connect 2.0 notification can be set up and configured from both the Total Connect 2.0 website and the Total Connect 2.0 mobile app. For our examples, we will mostly be focusing on the website, but understand that these menus are mostly the same on the app. They just might be organized slightly differently to better fit the smaller dimensions of a mobile phone. Really, both the website and mobile app are laid out very similarly, so if you can use one, then you should have very little trouble switching over to the other if needed. The important thing is to understand what all of the various terms mean and how they are all related.

First, let's take a look at the Users Menu of Total Connect 2.0. Like we said earlier, the most common practice is to set up an individual user account for each person who will be regularly using the system and receiving notifications. But if you are trying to limit the number of codes on your panel, then assigning multiple email addresses and/or phone numbers to a single user profile is also an option. On the TC2 website, you can easily locate the Users drop-down menu on the left-hand side.
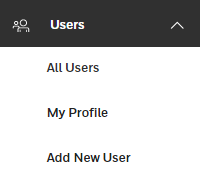
As you can see, the available options within Users are All Users, My Profile, and Add New User. The All Users option is useful if you are logged into a Total Connect 2.0 account with admin access. It will show all the users you have set up. My Profile is used for adjusting the settings for the user who is currently logged into TC2. This includes setting the user's name, preferred language, TC2 login password, assigned email addresses, assigned phone numbers, and even the security code they use with the panel. And the Add New User option is used for adding a new user to the Panel and if desired, to the Total Connect 2.0 account.
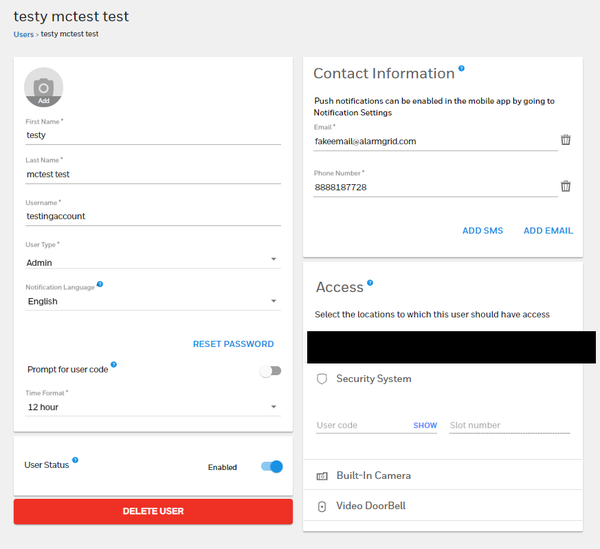

In the picture above, note the "Add SMS" and "Add Email" buttons. These are used for adding additional phone numbers and email addresses to a profile. Each assigned email and phone number will be used for notifications. If you don't want to create multiple users, then that is a method for ensuring that multiple people receive notifications. Just keep in mind that you will have no way of distinguishing which emails and phone numbers will receive which notifications. All emails and phone numbers assigned to the profile will be getting all the alerts.

Alternatively, if you create multiple user profiles, then you can pick and choose which profiles will be assigned to which notification groups. This is how you can set certain users to receive notifications regarding specific system events, while other users won't necessarily have to receive the same alerts for the same events. Whichever option you choose will work fine, and it's totally up to you. But you will have greater flexibility by creating multiple users.

Next, we would like to turn our attention to the Notifications Menu. This is where you will set up notification groups. Recall that different users can be assigned to different notification groups. Each notification group can correspondingly be assigned to different system events that will trigger notifications being sent out.
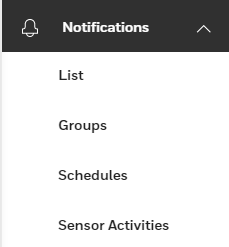

From the top, List shows the list of the specific system event triggers that will cause notifications to be sent out. Groups are the famous notification groups that we have been talking about throughout this post. Schedules are used for establishing set schedules for predetermined security and automation events to occur. Sensor Activities allows you to select specific sensors so that you can see if the sensor is faulted right from the main page of TC2, rather than having to access the complete system sensors list. For our purposes here, only List and Groups are really important.

After you have created the necessary user profiles and assigned email addresses and phone numbers to said profiles as needed, the next logical step is to create notification groups using the Groups option under the Notifications drop-down menu. If you click on the button with the two people and the + sign, then you can create a new notification group. This will involve providing a name for the notification group and choosing which users are included.


Upon building notification groups, you now get to the juicy step of actually building the triggers that will cause notifications to be sent out. These notification triggers are the actual system events that you want to be alerted about. To access this section, select List under the Notifications drop-down menu. You will likely find a bunch of notifications pre-assigned to the Default Group if you have never configured these settings before. To build new notifications, click the icon with three horizontal bars and the + sign. This will involve choosing the specific event that will trigger the notification to be sent out, as well as selecting the notification group that will receive the notification.
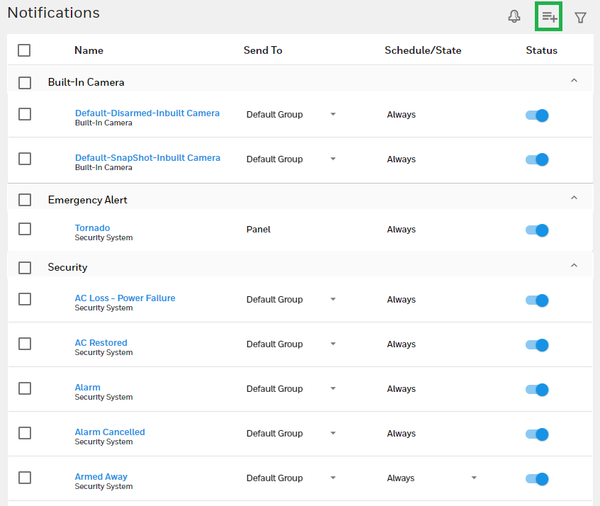

We know we've covered a lot of information here, so let us give a quick recap of the steps involved:

  1. Make user profiles. Each user profile will be able to control the system locally using their own user code. And Standard and Admin profiles will be able to access Total Connect 2.0 to control the system remotely. In most cases, each user profile will represent a different individual who uses the security system.
  2. Assign phone numbers and/or email addresses to user profiles. These are the contact points for sending notifications. Every added phone number and email will be contacted when a notification is triggered to be sent to the associated user. Note that phone number contacts are for text message alerts, NOT phone calls.
  3. Build notification groups. Each notification group consists of one or more user profiles. Every user in the notification group will receive notifications based on their assigned phone number(s) and/or email address(es) when a notification is triggered to be sent out. If you only want some users to receive a certain type of notification, then build a notification group that includes the relevant users, while leaving out users who do not need to be notified or who may receive the intended notification based on their inclusion in a different group.
  4. Create notifications. These are the actual system triggers that will cause a notification to be sent out. When creating a notification, you must select what system event will trigger the notification, and you must also choose which notification group will receive the alert.

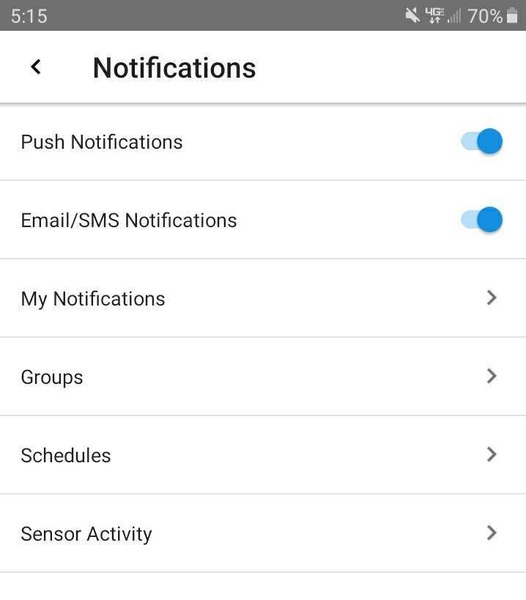
Lastly, we briefly want to touch on push notifications that you can set up on your Android or iOS device. A push notification is sort of like a text message notification, in the aspect that it will appear on your phone. But the big difference is that the alert will not appear through your text messaging app, but rather from the TC2 app itself. These push notifications can only be configured by using the Total Connect 2.0 mobile app on a mobile device or tablet. You cannot set up push notifications using a web browser. After enabling Push Notifications from within the TC2 app on your device, you will be prompted by your phone or tablet to allow the App to perform Push Notifications.

First, we will discuss enabling Push Notifications from within an Android device. Upon opening up the TC2 app and logging into your TC2 account, click the three horizontal bars in the upper-left corner. Then choose Settings, followed by Notifications. You can then toggle the Push Notifications option ON or OFF. To set which system events will trigger push notifications, use the My Notifications option.
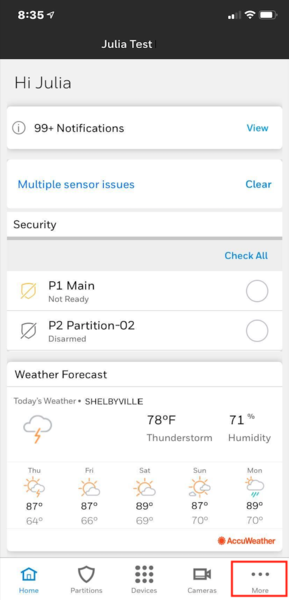
When using an iOS device, you will reach the option for Push Notifications by clicking the "More" option in the lower right corner of the main screen. From there, go to Settings > Notifications > Push Notifications, making sure that the option is enabled. Once you enable this option through the app, you will be prompted by the phone or tablet to allow the TC2 App to send you Push Notifications.

We really hope that this helps some users overcome their struggles with receiving TC2 notifications. If you are monitored by Alarm Grid, and you are still struggling with Total Connect 2.0 notifications, please feel free to email us at support@alarmgrid.com for extra assistance. We are certainly happy to help you out so that you can get notifications set up exactly how you want them. Our hours for checking emails run from 9am to 8pm ET M-F, so keep that in mind. We look forward to hearing from you!

Tags: , , , , , ,

Comments


Posted By

According to reports, Ubiquiti has corrected an issue affecting their UniFi Access Points (APs). Alarm Grid previously reported the issue back in February. The issue prevented various security systems from connecting. Users had to disable the Auto Optimize Network feature to connect.


It is our understanding that Ubiquiti pushed a firmware update to their UniFi Access Point devices. This firmware update made it so that a security system will not be booted from the network when the Auto Optimize Network feature is enabled for the AP. Users can now expect their systems to work while the AP is in this mode.

Before the issue was fixed, we were only aware of Honeywell Lyric Alarm Systems being affected. We later learned that other systems connecting with Ubiquity UniFi Access Points were believed to be affected as well. Regardless, there should no longer be any issues when using a UniFi AP with your system, as long as the AP received the firmware update.

If you are still experiencing issues, we recommend emailing us at support@alarmgrid.com. While we cannot push the update to an Ubiquiti AP, we can walk you through steps for making sure that your alarm system is doing its part. We check our email from 9am to 8pm ET M-F. Also make sure to check out our monitoring page if you are interested in learning more about our services. We look forward to hearing from you!
Update: The Honeywell ProSeries Panels (PROA7PLUS, PROA7PLUSC, PROA7, and PROA7C), when used with Ubiquiti Access Points, require that an Ubiquiti device has its Auto-Optimize feature turned OFF. This is needed for maintaining a stable WIFI connection. Please keep this in mind if you use an Ubiquiti Access Point with a ProSeries System.

Tags: , , , ,

Comments


Posted By

Alarm Grid is proud to announce that new Honeywell Lyric System Kits are now available! These new kits come included with Honeywell 5800MINI Door/Window Sensors, which are easy to enroll and install. Now is the perfect time to get started with a new Honeywell Lyric Security System!

Honeywell lyric controller encrypted wireless security system

Customers can choose between the Honeywell LYRIC5800PK Kit and the Honeywell LYRIC5800PK10 Kit. The LYRIC5800PK Kit includes three (3) door and window sensors and one (1) motion sensor. This is a good kit for a smaller home or an apartment where not many sensors are needed. If you have a larger home or business, then the LYRIC5800PK10 Kit is most likely the preferred option. That kit includes ten (10) door and window sensors and one (1) motion sensor. Of course, both kits can be easily expanded upon if needed. The Lyric supports 345 MHz Honeywell 5800 Sensors, 2GIG 345 MHz Sensors, and 128-bit AES encrypted Honeywell SiX Series Sensors.

Previously, Alarm Grid offered Lyric System Kits that featured the VERSA-2GIG Door and Window Contacts. The Honeywell 5800MINI Sensors offer the exact same performance, and they have an identical appearance. The only difference is that the Honeywell 5800MINI Sensors have a red circuit board, while the one for the VERSA-2GIG is yellow. But with the cover closed, you won't be able to see the difference. Both sensors enroll in the same manner, and they both provide excellent function as door and window contacts.

We have included some other accessories with these kits to help you get started. Both kits feature the Honeywell SiXPIR Motion Sensor. This passive infrared (PIR) motion detection sensor offers a coverage area of 40 feet by 56 feet, and it provides pet immunity for small animals weighing up to 80 pounds. As this sensor is part of the SiX Series lineup, it utilizes 128-bit AES encryption for enhanced wireless security. This military-grade encryption makes it nearly impossible for others to hack or takeover. And since the Lyric System supports up to 128 wireless zones, you will have no problem expanding on the system later if needed.

For monitoring service, the Lyric comes with a built-in WIFI card. This allows the system to connect with the AlarmNet360 Servers, provided that you obtain an appropriate monitoring plan. You should also make sure that your monitoring plan includes access to Total Connect 2.0, as that will really unlock some exciting features and capabilities for your system. By accessing TC2 through a web browser or mobile app, you can arm and disarm your system, control Z-Wave home automation devices, check system status and more. Speaking of Z-Wave, the Lyric Panel includes a built-in Z-Wave controller for adding devices like lights, locks and thermostats. You can create Total Connect smart scenes for automatic operation of these devices based on predetermined system events.

But perhaps the biggest benefit to the Lyric Alarm System is its ability to be used with Apple HomeKit. This is an interactive platform for iOS users that offers some impressive features when paired with a Lyric Alarm Panel. You can have your HomeKit devices respond automatically based on certain events of your Lyric System. And if you have a compatible HomeKit Hub, such as an iPad or an Apple TV, then you can control your Lyric System remotely using Siri voice commands sent from your iPhone. Simply put, this integration is awesome, and you will surely want to take advantage of it as much as possible! Just remember that you need to have the Lyric activated for monitoring service in order to enable it with Apple HomeKit.

We are sure that you will love your new Lyric System Kit. The panel is super easy to operate, and you will love its 7-inch full-color touchscreen display. And it looks great whether mounted on a wall or rested on a desk or table using the Honeywell LCP500-DK Desk Mount. If you have any questions about our new Lyric 5800MINI Kits, or if you want to learn more about our monitoring plans, please reach out to us by emailing support@alarmgrid.com. We operate support hours from 9am to 8pm ET M-F. We look forward to hearing from you!

Tags: , , , , , , ,

Comments


Posted By

With the holiday season quickly approaching us, we thought it was a good time to present some holiday buying guides for various security systems. Today, we are focusing on the Honeywell Lyric. This guide will help whether you are considering a new Lyric or adding upon an existing one.

Honeywell lyric controller encrypted wireless security system

The Honeywell Lyric is currently the flagship all-in-one wireless security system from Resideo. It has been one of the most highly regarded alarm systems for the past few years for several reasons. The system supports up to 128 wireless zones, making it suitable for applications big and small. It has a built-in Z-Wave controller, and you can pair up to 72 Z-Wave devices for home automation purposes. The Lyric is also one of the very few alarm panels that can support Apple HomeKit, making it perfect for iOS users looking to expand upon their HomeKit Network. In fact, we believe that the Lyric is the top HomeKit Security System on the market at this time.

The other major appeal of the Lyric is the fact that it can technically be monitored using an IP only communication path. This is because it connects with AlarmNet360 and the Total Connect 2.0 platform. Unlike most other monitoring platforms like Alarm.com which require cellular connectivity, Resideo allows IP only monitoring for panels connected with TC2. The Lyric has a built-in WIFI card, so you can connect with a local network right out of the box. Although we always recommend cellular communication for optimal reliability, we do understand that many users will want to use IP only service as a cost-cutting measure. Additionally, you can always add a cellular communicator to the Lyric System if you decide that you want to go cellular later on. Both the Honeywell LYRICLTE-A (AT&T LTE) and the Honeywell LYRICLTE-V (Verizon LTE) are great options.

Building a Lyric System from Scratch

Honeywell lyricpk lte enc encrypted at and t lte alarm system w For new users starting from scratch, the best option is typically to buy a complete Honeywell Lyric Security System Kit. This will include everything you need to get started with alarm monitoring. Whether you plan to use IP only monitoring service, or you intend on setting up cellular service, there is a perfect kit for you. For those planning to go IP only, no cellular communicator is needed, and you should choose a kit labeled "WIFI Only". If you intend to use the system for cellular monitoring, then both AT&T and Verizon system kits are available. Whether you go with a 3-1 kit (3 contacts and 1 motion) or a 10-1 kit (10 contacts and 1 motion) should depend on the size of the building you are monitoring. You will need more contacts to cover more doors and windows.

We recommend going through the Lyric System Kit Page linked above and finding the perfect Lyric Kit for your needs. In addition to the system, sensors, and optional communicator, you will also get a Honeywell LT-Cable with every kit. This makes it super easy to get the system up and running without having to prepare any standard alarm wiring.

Sensors for New and Existing Lyric Systems

Honeywell sixgb wireless glass break detector

One of the best aspects of the Lyric is that it has one of the most diverse and complete lineup of supported sensors in the entire security industry. Resideo created a sensor lineup designed exclusively for their Lyric System in the Honeywell SiX Series Sensors. These powerful sensors offer an impressive communication range of up to 300 feet indoors and 128-bit AES encryption for enhanced wireless protection. The lineup includes the following products:

With this great lineup, you can achieve a total and complete Lyric Security System by only using SiX Series devices. And for most Lyric users, that is the best option. But these are not the only sensors you can use with the Lyric System. The Lyric is also compatible with nearly any uni-directional 345 MHz sensor, which includes most devices from the Honeywell 5800 Series and the 2GIG 345 MHz lineup. Additionally, these lineups are both a little more fleshed out than the SiX lineup. There are certain sensor types (e.g. outdoor sensors) where you will need to turn to one of these product lineups.

Many users will also supplement their SiX Series devices with Honeywell 5800 Sensors and 2GIG 345 MHz Sensors as a cost-saving measure. These 345 MHz sensors will work just as well as the SiX Series devices on the Lyric. The only difference is that the 345 MHz sensors will not utilize any encryption, making them more susceptible to wireless attacks. The Lyric does have protection against 345 MHz RF jamming, but it can offer some users better peace of mind to know that their wireless sensors are encrypted. But if you are comfortable using non-encrypted wireless devices, then 345 MHz sensors can save you a lot of money when designing your Lyric System.

Some of our favorite Honeywell and 2GIG 345 MHz Sensors for use with the Lyric include:

Other Accessories for Your Lyric

Yale yrd216 brass front z wave push button deadbolt lock

We have already covered the sensors you will use with your Lyric System. However, there are still other devices you may want to add to your setup. The biggest attraction are Z-Wave devices like lights, door locks, and smart thermostats. One admitted weakness of the Lyric is that its automation controller is only a standard Z-Wave controller. The Lyric does not offer a Z-Wave Plus controller, and Lyric users cannot take advantage of the extended range and increased battery life of Z-Wave Plus. You can still use Z-Wave Plus devices with the Lyric System, but they will only offer the functionality of classic Z-Wave peripherals.

With that limitation in mind, you can still use the Lyric as a perfectly capable smart home automation hub. You can even pair the system as a secondary controller to other automation hubs (e.g. Samsung SmartThings) for added flexibility in your smart home. Nearly any Z-Wave automation device can be used with the system, so feel free to explore your options. We have plenty of devices on our website. Just remember that the Lyric System cannot support Z-Wave security devices. The Lyric Z-Wave controller is for automation purposes only. Alarm Grid does not sell Z-Wave security sensors on its website.

If you want to use your Lyric to control your garage door, then you will want to invest in a Honeywell 5877GDPK. This kit includes everything you need to get started with garage door operation for your Lyric System. Inside the kit there is a Honeywell 5877 Z-Wave Garage Door Relay, a Honeywell 5822T Garage Door Tilt Sensor, and a FortrezZ Z-Wave Siren/Strobe. You can purchase these items separately, but this convenient kit makes things easier.

The Lyric has only one compatible wireless keypad option, which is the Honeywell LKP500. This is a fairly standard push-button keypad with an LCD screen. You might also consider getting a cheap tablet and mounting it to the wall and using that as a keypad. You can download the Honeywell My Home Controller App to the tablet and essentially make the device a permanently mounted touchscreen keypad for your Lyric.

Lastly, you might want to get a desk mount for your Lyric System. This will eliminate the need for mounting the panel to the wall. Desk mounts are great for people living in apartments or rental homes, as well as users who simply do not want to drill holes. Using a desk mount sure beats laying the system flat on a counter! The Lyric Desk Mount is called the Honeywell LCP500-DK. There is also a desk mount for the Honeywell LKP500 Lyric Keypad called the Honeywell LKP500-DK.

Ask Us Questions!


Don't be afraid to reach out to us at Alarm Grid if you have any questions about the Lyric, or if you need any help choosing a system and accessories. The best way to reach us is to email support@alarmgrid.com. You may also reach us over the phone at (888) 818-7728. Remember that our support hours run from 9am to 8pm ET M-F. We look forward to hearing from you!

Tags: , , , , , , , , , , , , , , , , , , , , ,

Comments