Wireless Touchscreen Keypads Posts

Posted By

Here at Alarm Grid, we recently learned that the Qolsys IQ Panel 4 supports the Qolsys IQ Remote, but only the most recent iteration. Older Qolsys IQ Remotes are not compatible. If you plan to replace a Qolsys IQ Panel 2 with an IQ Panel 4, read on to see how you can tell the keypads apart.

As of now, only the Qolsys IQ Panel 4 AT&T LTE, Interlogix/GE Compatible version, and the Qolsys IQ Panel 4 Verizon LTE, Interlogix/GE Compatible version are available. The other iterations of the panel will become available in the next couple of months. The only touchscreen keypad that is currently compatible with these panels is the Qolsys IQ Remote, and only the latest version with P/N QW9104-840, at that. Keypads with a P/N of QW9103-840 or below are not compatible. The sticker showing the part number should be on the back of the keypad.

Below, you can see the back of an IQ Remote with the P/N: QW9103-840. This keypad is not compatible with a Qolsys IQ Panel 4:


Looking at the sticker on the back of the keypad is the first way to easily determine whether the IQ Remote will work with the IQ Panel 4 or not. But, what if the sticker has been removed, or the touchscreen keypad has been mounted to the wall and the back side is difficult to access? There is another easy way to tell whether the IQ Remote you have is the older or newer version.

When the IQ Remote was re-designed, the front-facing camera was moved from the upper right corner to the center of the keypad. This was done, in part to better match the look of the Qolsys IQ Panel 2/2 Plus. Checking the location of the camera is the easiest way to determine whether it is a newer or an older Qolsys IQ Remote.

Below you can see one of the original Qolsys IQ Remotes. You can see that the camera is located in the upper right corner of the keypad.

Below is an image of the newer Qolsys IQ Remote, P/N QW9104-840. You can see the camera has been moved to the front center, and in the upper right corner you can see that a microphone has been added:


Checking the camera location is by far the easiest and quickest way to determine if the IQ Remote you have is compatible with the Qolsys IQ Panel 4. It's rumored that a PowerG Touchscreen Keypad is in the works, which, if true will likely make the IQ Remote obsolete given the superior wireless range of the PowerG protocol.

The Qolsys IQ Panel 4 can support up to three (3) IQ Remotes, but it also supports the use of up to five (5) Wireless PowerG Keypads (WS9LCDWF9, HS2LCDWF9, and HS2LCDWF9ENG) and up to two (2) Hardwired DSC Keypads (HS2LCD, HS2ICN) per DSC PG9WLSHW8 PowerG Wired to Wireless translator module. Up to two (2) modules are currently supported per panel, so up to four (4) of the wired keypads can be used. This gives a total of up to 12 remote keypads.

Have comments, questions, suggestions? Leave a comment below and we'll be happy to respond. Our support hours are from 9:00 am - 8:00 pm Eastern Time, Monday - Friday, and our support email is support@alarmgrid.com. We always look forward to hearing from you.

Tags: , , , , , , , , , , , , ,

Comments


Posted By

2GIG has announced the release of their first big firmware update for the 2GIG Edge. This update adds support for image sensors in the form of the 2GIG-IMAGE3. In order to support image sensors, the 2GIG XCVR3-GC3 must be installed. Image sensors can be used without losing any other features.

The 2GIG Edge is a great addition to the 2GIG panel lineup. It has built-in facial recognition, Z-Wave Plus V2 (700 Series) support, up to four (4) Smart Area partitions, Bluetooth disarming, and so much more. One of the disappointing aspects of the panel rollout, is that it didn't support image sensors at the time of its release. That problem is now rectified with the new 3.1.0.011 firmware.

If you have a 2GIG Edge, then there are a couple of ways that you can get your panel updated. Alarm.com is still in the testing phase with this firmware, so it can't be pushed remotely quite yet, but remote over-the-air (OTA) updates will be available soon. Once this form of upgrade is available, you'll need to request the update from your alarm dealer. If your panel has a WIFI connection, the update will be completely free. If your panel connects to Alarm.com via cellular only, then a small fee will be incurred when updating OTA.

If you're an Alarm Grid monitoring customer, you can request the upgrade by emailing support@alarmgrid.com. Once the update is available, we'll verify the cost, if any, and if you give the go ahead, we'll push the update to your panel, and pass the cost along to you on your next monthly monitoring bill, with no markup. Remember, there will only be a fee if your panel connects to Alarm.com via cellular only. The cost for this type of update varies, depending on the size of the file to be downloaded. It could be as little as fifty-cents, or as much as a few dollars.

The other way that your panel can be updated is via USB. There is a USB port on the top of the 2GIG Edge. You can download the firmware update files from Alarm Grid here. This is a free download. Use a standard USB drive with at least 1GB capacity, and not more than 16GB capacity. Be sure the drive is formatted using FAT32, and that it has only one (1) partition. The file you download should be saved to the root directory of the USB drive. Full instructions for downloading and upgrading can be found here.

Once the file has been downloaded to the USB drive, remove the drive and take it to the 2GIG Edge panel. The USB port is on top of the panel, covered by a rubber boot. Remove the boot, and insert the drive. A message should appear on the panel, letting you know that an update is available. Press "Update", enter either the Installer Code (default 1561) or Master Code (1111) and the update will then proceed. Be sure the panel has AC power, and that AC power is not interrupted during the update process. The panel will reboot and provide a message letting you know when the update is complete. Remove the USB drive and reinsert the rubber boot.

If you have a 2GIG Edge Remote Keypad, it will be updated by the 2GIG Edge panel, once the panel has completed updating. Be sure the keypad has AC power and that it is connected to WIFI and to the Edge panel. You can verify this by making sure the keypad shows the panel home screen, and the proper panel status. Once the panel has been updated, it should automatically update the keypad. Again, once the firmware has been installed, the keypad will reboot to complete the update process.

In addition to support for image sensors, this firmware also corrects a few known issues regarding WIFI connection problems, and both remote keypad and main panel touchscreen issues. You can read the full firmware Release Notes Here.

So, what do you think about this firmware update? Do you have a 2GIG Edge and want to share your experience with it? Have you been anxiously awaiting image sensor support? Leave a comment below and let us know your thoughts. We always look forward to hearing from you.
Tags: , , , , , , , , , , , , , , , , , , , , , , ,

Comments


Posted By

The leading keypad option for the Qolsys IQ Panel 2 Plus is unquestionably the Qolsys IQ Remote. This innovative touchscreen keypad mimics the screen of an IQ2 or IQ2+, and it allows for security and automation control from a second on-site location. But sadly, it lacks a replaceable battery!

To be clear, the Qolsys IQ Remote does have a backup battery. When AC power for the IQ Remote is lost (either due to the transformer being unplugged or an electrical outage), the backup battery will keep it running for several hours. But like any rechargeable battery, the one inside the Qolsys IQ Remote has a limited useful life. And once that useful life is up, the battery cannot be replaced with a new one. This means that the IQ Remote Keypad will need to be plugged in at all times in order to be used. If AC power becomes lost for any reason once this happens, then the IQ Remote will immediately power down. Also, the keypad will then always show a low-battery warning that can never be cleared. While not completely debilitating, it is an unfortunate aspect of the Qolsys IQ Remote device.

When we spoke with Qolsys about this issue, they assured us that the IQ Remote battery is "very long lasting", and a user shouldn't encounter this issue for at least ten (10) years from the initial manufacture date, assuming that the battery is cared for properly. Additionally, the company has stated that they have not received any excessive reports of IQ Remote battery failures since its release more than five (5) years ago. But it's fair to expect that Qolsys might be hearing about this issue more frequently in about five year's time when a large number of Qolsys IQ Remote batteries begin failing! At least most IQ Remote Keypads are not carried or transported around, and most users just leave them mounted in a single location. If a user gets a backup generator for the device, then the issue might not cause serious problems.

Still, this is definitely a disappointing limitation of the Qolsys IQ Remote Keypad. We hope that Qolsys will see this message and consider updating the IQ Remote to support an end-user replaceable battery. A well-constructed device can certainly be used for more than 10 years, but it needs a replaceable battery option so that it can truly go the maximum distance. Also, for anyone considering the IQ Remote for use with an IQ Panel 2 or IQ Panel 2 Plus, we still think it's a great keypad option, and we still recommend using it. Just be aware that after ten (10) years or so, the battery will probably stop holding a charge and will begin not working as intended. The keypad will need to be plugged in and receiving power at all times once this happens, or else it will power down immediately. Our hope is that Qolsys redesigns the IQ Remote Keypad to put an end to this issue. Then a user can buy a new battery once the original reaches its end-of-life, install the new one, and keep using this great keypad!

For now, we would love to hear what you have to say about the Qolsys IQ Remote lacking a replaceable battery. Does this issue influence your decision in buying this keypad? Or do you think that it's not a major concern? Please let us know your thoughts in a comment down below. We're sure that many users who buy this keypad, and also those who have bought it in the past, may be surprised to learn that the device's backup battery cannot be replaced. And if we ever learn of Qolsys updating the IQ Remote to fix this issue, or releasing a successor keypad with a replaceable battery, then we will be sure to let you know in the Alarm Grid Blog so that you can make an informed buying decision. Please stay tuned for more security news and updates coming real soon!

And before we forget, we wish everyone in the United States a Happy Independence Day (4th of July) over this upcoming weekend! We are open today, Friday, July 2nd, and we will also be open for business as usual on Monday, July 5th. We look forward to serving you!

Tags: , , , , , , , , ,

Comments


Posted By

Two new products have been added to the Alarm Grid website. The Resideo PROWLTOUCHC Wireless Touchscreen Keypad and the Honeywell DT8050V Hardwired DUAL TEC® Motion Sensor are now available for purchase. Today, we will take a quick look at these two exciting new products from Resideo.

The Resideo PROWLTOUCHC Keypad is the exact same device as the Honeywell Home PROWLTOUCH Keypad built for the Honeywell Home PROA7PLUS and the Resideo PROA7PLUSC. The only difference is that the Resideo PROWLTOUCHC says "Resideo" across its front. This is instead of "Honeywell Home", which is shown across the Honeywell Home PROWLTOUCH. If you couldn't guess, the C at the end of PROWLTOUCHC is used to indicate Commercial. It seems Resideo doesn't want the phrase Honeywell HOME written across the front of a keypad built for commercial use. The company has made similar variants for other products recently. Truly, these keypads are exactly the same, and you can use them in-place of each other without issue. If you are a homeowner needing a touchscreen keypad for your PROA7PLUS, and you prefer your keypad to read "Resideo" instead of "Honeywell Home", then you can certainly use the PROWLTOUCHC instead of the PROWLTOUCH. Even though the PROWLTOUCHC is technically the commercial version, it will still work fine in a home. Likewise, if you are a business owner and you like "Honeywell Home" more than "Resideo", then feel free to use the residential PROWLTOUCH model. It may seem a bit silly, but that's the only difference - whether your keypad says Honeywell Home or Resideo. If you prefer Resideo, well then the PROWLTOUCHC is now here!

The other exciting new product from Resideo is the Honeywell DT8050V DUAL TEC® Motion Sensor. This sensor is a direct replacement for the Honeywell DT8050, which has been discontinued. We're still not entirely sure what differentiates the DT8050V from the DT8050. But if you were considering the DT8050, well you should now look into the DT8050V instead. Just like its predecessor, the new DT8050V is a DUAL TEC® motion sensor that utilizes both passive infrared (PIR) and microwave detection. By putting both these detection methods to use, false alarms can be prevented. The sensor will only alert the system if both PIR detection and microwave detection are triggered. Much like most other wired motion sensors, the DT8050V uses a 4-wire connection with the panel. Two (2) wires are for the zone, and the other two (2) are for power. There is another pair of terminals that can be used for a normally closed tamper output, but the use of a tamper circuit is optional. You can use the sensor at pretty much any standard (non-Polling Loop, non-Addressable) wired zone. It's great for use on a Honeywell VISTA System, a DSC PowerSeries NEO, an Interlogix Wired System, and much more. This Dual Tec motion sensor can serve as an excellent long-term addition to your wired system!

If you have any questions about the new Resideo PROWLTOUCHC or the Honeywell DT8050V, contact us via email at support@alarmgrid.com. We're here to help you from 9am to 8pm ET M-F. We look forward to hearing from you!

Tags: , , , , , , , ,

Comments


Posted By

Many users consider adding keypads to their alarm systems so that they can control their systems from multiple on-site locations. And for wired panels, at least one keypad is required for on-site operation. Today, we will briefly cover some of the alarm keypads that you might encounter.

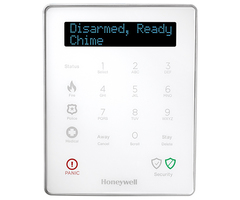
Honeywell lkp500 wireless keypad for lyric controller

First, it is important to understand that a keypad is NOT an actual alarm system. It is merely an input and output device for an alarm system. A user will input commands through the alarm keypad. The system will also provide information about security panel status through the keypad. Nearly all keypads will provide basic functionality, such as arming and disarming and bypassing zones. Some more advanced keypads may offer additional capabilities, such as system programming and performing home automation functions.

If you have a wired system, then you will absolutely need at least one keypad. This is because the panel will need some means for on-site operation. When adding your first keypad to a wired system, it is usually recommended that you get an alphanumeric keypad with a built-in wireless receiver. Alphanumeric means that the keypad will display full language text, which is important for successfully programming the system. Having a built-in wireless receiver will allow you to start pairing wireless sensors with the system, which will give you more flexible installation options. Examples of alphanumeric keypads with integrated wireless receivers include the Honeywell 6160RF for Honeywell VISTA Systems and the DSC HS2LCDRF9 N for DSC PowerSeries NEO Systems. For additional keypads, you should just use standard keypad models, without integrated wireless receiver modules.

But for a wireless system, adding a keypad is almost always optional. This is because a wireless panel is consider "all-in-one", and you can control the system directly from the panel itself. Some wireless panels like the Honeywell Lyric and the Qolsys IQ Panel 2 Plus have built-in touchscreen controllers for this purpose. Other wireless panels like the Honeywell LYNX Plus L3000 have a less fancy, but still perfectly functional, numeric touchpad for this task. Most wireless system users don't bother adding an external system keypad.

That being said, you can still choose to add a keypad to a wireless system if you want. The benefit to adding a keypad is that you will have an additional physical device for controlling your system while you are on-site. This can be very useful if you have multiple entrances for coming and going, such as a front door, back door, and garage door. You might also consider putting a keypad in an easily accessible location, such as by the bed in your master bedroom so that you can conveniently operate your security system from that location as well.

Many systems will provide you with multiple keypad options to choose from. Depending on your needs, you may be selecting between a numeric touchpad keypad and a touchscreen keypad. A numeric touchpad keypad is operated by pressing various buttons on the device to enter specific codes and command sequences. These keypads are relatively basic, but they can be convenient for performing simple system functions. On the other hand, a touchscreen keypad will provide a colorful touchscreen display with intuitive menu icons. This can be more cheerful and inviting for someone who isn't used to operating an alarm system. The downside with a touchscreen keypad is that they are often much more expensive than numeric touchpad keypads. And it's also important to understand that your selection of keypad choices may be limited based on the panel you are using.

But before you navigate our site to start purchasing new keypads for your system, you should really consider if you actually need one. The most common alternative to a secondary system keypad is an interactive service platform that can be accessed through your phone or a web browser. If your system is monitored, then there's a good chance that you already have access to one of these platforms. Most Alarm Grid monitored customers have access to either Total Connect 2.0 or Alarm.com, depending on the system they are using. Both platforms can be conveniently accessed remotely to offer the same functionality that you would get from a physical on-site keypad. So instead of going to your secondary system keypad, you might just pull up your phone to access Total Connect 2.0 or Alarm.com and control your system from there! Check out our monitoring plans to see which ones offer access to these exciting platforms.

Another option is to get a key fob for your system. A key fob is a small handheld device that enrolls with a security system wirelessly to perform various inputs and commands. You can easily carry a key fob around in your pocket or purse, or you can put it on a key ring for easy access. Then, with a press of a button, you can arm or disarm, trigger an automation device, or activate an alarm on your system. Key fobs are often more limited than fixed-location keypads, but they can be very convenient for performing quick commands. Just make sure to not lose your key fob. The devices are quite small, and they can easily become misplaced or lost. The same usually cannot be said for a keypad mounted on your wall!

If you are interested in learning more about alarm system keypads, or if you want to find out which keypads are compatible with your system, then we are happy to help! We offer a wide selection of keypads for use with many types of security systems. The best way to contact us is to email support@alarmgrid.com. If you are trying to determine system compatibility, then you may want to include a picture of your panel so that we know what brand and model you are working with. Remember that our hours for checking email run from 9am to 8pm ET M-F. We look forward to hearing from you!

Tags: , , , , , , , , , , , , , , , , , , , , , , , , ,

Comments