Promotional Posts

Posted By

Hi DIYers! Today, we're taking a look at the Qolsys IQ Hardwire 16-S. This is a wired to wireless converter that communicates at the 319.5 MHz frequency. At this frequency, the IQ Hardwire 16-S is compatible with the Qolsys IQ Panel 2, the original Qolsys IQ Panel and Interlogix Systems.

Qolsys iq hardwire 16 s qs7131 840The main reason to use the Qolsys IQ Hardwire 16-S is to use hardwired security sensors with the Qolsys IQ Panel 2 System. This works by connecting any hardwired sensors directly to the Qolsys IQ Hardwire 16-S. The converter will then send a 319.5 MHz signal to the IQ Panel 2 System on the behalf of the hardwired sensors. By doing this, each hardwired sensor will be able to use its own wireless zone on the system. As the name implies to 16 wired sensors can be connected with the IQ Hardwire 16-S. If a user doesn't need this many terminals, the IQ Hardwire 8-S provides identical function.

Another benefit of the Qolsys IQ Hardwire 16-S is that it utilizes 128-bit AES encryption to prevent the module from being taken over by hackers and potential intruders. Any time that the Hardwire 16-S sends a command to the IQ Panel 2, the system will need to send an appropriate response in order for the command to go through. This advanced level of protection is great for keeping the security setup secure at all times.

The Qolsys IQ Hardwire 16-S can also be used with other panels that communicate at the 319.5 MHz frequency. However, the encryption feature will only be active when the device is used with the IQ Panel 2. With other systems, the device will still work, but it will operate as an unencrypted 319.5 MHz sensor. Qolsys also offers a similar device that doesn't utilize encryption, the IQ Hardwire 8. However, this module only supports eight hardwired sensors.

The IQ Hardwire 8-S is perfect for users who want to upgrade to a brand-new IQ Panel 2 System while still keeping their older hardwired sensors. You can purchase one today on our website.

Tags: , ,

Comments


Posted By

Qolsys recently informed us that they plan to release the new PowerG and legacy daughtercards for the IQ Panel 2 in the coming weeks. New IQ Panel 2 Systems will be available with different combinations of these cards so that users can choose the proper type for their existing sensors.

Qolsys iq panel 2 at and t wireless security system with at and Each daughtercard will function as a wireless receiver for the system. The types of daughtercard that are used will determine which types of wireless security sensors can be used with the system. There will be four main daughtercards available for the system. These include three legacy daughtercards (319.5 MHz, 345 MHz and 433 MHz) and a PowerG daughtercard (915 MHz).

We are particularly excited about the PowerG Sensors. These sensors boast an incredible range of up to 2,000 feet away in open air when used with the IQ Panel 2 Plus. They also offer 128-bit AES encryption to remain protected against hacking attempts. Overall, these are some of the most powerful and advanced security sensors we have ever seen, and we are sure that users will be extremely satisfied with their performance.

Wireless PowerG Door/Window ContactOn the IQ Panel 2 board, there are four daughtercard ports. One port should be used with either a PowerG daughtercard or an image sensor module, while the other port should be used with one of the legacy daughtercards. The PowerG and Alarm.com Image Sensor modules operate on similar 900MHz frequencies. That means you will have to choose one or the other. Likewise, a user should not use more than one legacy daughtercard with the system at any given time, as two legacy daughtercards may cause interference with each other in the 300-400 MHz range.

When deciding which daughtercard is needed, users should verify the type of any existing wireless equipment and consider future expansion. The wireless frequency and sensor matrix is as follows:

  • 319.5 MHz: Legacy Interlogix/GE and all Qolsys Sensors (319 and S-Line!)
  • 345 MHz: Legacy Honeywell (5800 series) and 2GIG Sensors
  • 433 MHz: Legacy DSC Sensors
  • 915 MHz: PowerG Sensors

Since only one legacy daughtercard can be used, it will not be possible to use multiple types of legacy sensors with the system (except for Honeywell and 2GIG since they operate on the same 345MHz frequency and use the same daughtercard). For example, a user would not be able to simultaneously use older Honeywell 5800 Series Sensors and Interlogix Sensors at the same time. However, a wireless converter will likely be able to overcome this issue.

Qolsys has informed us that the daughtercards will not be available for individual purchase. Instead, they can be obtained by purchasing a new IQ Panel 2 System. According to Qolsys, the following versions of the system will be available:

  • IQ Panel 2 with PowerG and Legacy 319.5
  • IQ Panel 2 with PowerG and Legacy 345
  • IQ Panel 2 with PowerG and Legacy 433

Additionally, each of these options will be split into two further options for AT&T and Verizon LTE cellular communicators. These will both operate with Alarm.com and open up a world of possibilities with the dexterity of the Alarm.com ecosystem. According to Qolsys, these systems will be available in September 2018. We'll make sure to keep you updated with any further news on these exciting new products!

Tags: , ,

Comments


Posted By

Hi DIYers! We wanted to let you know that we have reduced the prices for many of our Qolsys products. At Alarm Grid, we're huge fans of Qolsys, and we recognize their hardware as being some of the most versatile and reliable equipment in the industry. The price changes are outlined below:

Product
Name
Old
Price
New
Price
Price
Difference
Percent
Savings
Qolsys IQ Hardwire 16-S
$124.99 $99 $25 20%
Qolsys IQ Battery
$33.99 $29.99 $4 12%
Qolsys IQ Panel 2
Verizon LTE

$449.99 $399.99 $50 11%
Qolsys IQ Panel 2 AT&T LTE
$449.99 $399.99 $50 11%
Qolsys IQ Panel 2
Classic Kit Verizon

$499.99 $449.99 $50 10%
Qolsys IQ Panel 2
Classic Kit AT&T

$499.99 $449.99 $50 10%
Qolsys IQ Dimmer
$49.99 $44.99 $5 10%
Qolsys IQ Siren
$81.99 $74.99 $7 9%
Qolsys IQ Glass-S
$89.99 $83.99 $6 7%
Qolsys IQ Temp
$29.99 $27.99 $2 7%
Qolsys IQ Fob-S
$28.99 $26.99 $2 7%
Qolsys IQ Power Supply
$16.99 $15.99 $1 6%
Qolsys IQ Smoke
$67.99 $64.99 $3 4%
Qolsys IQ Doorbell
$27.99 $26.99 $1 4%
Qolsys IQ DW MINI-S
$24.99 $23.99 $1 4%
Qolsys IQ Recessed Door-S
$33.99 $32.99 $1 3%
Qolsys IQ Pendant
$33.99 $32.99 $1 3%
Qolsys IQ Motion-S
$57.99 $56.99 $1 2%
Qolsys IQ Flood
$55.99 $54.99 $1 2%
Qolsys Image Sensor
$99.99 $98.99 $1 1%
Tags: ,

Comments


Posted By

When one thinks of upgrading their security system, they would typically think of adding a new sensor to their setup. After all, it's sensors that a system uses to detect any important system events, such as burglary or fire. But often upgrading a communicator is even more important.

Simply put, the communicator is what an alarm system uses to send outbound signals to the user and/or a central monitoring station. If the communicator fails, then the alarm system is nothing more than a local sounder. It will have no way of alerting off-site users or requesting emergency dispatch from a central monitoring station. Therefore, it's extremely important that the communication path used by an alarm system is dependable, reliable and gives the user peace of mind. For most users, an alarm system that uses cellular communication is the ideal solution.

The Honeywell Lyric Controller is the flagship wireless security system from Honeywell. This system provides support for up to 128 wireless zones, and it can even work with the encrypted Honeywell SiX Series Sensors. The touchscreen controller is extremely easy to use, and the build-quality lives up to the Honeywell name. Additionally, the system comes with a Z-Wave controller built-in for controlling Z-Wave home automation devices. Overall, the Lyric is one of the top security systems available on the market today.

Honeywell lyric controller encrypted wireless security systemHowever, there is one issue with a fresh, brand-new, out-of-the-box Lyric. This problem is that the system does not have an integrated cellular communicator. Although there are Lyric Controller System Kits that come with a cellular communicator, the base version of the system does not have such a module. If no cellular module is added, the system will be forced to rely on a WIFI connection. This might not seem so bad at first. WIFI is extremely fast, and most people think of modern internet services as being extremely reliable. For that reason, many users make the decision to go with a WIFI-only setup for their Honeywell Lyric Controller.

But going with a WIFI-only communication path can prove to be a major mistake. WIFI signals regularly go down, often for seemingly no reason. Additionally, a power outage of any kind will cause the WIFI service to go down, and a panel that uses a WIFI-only connectivity will be unable to send any outbound signals. This means that the property will be unprotected. But with a cellular communicator, this is occurrence is nearly impossible. Modern cellular communication is extremely reliable. It is not affected by power outages, and it offers users great peace of mind.

For those reasons, adding a cellular communicator to a Lyric Controller is extremely important. Honeywell offers various cellular communicators for the Lyric System. Adding one of these communicators can be the single most important upgrade for a Lyric Controller, due to the fantastic reliability and consistency that it will provide for the system. And for users looking for a new communicator, we recommend choosing the Honeywell LYRICLTE-A.

Honeywell lyric lte a at and t lte cellular communicator for theThe LYRICLTE-A is currently the only communicator for the Lyric Controller that can connect with an LTE cellular network. Specifically, the LYRICLTE-A connects with the LTE network for AT&T. LTE networks represent the latest and most advanced cellular technology available, and they provide lightning-fast speeds and superb reliability. Plus, cellular service providers have promised that they will continue to support for their LTE networks for many years, even decades into the future. And with trusted service from AT&T, the LYRICLTE-A will ensure that the Lyric Controller is always connected and always protecting your property. It should be mentioned that Verizon also plans to release an LTE communicator for the Lyric sometime in the near future. But for now, the LYRICLTE-A and AT&T is nearly always the best option for Lyric users.

With that in mind, we believe that the LYRICLTE-A is the single most important upgrade a user can make for their Honeywell Lyric Controller System. The level of reliability and consistency of cellular communication cannot be compared with by any other communication path. And with connectivity to an LTE network, users can be sure that their Lyric System will communicate as it should far into the distant future.

An alarm system is only good if it can alert others in an emergency situation. A system that cannot communicate properly is a sitting duck. Even if a system has every sensor imaginable, it won't matter if the system cannot send a signal to the end user or a central monitoring station when it counts. With the LYRICLTE-A and cellular communication, a Lyric System will be able to communicate successfully every time. This makes the LYRICLTE-A the single most important upgrade for the Honeywell Lyric Controller. Don't leave your Lyric System unprotected. Upgrade your Lyric with the very best in cellular communication with the AT&T LYRICLTE-A.

Tags: , , ,

Comments


Posted By

Reliability is the single most important factor for a smoke detector. It is critical that these devices quickly and accurately respond whenever there is a fire in the building. One of the best ways to ensure this reliability is with a smoke detector that utilizes photoelectric technology.

Photoelectric smoke detectors are some of the most popular life-safety devices available today. The defining feature of a photoelectric sensor is its internal light source and sensing chamber. By default, light will never fall on the internal photo sensor. The presence of smoke or other airborne particles will cause the light to refract, which will have it strike the sensor and produce an alarm. This means that the device will not activate suddenly, as long as the sensing chamber stays clear.

But when smoke enters the sensing chamber, the light inside the sensor will be refracted. This will cause the internal light to strike the photoelectric sensor. When this happens, the smoke detector will send an alert to the system to let it know that there is smoke (and therefore a fire) in the building. The alarm system will then perform the programmed response by alerting others to the fire.

Overall, this method is very effective for detecting fires. But with this process, there are a few things to keep in mind to ensure that a smoke works properly. It is possible that other airborne materials besides smoke can also enter the inside of the smoke detector, adjust the light source and cause an alarm. Airborne particles can also potentially prevent the detector from allowing smoke to refract the internal light onto the sensor. If this happens the smoke detector will not function as it should.

To prevent this from happening, users should make sure to place their photoelectric smoke detectors in appropriate areas. They should not be facing any vents or air ducts. Photoelectric smoke detectors should also not be placed in garages, bathrooms, kitchens or laundry rooms. This is because these rooms feature large amounts of humidity and dust that may prevent the sensor from detecting smoke.

Instead, we recommend placing photoelectric smoke detectors in large open areas where their function will not become disrupted. Some ideal locations include large central living rooms, near staircases, in hallways and outside of sleeping areas. Since smoke rises, all photoelectric smoke detectors should be installed high up on the wall or on the ceiling. By following these guidelines, a photoelectric smoke detector is more likely to work properly. For more information on the proper placement of smoke detectors, please review this helpful guide. Users should also make sure to test their photoelectric smoke detector on a regular basis and to replace the batteries when low.

Some of the most popular photoelectric smoke detectors we offer include the Honeywell 5808W3, the Honeywell SiXSMOKE and the 2GIG SMKT3-345. These are all extremely versatile smokes that also double as heat detectors. Of course, users must make sure that they smoke they choose is compatible with their alarm system. Assuming that it is a wireless smoke, it must communicate at a frequency that is accepted by their system. We hope that you will check out our selection of photoelectric smoke detectors so that you can protect your home or business.

Honeywell 5808w3 wireless smoke detector and heat detector

Tags: , , , , , ,

Comments


Posted By

Update: Please see this new guide for using MyAlarms.com.

Hi DIYers! We would like to remind our customers that they have the ability to place their systems on test mode without contacting us. Customers can do this using the MyAlarms.com portal from our monitoring partner Criticom. This is useful for customers who have central station monitoring.

With MyAlarms.com, customers can put their systems on test mode, view their account information and view their signal history. To do this, a user must create an account with MyAlarms.com. To get started, simply contact Alarm Grid, and provide us with the following information:

A username to use with MyAlarms.com (cannot be an email address)

The email address associated with your Alarm Grid account

The address where you receive monitoring services

After receiving this information, our team will get started on creating your MyAlarms.com account. You will then receive an email from noreply@myalarms.com to finish creating your account, which includes providing a password.

If you have any questions about this service and to get started, please contact us at support@alarmgrid.com, or call us at 888-818-7728 from 9am to 8pm Monday through Friday.

Tags: ,

Comments


Posted By

One of the most versatile security key fobs on the market today is the Honeywell 5834-4. This is a wireless four button key fob with up to eight different programmable functions. The device will function from up to 50 feet away from the system. This makes the 5834-4 a convenient tool for quickly arming and disarming your system and performing other useful functions. This helpful guide will tell you everything you need to know about the 5834-4 key fob so that you can fully integrate it into your security setup.
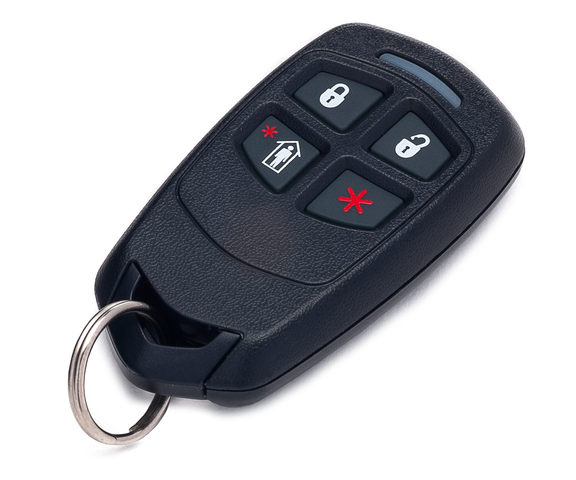

Overview of the 5834-4 and Other 5800 Series Key Fobs

The Honeywell 5834-4 is actually the same security key fob that ADT provides for their monitored customers. This means that an ADT Key Fob can generally be used in the exact same manner as a 5834-4. If an ADT customer decides to leave ADT, they will most likely be able to use their old ADT Key Fob with their new monitoring company. A user can program their old ADT Key Fob with any compatible alarm system, even if the device has not been deleted from the old system. That said, we do recommend deleting the device from the old system if possible.

The 5834-4 is recognized as a wireless sensor from the Honeywell 5800 Series. Just like the other devices in this lineup, the 5834-4 Key Fob operates at a wireless frequency of 345 MHz. It will interface with any control panel that utilizes this wireless frequency. This includes the Honeywell Lyric Controller, Honeywell LYNX Touch Panels, Honeywell VISTA Panels (with an added wireless receiver), the 2GIG GC3 and the 2GIG GC2. In order to achieve the maximum functionality of the device, the 5834-4 will require eight separate wireless zones on the system.

The 5834-4 can perform system commands at a maximum distance of up to 50 feet away from the alarm system, though a Honeywell 5800RP Wireless Repeater can be used to extend this range. Also, any button press that is made using the 5834-4 must be held down for half a second before the programmed action will go into effect. This helps to prevent potential false alarms caused by the key fob.

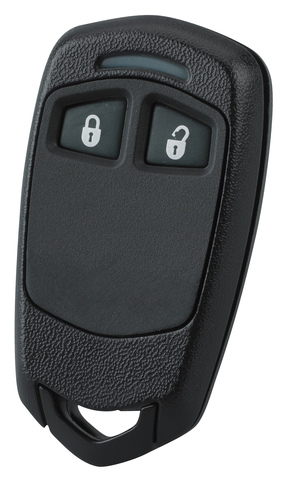
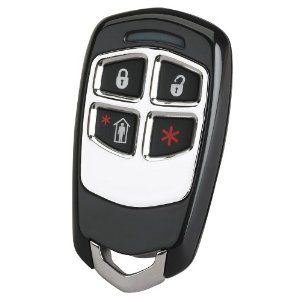
In addition to the 5834-4, Honeywell produces two other key fob devices that are very similar in terms of use. The 5834-2 features two buttons and up to three programmable functions. This two-button key fob is a good option for users who do not require a device with as many functions as the 5834-4. Honeywell also offers the 5834-4EN. This is literally the exact same device as the 5834-4. The only difference is that the 5834-4en features a design with a pleasant silver finish.
Enrolling the 5834-4

Each function on a 5834-4 Key Fob is assigned its own wireless zone on a security system. This means that if every possible button entry is set up, the device will take up eight wireless zones. Each button entry can be learned-in with the security system, much in the same way as any other wireless security sensor. With the panel in its learn mode, press and hold the button entry you want to program. The panel will beep to let you know that it has recognized the key fob. Do this three times to auto-enroll that button press with the system.

Please note that some alarm panels will require you to use the panel's designated "key fob zones" to auto-enroll the 5834-4 with the system. For these panels, attempting to assign the 5834-4 with a non-key fob zone will require that the serial number be entered in manually rather than being learned-in automatically. While the 5834-4 can technically be used with any wireless zone, we always recommend assigning the device to a key fob zone if possible. The exact zone numbers for the key fob zones vary between different alarm panels.

Also note that most panels will have a specific sub-menu within programming for setting up key fobs. By setting up a 5834-4 through this sub-menu, the device inputs will automatically be assigned to a designated key fob zone on the system. Again, we strongly recommend setting up a 5834-4 key fob through the key fob sub-menu for the panel.

The table below outlines the key fob zone numbers for various types of alarm systems:

Panel Type
Key Fob Zones
Honeywell VISTA-15P 49-56
Honeywell VISTA-20P & VISTA-21iP 49-64
Honeywell LYNX Touch 140-147
Honeywell Lyric Controller 131-162
2GIG GC2 51-58
2GIG GC3 32 Key Fob Zones*
*Note: The 32 key fob zones on a 2GIG GC3 are considered separate from other wireless zones.

The 5834-4 uses two different 7-digit Serial Numbers. The second Serial Number is one digit higher than the first Serial Number. So for example, if the first Serial Number is 123-4567, then the second Serial Number would be 123-4568. The first Serial Number is used with all single-button presses, while the second Serial Number is used with multi-button presses. Each unique input is assigned a Loop Number 1-4. This means that each of the eight possible inputs will have a Serial Number and Loop Number combination that is unique from all the others. This is shown in the following diagram:

Note that each button is identified by a different letter. The button in the upper-left corner with the closed lock is Button A. The button in the upper-right corner with the open lock is Button B. The button in the lower-left corner with the person standing inside the house is Button C. The button in the lower-right corner with the asterisk (*) is Button D.

Please note that the button combinations of A+D and B+C are not used with the system. But all other two-button combinations are fair game. Serial Number 2 will be one digit higher than Serial Number 1. The following table outlines every Serial Number and Loop Number combination used with the 5834-4 Key Fob:

Input Serial Number Loop Number
A 1 3
B 1 2
C 1 4
D 1 1
A+B 2 1
A+C 2 3
B+D 2 4
C+D 2 2

Configuring the 5834-4

Once an input has been enrolled with the panel, you must then configure the settings for that input. The exact options for for this will vary depending on the type of panel that is being used. Most options are fairly self-explanatory and can be configured with relative ease. For example, below are the menu options displayed for a Honeywell LYNX Touch L7000, assuming that the device is being programmed through the key fob menu. Please note that these are essentially the same menu options that will also be displayed on any other Honeywell LYNX Touch Panel, as well as the Honeywell Lyric Controller. Make sure to save your changes when you have finished configuring the key fob settings.

  • Key Type: This tells the panel how many different inputs are used on the key fob device. Since a 5834-4 Key Fob with eight different possible inputs is being used, the option "8 button" is chosen.
  • User: This will show in the event log which user interacted with the panel. This is great for assigning different system users their own personal key fob.
  • Serial Number: This is the Serial Number for the key fob. If the Serial Number is entered incorrectly, the key fob will not work with the system. For that reason, we strongly recommend auto-enrolling the 5834-4 with the system.
  • Zone: This is the first zone on the system that the key fob will be assigned to. That zone, and the following seven zones will be used with that key fob.
  • Button Key 1: Button A on the 5834-4. This is the picture of the closed lock. This lets you choose the action that will be taken for that input.
  • Button Key 2: Button B on the 5834-4. This is the picture of the opened lock. This lets you choose the action that will be taken for that input.
  • Button Key 3: Button C on the 5834-4. This is the picture of the person standing in the house. This lets you choose the action that will be taken for that input.
  • Button Key 4: Button D on the 5834-4. This is the picture of the asterisk (*). This lets you choose the action that will be taken for that input.
  • Button Key 5: Button combination A+C on the 5834-4. This lets you choose the action that will be taken for that input.
  • Button Key 6: Button combination C+D on the 5834-4. This lets you choose the action that will be taken for that input.
  • Button Key 7: Button combination B+D on the 5834-4. This lets you choose the action that will be taken for that input.
  • Button Key 8: Button combination A+B on the 5834-4. This lets you choose the action that will be taken for that input.

Also take note of the different possible actions that can be used with each possible input:

  • Disarm: This will disarm the system if the system is set to armed stay or armed away.
  • Arm Away: This will set the system to armed away.
  • Arm Stay: This will set the system to armed stay.
  • No Response: The input will not be used with the system.
  • 24 Hour Silent: This will produce a silent alarm on the system. This essentially allows the 5834-4 to be used as a silent panic switch.
  • 24 Hour Audible: This will produce an alarm event on the system. Any sirens and sounders set up with the system will activate.
  • 24 Hour Auxiliary: This will produce an alarm event on the system. The system sounder will activate, but any sirens will not. This is typically used for medical emergencies.
  • Silent Burglary: This will produce a silent alarm on the system. However, this command will only work if the system is armed.
  • Fire No Verification: This will produce a fire alarm on the system.

Standard Mode vs. High-Security Mode

the 5834-4 Key Fob features two different transmitting modes. These are standard mode and high-security mode. Simply put, standard mode has the 5834-4 function as an unencrypted device, while high-security mode has it function as an encrypted device. Putting the 5834-4 into high-security mode will make it nearly impossible for others to hack or compromise the device. However, high-security mode is only compatible with alarm panels that support this feature. For panels that do not support this feature, the 5834-4 Key Fob must be placed in standard mode before it can be used with the system. Some panels that do not support high-security mode include the 2GIG GC3 and the 2GIG GC2.

To activate high-security mode on the 5834-4 Key Fob, press and hold the A+C+D buttons on the device simultaneously for five seconds. The LED light on the device will flash red to indicate that the device has been placed into high-security mode. Once in this mode, any input made using the 5834-4 Key Fob will cause the LED light on the device to flash red.

To activate standard mode on the 5834-4 KeyFob, press and hold the B+C+D buttons on the device simultaneously for five seconds. The LED light on the device will flash green to indicate that the device has been placed into standard mode. Once in this mode, any input made using the 5834-4 Key Fob will cause the LED light on the device to flash green.

The 5834-4 Battery

The Honeywell 5834-4 Key Fob uses a 3-volt CR2032 lithium battery. Every new 5834-4 comes included with a fresh battery that is already installed. The battery should last for about three to five years before requiring a replacement. As the key fob is used, the power that is supplied by the battery will being to slowly drop. Once the power drops below 2.3 volts, a low battery message will be displayed on the alarm system. Please note that this message will only appear if a button is pressed on the key fob. If the key fob is not used, then the panel will not recognize that the battery is low. Additionally, once the battery is low, the LED light on the key fob will no longer flash when an input is made. If the power drops below 2.0 volts, then the device will stop working entirely.

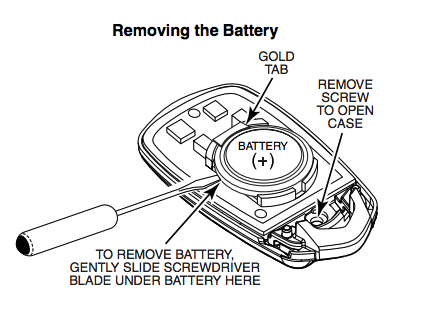
To replace the battery, use a small Phillips head screwdriver to remove the screw on the back of the device. Then slide a flathead screwdriver underneath the battery on the side with the gold tab to pop the battery out. With the old battery removed, slide the new battery into place, making sure that the positive (+) side is facing upwards. Firmly press down on the opposite side to click the battery into place. Finally, reapply the back cover, and screw it into place. Make sure to test the 5834-4 Key Fob after replacing the battery to ensure that it has been installed properly.

If You Need Further Help

The Alarm Grid support team is happy to help any monitored customer with using their 5834-4 Key Fob. Please contact us via email at support@alarmgrid.com or over the phone at 888-818-7728 from 9am-8pm ET M-F if you require further assistance.

Tags: , , , , , , ,

Comments


Posted By

If you've ever wanted a glimpse into the world of Alarm Grid training, we have it! Alarm Grid's team occasionally takes an hour or two off and learns a little bit about the products that we recommend to you. These trainings are in-depth explanations of the functions of items attached to your system. If you wonder how it is that our wonderful staff know so much, well, I think you're going to be astounded by the quality of training they receive.

Below, Julia, an industry veteran and our most senior tech, steps the rest of the staff through a great tutorial on glass breaks and motions.


Tags: , , , , , , ,

Comments