Home Security Blog

Posted By

For a current, updated list of states that we charge sales tax in, check out our Sales Tax Policy, which is updated daily

Recently the Supreme Court decided South Dakota v. Wayfair, Inc. (Wayfair). The ruling allows states to require out-of-state retailers to collect sales tax. The decision changes the landscape of e-commerce significantly.

We appreciate the benefits of doing business in the United States. We were blessed with unprecedented advantage as an e-tailor. We are sad that one of e-commerce's biggest benefits is disappearing. But we also recognize the change was inevitable. We appreciate that most states have provided immense clarity. We also appreciate that technology allows small e-tailors to affordable compliance solutions.

We recognize that Alarm Grid is now required to pay our fair share in states all around the US. Unfortunately, that means that we are going to start charging sales tax in 32 new states. Those taxes will begin showing up on invoices as early as yesterday. All taxes will be active between now and early April. Most invoices will reflect sales tax as of April 1, 2019. While this would be a great April Fools prank, unfortunately, it’s not one. Alarm Grid is in Florida. Our Florida customers have always had to pay sales tax on both product sales and monitoring. If you're one of Alarm Grid's Florida residents, nothing is changing for you.

Unlike Florida, some states exempt services like monitoring. Others do not. Navigating the tax landscape of 50 states is extremely complicated. We've spent a long time unwinding which state does what. Regardless of the state, products are always taxed. Moreover, as Alarm Grid grows, we are going to become nexused in more and more places. As that happens, we will make announcements to keep you updated about how your charges will change.

Below is a table of locations and respective links to relevant regulations. Products will be taxed in all listed states. In the "Monitoring Taxed" column we list whether states require us to charge sales tax on monitoring. Some states do not charge taxes on alarm monitoring. Others do. If the cell is blank it’s because we are still awaiting answers from that state's Department of Revenue. As soon as we know, we will update the table.

For the wild west internet that we have come to know and love, this might feel like a big setback. But we are aware of the enormous advantage online businesses gain from regulations. We have never competed on price, and we won’t be starting today. Alarm Grid has the best service in the industry. We have changed the way the industry works with customers. And we will continue to do just that.

There is no innovation in profiting from the free margin provided by our ability or any company’s ability to avoid taxes. And while the lower prices have been nice, Alarm Grid doesn't grow by eking out an additional 3-8% from each sale. Rather we need to continue working to stand out from our competition. We will continue to provide the same great products, service, and support.

This is a bittersweet day for us. It’s a day that all e-commerce companies knew was coming. We apologize for those impacted by the change. And we hope you continue using Alarm Grid for all of your security system needs.

State

Monitoring Taxed?

Date Taxes Will Begin Appearing on Invoices

Arizona

No

3/22/2019

Arkansas

Yes

4/1/2019

California

No

3/22/2019

Colorado

No

3/26/2019

Connecticut

Yes

4/1/2019

District of Columbia

Yes

4/8/2019

Florida

Yes

7/20/2012

Georgia

No

3/24/2019

Hawaii

Yes

4/1/2019

Illinois

No

3/22/2019

Indiana

No

3/22/2019

Iowa

Yes

4/1/2019

Kansas

No

4/1/2019

Kentucky

No

3/26/2019

Louisiana

No

4/8/2019

Maine


Sometime in Early April

Maryland

Yes

4/1/2019

Michigan


Sometime in Early April

Minnesota

Yes

4/1/2019

Nebraska

Yes

4/1/2019

Nevada

No

3/22/2019

New Jersey

Yes

4/1/2019

North Carolina

No

4/26/2019

Ohio

Yes

3/21/2019

Oklahoma

No

3/22/2019

Pennsylvania

No

3/26/2019

South Carolina

No

3/26/2019

South Dakota

Yes

5/17/2019

Tennessee

No

3/26/2019

Texas

Yes

3/25/2019

Utah

No

4/1/2019

Virginia

No

3/22/2019

Washington

Yes

4/1/2019

West Virginia

Yes

Sometime in Early April

Wisconsin

Yes

5/17/2019

Tags:

1 Comment


Posted By

A couple of weeks ago, we learned that AlarmNet announced an end date for activating 3G and 4G cellular communicators. Now Alarm.com has followed suit by announcing that they will no longer allow 3G activations starting June 30, 2019. Future activations must use LTE communicators.


Both AT&T and Verizon have made it clear that LTE and eventually 5G communication is the way of the future. They are beginning the process of phasing out their older 3G networks in favor of faster and more advanced technology. AT&T has publicly stated that their 3G network will be shutdown in February 2022. The shutdown for the Verizon CDMA Network is expected to occur around this time as well. Users should start preparing for the long-term now by getting LTE communicators for their systems.

If you have an Alarm.com 3G Cellular Communicator, you must activate it by June 30, 2019, or else it will not work. If you deactivate your Alarm.com 3G Communicator after this date, you will not be able to reactive it. Reactivating a communicator is considered the same as a new activation. If you have a 3G communicator that is already activated, then it will continue to work as long as the associated cellular network is kept in service. But once the network is shutdown, the communicator will stop working.

Any customer who has an Alarm.com 3G Communicator should get it activated as soon as possible to avoid missing the cut-off date. Customers who want to prepare for the long-term should obtain an LTE communicator. This may mean upgrading to a new alarm panel. To activate a communicator or to learn about the options available to you, please email support@alarmgrid.com. You may also call us at (888) 818-7728 during our normal business hours of 9am to 8pm EST M-F.

Note: Verizon stopped allowing activations for all CDMA communicators starting on December 22, 2018. More information about this can be found here.

Tags: , , , , , , , , , , , , , , , , , , , , , , , , , , ,

0 Comments


Posted By

We have received news that San Jose, CA has recently repealed its Verified Response policy for emergency dispatch. The city will now respond normally to a dispatch request from a central monitoring station. This is great news for customers in San Jose who depend on reliable dispatch.

For anyone who does not know, Verified Response is a policy in which a dispatching center will not send out emergency police response unless a crime is confirmed visually or audibly. The purpose of these policies is to reduce false alarms and to save costs by not sending out potentially unnecessary dispatch.

As a monitoring service provider, Alarm Grid is opposed to Verified Response policies. We want all our customers to receive reliable emergency dispatch in the event of a potential crisis. We understand the need to limit false alarms and not waste the time and resources of our valued local law enforcement. That being said, we take several steps to eliminate false alarms with our central station partner, Criticom.

Some of the actions that Criticom takes to reduce false alarms include check-in calls, false alarm passwords, and allowing end users to place their systems on test mode. A Verified Response policy only makes it more difficult for an end user to get the help that they need in a timely manner, and it does not sufficiently reduce occurrences of false alarms.

The truth is that the vast majority of false alarms come from a very small percentage of overall alarm users. Putting burdensome requirements in place before allowing the authorities to properly respond and failing to work directly with the end users and alarm companies that create false alarms leads to a less safe environment for all.

We are sure that our San Jose customers will appreciate this action, and they will enjoy greater peace of mind in knowing that Criticom Monitoring Services will now be able to successfully request emergency police dispatch to their homes and businesses. Additionally, we have noticed a trend that many Southwestern US Cities have started reversing Verified Response policies that were all put into effect somewhat recently. Alarm Grid will provide updates as we receive more information.

If you receive alarm monitoring service in an area where a Verified Response policy is still in place, there are some actions you can take to ensure that emergency help is sent out during a crisis. The best option is to install security cameras or use image sensor modules to provide a visual look-in for any activity at your home or business. End users might also consider using panels with a built-in camera, such as a Honeywell Lyric Controller or a Qolsys IQ Panel 2.

Remember that when using cameras, you must be able to respond to calls from the central station and let them know that any given alarm is legitimate. If you cannot do this, then you will not receive the authority response you expect. For these users, the best option is often to use a local guard service that handles the dispatch and alerts the local police after they arrive on the scene and confirm that a crime is taking place. Alarm Grid customers in Verified Response areas can contact us about arranging for a local guard service to protect their homes and businesses.

We encourage every Alarm Grid customer to check with their local jurisdiction to find out if any Verified Response policies are in effect in their area. If you have any questions about Verified Response policies, you can always reach out to us. We are available via email at support@alarmgrid.com. You may also call us at (888) 818-7728 during our regular business hours of 9am to 8pm EST M-F. We look forward to hearing from you!

Alarm grid inside security stickers

Tags: , , ,

0 Comments


Posted By

Hi DIYers! We have received news from Honeywell that Lyric Firmware Update MR8 is now available! This is the latest firmware update for the Honeywell Lyric Controller, and it is currently available for free download. End users can expect a few minor system improvements with the update.

Honeywell lyric controller encrypted wireless security system

From an end user's perspective, the following changes can be expected with Firmware Update MR8:

  • The WIFI indicator in the upper-left corner will now display a red X if WIFI connectivity goes down.
  • The Honeywell SiX Series Sensors now have a shorter RF transmission supervision interval. It is now six hours for all burglary devices, four hours for the Honeywell LKP500 Keypad, and two hours for all life-safety devices. Previously, the RF transmission supervision interval was 12 hours on all devices.
  • In the SiX Programming Menu, the Zone Number will now be shown in Red if the zone is faulted. Additionally, a tamper message will be displayed in Red if the zone is tampered.
  • The SiX Programming Menu now shows every enrolled SiX Series device for quick access. Newly enrolled sensors will be labeled "Newly Enrolled", which will be displayed in place of the Zone Number.
  • The Honeywell LKP500 Keypad will no longer beep after performing an update.
  • The Honeywell LKP500 Keypad will no longer announce Night Stay when Voice is disabled.
  • Eaton Cooper Z-Wave Light Switches are now supported.

Additionally, the update includes various changes that will make it easier for your alarm company to monitor your system. That is why performing the update is crucial for all Lyric System owners.

Performing the update is very easy. First, you must make sure that your Lyric System is ready and has no trouble conditions, including any tamper cover and low-battery messages. It must be actively monitored with a working communication path. Start from the main screen of the system, and choose Security, followed by Tools. Then enter your system's Installer Code, which is 4112 by default. Then click on the Update Firmware button. The button should grey out to indicate that it has been selected.

You can then return to the home screen, and the update should be applied automatically. It will typically go through in a few minutes with a WIFI connection, but it may take up to an hour with cellular only. Once the update is ready, the system will reboot to complete the process.

You can check the system revision to confirm the update. Go to Security > Tools > Master Code (default 1234) > Advanced > System Information. Then check the revision to make sure it reads 01.08.


If you are an Alarm Grid monitored customer with any questions about the the MR8 Firmware Update, you can email support@alarmgrid.com for more information. You may also call us at (888) 818-7728 from 9am to 8pm EST M-F. We look forward to hearing from you!

Tags: , , , , ,

3 Comments


Posted By

Hi DIYers! Today, we're presenting another basic security tip. This tip is to never Arm or Disarm your system using your Installer Code. That system code should only be used for programming, and it should be kept at its default to prevent you from being locked out of programming later.

Honeywell lyric controller encrypted wireless security system

If you go to Arm your system, you will often be prompted to enter a system code. Normally, you will use your Master Code or a standard user code to complete the Arming process. However, you will notice that your can technically Arm using your system's Installer Code. By doing this, you will make it possible for you to Disarm using that same code later on. But if you use your Master Code or a user code to arm, then you will not be able to disarm using your Installer Code.

The problem with using your Installer Code to Arm and Disarm is that an intruder may know the code and use it to gain access to the system. Default Installer Codes are usually common knowledge, and an intruder will often try one of these codes in a quick attempt to disarm. While keeping the Installer Code at its default is good practice, you will never want to use this code on a regular basis. Instead, you should only use the Installer Code to enter programming when the system is already Disarmed.

The default Installer Codes for many popular security systems are as follows:

If you are using one of these codes to Arm and Disarm your system, then you should stop this practice immediately. Instead, you should use your system's Master Code to arm and disarm. Make sure you change the Master Code from its default before using it to control your system. Set it to a unique code that is difficult for others to guess, but easy for you to remember. Then use that unique and personalized code to Arm and Disarm when needed. If you need to create any additional system codes, make sure they are not obvious for an intruder to guess. You can Arm and Disarm using a standard user code just like you would a Master Code.

If you are an Alarm Grid customer with questions about system codes, please reach out to us. We want to make sure you are using a secure code to Arm and Disarm your system and that you are not putting yourself at-risk for a security breach. Please email us at support@alarmgrid.com, or call us at (888) 818-7728 during our normal business hours of 9am to 8pm EST M-F. We look forward to hearing from you.

Tags: , ,

0 Comments


Posted By

Hi DIYers! Our team is back with another video recap. We have six new videos this week, as it was a dead even split between Joe, Jarrett and Jorge. Each of our talented actors had two new videos apiece. Let's take a look at the latest videos from the Alarm Grid Video Production Team!

Factory Resetting the Honeywell Lynx Touch L7000

Jarrett puts on a smile as he shows users how to perform a factory reset on a Honeywell L7000 System. This is accomplished by loading one of the Default Configurations. By performing a factory reset, the entire L7000 System will need to be reprogrammed from scratch. All sensors will need to be relearned with the panel, and all system settings will be reset to their default. Additionally, the Master Code will be reset to its default of 1234, and the Installer Code will be reset to its default of 4112.


Bypassing a Sensor in Total Connect

Jarrett happily demonstrates how to bypass zones in Total Connect 2.0. When you bypass a zone, the associated sensor will remain inactive and be unable to cause a system alarm. For example, if you bypass a door sensor when arming your system, then people will be able to open and close that door without causing an alarm. However, all other system zones will still remain active as usual. Sensors must be bypassed individually for each Arming session.


Addressing a Honeywell Alarm Keypad

Joe explains how to address a Honeywell Alarm Keypad with a Honeywell VISTA Security System. Touch-button keypads use addresses 16 thru 23 on VISTA P-Series Panels. Address 16 is always enabled, while addresses 17 thru 23 must be specifically enabled within programming. Meanwhile, an Advanced User Interface (AUI) device will use address 1, 2, 5 or 6. Touchscreen keypads are considered AUI devices and will use one of these slots. Remember that the Total Connect 2.0 platform itself takes up an AUI slot.


Using the Lynx Touch with a 3rd Party Z-Wave Controller

Joe talks about how how you can use a Honeywell LYNX Touch System as a secondary Z-Wave controller. This is done by pairing the system itself with a different Z-Wave hub. All Z-Wave devices from the primary hub will be automatically pushed over the LYNX Touch System. They can then be controlled from both the primary controller and from the LYNX Touch. However, you will need to use the primary controller to learn-in new Z-Wave devices. You must install an L5100-ZWAVE Card in the LYNX Touch System to support any Z-Wave functionality.


IP Fault Time Setting on the Lyric Alarm Panel

Jorge with his colorful hair discusses the IP Fault Time Setting on the Honeywell Lyric Controller. This setting will have the system display a trouble condition whenever the WIFI goes down for a certain period of time. That way, the user will know later that the system was unable to communicate with the AlarmNet Servers. An IP Fault Time trouble will only appear on the panel if WiFI is set as the only communication path. If the system has a cellular backup, then only the central station will receive an E350 Communication Path Failure on Zone 951.


Programming a Honeywell 5800CO Into an All-in-One Panel

Jorge walks users through the process of programming a Honeywell 5800CO with a wireless alarm system. The Honeywell 5800CO is a carbon monoxide detector that operates at 345 MHz. It is primarily used with Honeywell Systems, but it will work with nearly any panel that accepts the 345 MHz frequency. The sensor will cause an instant system alarm when activated. All building occupants should vacate the premises immediately if a CO alarm occurs. When programmed as a 24-Hour Carbon Monoxide Zone, the 5800CO Sensor cannot be bypassed.

Tags: , , ,

0 Comments


Posted By

Hi DIYers! Today, we're going to discuss the three main Arming modes used with alarm systems and explain how exactly they work. The three modes to discuss are Arm Away, Arm Stay and Arm Night. The key is knowing which Zone Types are active in each Arming mode and which ones are bypassed.

Honeywell lyric controller encrypted wireless security system

For the purpose of this post, we will be providing information specific to Honeywell Alarm Systems. However, this information can be applied across virtually any alarm control panel with the relevant Arming modes. Each mode has a specific application and time when it is most appropriate. Also remember that 24-Hour Zones (burg, fire, CO, auxiliary, audible, silent) will remain active at all times and can always cause an alarm, even when the system is disarmed. With that in mind, let's get started!

Arm Away

  • Use when you leave your home.
  • Perimeter Zones and Day/Night Zones will cause immediate alarms, including during the Exit Delay countdown.
  • User must disarm within the set Entry/Delay Period after activating an Entry/Exit Zone or an Interior w/ Delay Zone, or else an alarm will occur.
  • If an Interior Follower Zone is activated, then an immediate alarm will occur, unless it was activated after an Entry/Exit Zone.
  • If Auto-Stay Arming is enabled, then an Entry/Exit Zone must be activated when Arming Away, or else the system will revert to Arm Stay mode after the countdown.
  • The system will continuously beep during the Exit Delay countdown when Arming Away, unless a Silent Exit is performed.

Arm Stay

  • Use when someone is in the building, but you want the system to remain in an Armed state.
  • Interior Follower Zones and Interior w/ Delay Zones are automatically bypassed and cannot cause an alarm.
  • Perimeter Zones and Day/Night Zones will cause immediate alarms, including during the Exit Delay countdown.
  • If an Entry/Exit Zone is activated, the user must Disarm within a set Entry Delay period, or else an immediate alarm will occur.
  • The system will not continuously beep during the Exit Delay countdown when Arming Stay.

Arm Night

  • Essentially a more-secure version of Arm Stay Mode.
  • Set an Interior Zone to not be bypassed by enabling the Arm Night option for that zone within Zone Programming.
  • Interior Zones without Arm Night enabled will be bypassed.
  • Set Arm Night by choosing Arm Stay and then highlight the option for Arm Night on the code entry screen.
  • Arm Night option is only available if you have at least one Interior Zone with the Arm Night option enabled.


Disarmed

  • Mode when the system is not in a secured state.
  • Most security zones can be activated without causing an alarm.
  • The system will still display faulted zones, chime and read out Zone Descriptors if enabled.
  • If a Day/Night Zone is activated, then a trouble condition will occur.
  • If a 24-Hour Zone is activated, a system alarm will still occur.
  • The 24-Hour Zone category includes most Life-Safety Sensors, such as smoke detectors and carbon monoxide detectors, as well as police and medical panic buttons.

If you're an Alarm Grid monitored customer and you have any questions about your system's arming functions, please reach out to us. You may email support@alarmgrid.com or call us during our normal business hours of 9am to 8pm EST M-F at (888) 818-7728. And if you aren't already signed-up, then you can click the link in the upper-left corner of the page to get started. We look forward to working with you.

Tags: ,

0 Comments


Posted By

Hi DIYers! We have received news that Qolsys has made the latest firmware version for the IQ Panel 2 available through downloader rather than having to apply a patch tag. The company has also refined the facial recognition feature on the IQ Panel 2 to work more effectively than before.

Qolsys iq panel 2 at and t wireless security system with at and

As you may remember, we talked about the facial recognition feature last month. We found that it worked fairly well at the time, but we're happy to hear that Qolsys has been continuing to improve the feature. Users should now find that the panel camera now recognizes suspicious faces more accurately. Once a user has properly calibrated the feature, they can receive alerts regarding any suspicious activity via text and/or email. We recommend reading our previous blog for more information about the feature and how to get started.

If you haven't already updated your IQ Panel 2 System, now is a great time to do so. Start from the main screen of the panel. Then press the small grey bar at the top. Choose Settings, followed by Advanced Settings. Then provide the system's Installer Code, which is 1111 by default. Select Upgrade Software, and then Upgrade Using Network. Then complete the on-screen instructions to perform the upgrade. Please note, your IQ Panel 2 System must be connected with a local WIFI network for the upgrade to go through successfully.

Remember, you need at least 10 saved faces before the facial recognition feature goes into effect. And the more faces you have, the more accurate the software will be. We recommend the strategy of repeatedly arming and disarming to continuously take photos until you have enough images. The images you take might not appear on Alarm.com right away. You may need to logout and then log back in before the images will appear. But if you're like us, you will soon have a surplus of images!

Then we had a different person disarm using that same code. Sure enough, we received a notification in our email!. The IQ Panel 2 was able to distinguish between the approved saved images and the different individual.


Remember, you must enable the feature in two different areas on Alarm.com. You must provide contact information in the Users tab and configure the feature:


And you must set the same recipient in Unexpected Activity within the Notifications tab:


We hope that you will enjoy using this new feature on your IQ Panel 2. Remember, you need a monitoring plan if you want to use this feature and Alarm.com. You can sign-up for monitoring by clicking the orange Alarm Monitoring button in the upper-left corner of this page. Please email support@alarmgrid.com if you have any questions.

Note: Due to privacy concerns, this feature is currently available for users in the 50 US States. We are hopeful that this feature will be made available to users in Puerto Rico and Canada in the future.

Tags: , , , , , , , , , , , , , , , ,

0 Comments


Posted By

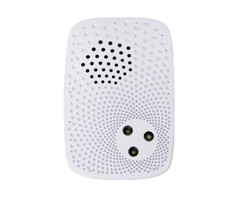
Hi DIYers! Today, we're taking a closer look at the Qolsys IQ Siren. Specifically, we want to go into the details of how it is used when paired with a Honeywell Alarm System. As you may know, the IQ Siren is a Z-Wave device that pairs with most Z-Wave controllers, including Honeywell Panels.

Qolsys iq siren z wave siren for qolsys iq and iq panel 2 qz2300

What's interesting is that the Qolsys IQ Siren learns-in with Honeywell Alarm Systems not as a Z-Wave siren, but as a Z-Wave light switch. This is not the case with the Qolsys IQ Panel 2, which immediately recognizes the IQ Siren for what it is - a siren. This way, the siren automatically activates during audible alarm events, with no special automation functions required. The 2GIG GC2 and 2GIG GC3 Alarm Systems also properly recognize the IQ Siren as a siren. We even wrote an FAQ and shot a video about this.

But since Honeywell Systems view the Qolsys IQ Siren as a light switch and not a siren, things become a little bit tricky. After all, you want the siren to operate like a siren, not a light switch! Fortunately, there's a way around this problem. That is using Total Connect 2.0 to create smart scenes. These scenes will tell the siren to activate when the Honeywell System experiences an audible alarm event, and also to stop sounding when the system is disarmed and the alarm is cleared. How's that for a creative solution?

It might take a little bit of extra work to get the Qolsys IQ Siren working on a Honeywell Security Panel, but it really is worth it. This is a 105 dB siren with a built-in strobe light to provide a visual indication of an alarm. For a sound comparison, 105 dB is about as loud as a table saw. It blows the 85 dB sounder built into the Lyric and LYNX Touch Systems out of the water. It's much easier to install than a hardwired siren, and it is extremely versatile overall. This makes the IQ Siren a winning option for many DIY users.

The Qolsys IQ Siren is great for any Honeywell System with a Z-Wave controller. Remember, the Lyric already includes a built-in Z-Wave controller, while the other panels need to have one added separately. The LYNX Touch Systems need a Honeywell L5100-ZWAVE Card, while the VISTA Panels need either a Honeywell VAM or a Honeywell Tuxedo Touch Keypad. It is also helpful to have access to Total Connect 2.0. If your monitoring plan does not include TC2, now is a great time to get started!

Please note that while you can create the necessary scenes from the panel and not from TC2 (with the exception of the Lyric system) we find that using TC2 is the easiest option. You can use the TC2 website or the mobile app on Android and iOS devices. We like using the website to create scenes. But if you prefer the mobile app, that's okay too!


Once you have paired the IQ Siren and logged into your TC2 account, it's time to create the scenes! Most users will want three scenes. These are:

  • A scene to activate the siren during a burglary alarm
  • A scene to activate the siren during a fire alarm
  • A scene to deactivate the siren during a panel disarm

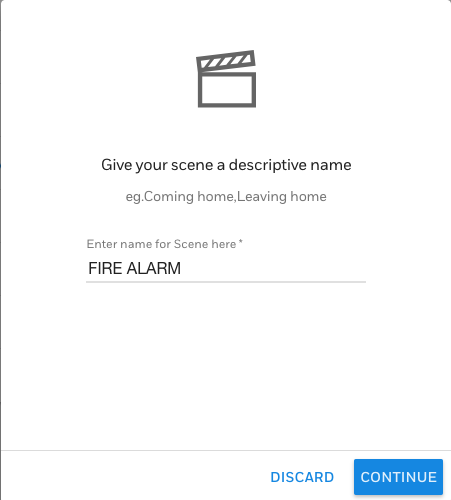
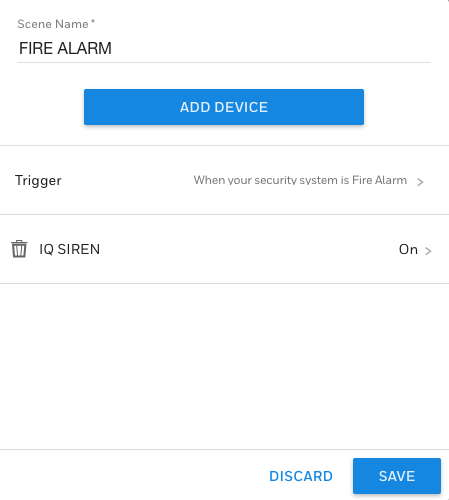
For our example, we will be creating a scene for the fire alarm. The other scenes will follow a similar process. Start by navigating to the Scenes Menu. Then choose Add Scene. You will then name your scene:


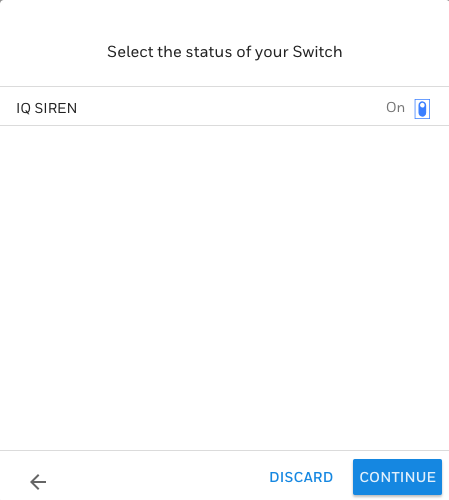
Then you will include the IQ Siren into the scene. It will be listed under "Others". Since we are setting it to activate during an alarm, we will set the device to On for this scene. But if you wanted to have the siren stop sounding when an alarm is cleared, then it would be set to Off.


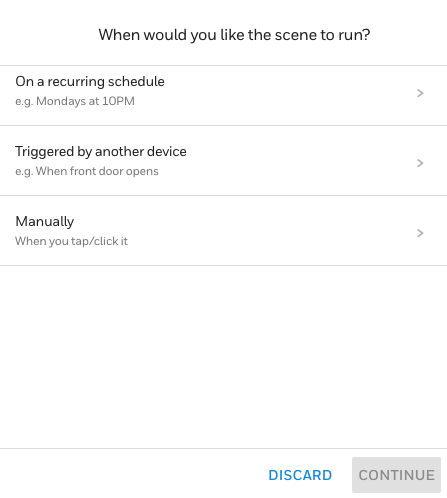
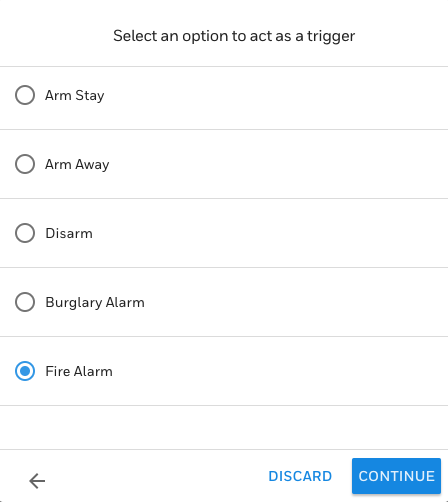
Next, you will set when the scene should run. Since it is being controlled by either a system alarm or a system disarm, you will choose "Triggered by another device". Then choose the appropriate function.


Finally, save your scene!


And that's it! Remember, you must do this for each individual scenario (burglary alarm, fire alarm, and to turn off upon disarm) if you want the IQ Siren to provide complete functionality. Alarm Grid monitored customers can always get further assistance by emailing support@alarmgrid.com. You can also call us at (888) 818-7728 during our normal business hours of 9am to 8pm EST M-F. If you aren't already monitored with Alarm Grid, make sure to press the orange Alarm Monitoring button at the top of this page. We look forward to working with you!

Tags: , , , , , , , , ,

0 Comments


Posted By

Hi DIYers! Welcome to the first edition of Alarm Grid Tips! This is where we teach you basic principles about alarm systems. Most of these tips will be designed for beginners, so anyone can follow along! Today, we're going to show you why you should run a wire through the back of a panel.

Honeywell l5200 lynx touch wireless home security system and alarm control panel

One of the first things you will do when setting up an alarm system is power it on. This involves connecting a 2-conductor wire to the appropriate power terminals on the back of the panel. This is something you must do whether you are mounting the panel to the wall or using a desk mount to avoid drilling holes. The panel will ultimately receive its primary power from a plug-in transformer.

If you have a wireless system, you will want to run the unconnected power wire through the back plate before connecting it to the panel. This way, you can properly close the panel. If you try to connect the wire first, you will feel pretty silly when you have to disconnect the wire and then redo the same connections!

You can see this example below with a Honeywell L5200 System. First, let's see what happens if you don't run the wire through the back plate:


Now let's try again with the system wired correctly:


The principle is the same if you have a hardwired panel. These systems are normally housed inside a metal enclosure. You will want to run any connecting wires through one of the openings on the side or in the back. This way, you can properly close the metal cabinet door. You can see this on our Honeywell VISTA 21iP System below. Note that we removed the door for easy access, but we would be able to close it if it were still attached!


Also remember that you must follow proper polarity if your system is running DC power. The black wire will connect to the negative (-) terminals on the transformer and the panel. The red wire will connect to the positive (+) terminals on the transformer and the panel. If you are using AC power, then either wire can go to either terminal. Make sure you know whether your system uses AC or DC power before wiring!

Below is an example of DC transformer where proper polarity is followed:


That concludes today's Alarm Grid tip! Keep an eye on our blog for more tips in the future. We will also let you know if there's any important new security news. If you're an Alarm Grid customer in need of assistance, or if you are interested in an alarm monitoring plan, please reach out to us by emailing support@alarmgrid.com. You may also call us at (888) 818-7728 during our normal business hours of 9am to 8pm EST M-F. We look forward to hearing from you!

Tags: , ,

2 Comments