DIY Security Systems Posts

Posted By

Hi DIYers! Today, we are happy to unveil the Honeywell Home VISTA-21iPLTE. This is the newest hardwired system from the VISTA Series by Resideo, and it is essentially replacing the existing VISTA-21iP System. The big addition is its ability to support special plug-in LTE communicators.


The Honeywell Home VISTA-21iPLTE is actually the same as a VISTA-21iP System, except that the 21iPLTE board has been upgraded to support new plug-in LTE communicators. This includes the Honeywell Home LTE-21V with Verizon LTE (available now).

This new plug-in module is just like the older Honeywell VISTA-GSM4G Communicator, which is conveniently plugged into the VISTA-21iP board. The only difference is that the LTE-21V supports LTE connectivity. This is important for anyone looking to use cellular communication with a security system.

The reason you want to use an LTE communicator with your alarm system is that it offers superior speed and reliability when compared with older 3G and CDMA networks. Also, these older networks are in the process of being shut down. By going with LTE, you are providing a long-term solution for your panel.

Just like the existing VISTA-21iP, the new VISTA-21iPLTE has a built-in IP communicator, which is basically the equivalent of a Honeywell 7847i Communicator. Even if you don't add a cell module to the VISTA-21iPLTE, you will still be able to connect it with AlarmNet for IP monitoring and access to Total Connect 2.0.

Honeywell vista gsm4g alarmnet vista 21ip cellular alarm monitor

But, adding a cellular communicator is very important for dealing with internet outages. If the internet goes out and you don't have a cellular backup, then your 21iPLTE will lose connectivity with the AlarmNet360 Servers. Maintaining this connection is necessary for properly utilizing any monitoring service. This makes cellular backup crucial!

By connecting your VISTA-21iPLTE Panel with AlarmNet360, you will also be able to control your system through Total Connect 2.0. This is an interactive monitoring and automation platform that you can access from nearly anywhere using your phone. Make sure you choose a monitoring plan with TC2 service!

If you plan to use cellular communication with your VISTA-21iPLTE and Alarm Grid, then you will need a Gold or Platinum Level Plan (Self or Full). This is needed to activate the cellular radio and connect it with AlarmNet360. You can find more information about all our monitoring plans on our monitoring page.

Once you have access to Total Connect 2.0, you will be able to control your 21iPLTE System from any location with network access. You can use Total Connect 2.0 to arm and disarm, check current system status, control Z-Wave devices (controller required), view IP cameras (video monitoring required), and so much more!

Honeywell vista 21ip internet alarm control panel open

As far as functionality is concerned, the VISTA-21iPLTE is just like like a VISTA-21iP. Other than the added support for the LTE-21V, they are the same panel. As a result, almost any specification that applies to the VISTA-21iP also applies to the VISTA-21iPLTE.

The VISTA-21iPLTE is capable of supporting up to 64 total zones. However, you can only use eight (8) hardwired zones out of the box. To use additional wired zones, you will need to add Honeywell 4219 Expansion Modules. To use wireless sensors, you will need a wireless receiver, such as the 6160RF Keypad.

By adding up to five (5) 4219 Expansion Modules, you can use up to 48 hardwired zones on the VISTA-21iPLTE. Keep in mind that Zones 2 through 8 support zone doubling. Zone 1 is a special zone for use with 2-wire smokes. That is why it does not support zone doubling, although it can be used as a burglary or environmental zone if 2-wire smokes are not needed. You can have up to 16 2-wire smokes on the zone.

Adding a compatible wireless receiver will let you use wireless 345 MHz sensors from the Honeywell 5800 Series. A standard wireless receiver will only support uni-directional (one-way) devices. But a wireless transceiver like the 6160RF will also let you use bi-directional devices. Up to 56 wireless zones can be used. The number of available wireless zones depends on the number of wired expansion zones being used.

It is important to keep in mind that the total number of zones (wired and wireless) can never exceed 64. Additionally, zones 49 through 64 on a VISTA-21iPLTE are designated as key fob zones. But you can use these zones with any wireless sensor, as long as you have a wireless receiver added.

Honeywell 6160rf alphanumeric alarm keypad with integrated transceiver

There are also some other accessories you can add to a VISTA-21iPLTE System. First and foremost, you will want a keypad for controlling the system. As stated earlier, the Honeywell 6160RF is a great option. If you don't plan to use wireless sensors, then the standard Honeywell 6160 will work just as well.

You might also consider getting a touchscreen keypad for the system. These can be easier to use than push-button keypads. But just remember that only push-button keypads can backdoor into programming. The new Honeywell 6290W is a great option. Or you could go with the Tuxedo Touch which will also add Z-Wave functionality.

There are limits to the number of keypads you can use with the system. Up to eight (8) push-button keypads can be added. Touchscreen keypads count as AUI devices, and the VISTA-21iPLTE will only support a max of four (4) of these. Keep in mind that the Total Connect 2.0 service also counts as an AUI device!

Speaking of Z-Wave, a Z-Wave controller is needed if you want to use Z-Wave devices with the system. Adding a Tuxedo Touch is a great way to add Z-Wave capabilities. If you already have a keypad, then the standalone Honeywell VAM was an option, but it has recently been discontinued. Remember, you can control all Z-Wave devices through TC2.
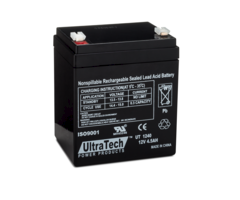
Ultratech 1240 alarm control panel battery backup 12v 4 dot 5ah

Lastly, the system comes with its own transformer for supplying power. You will still need to supply a backup battery like the UltraTech IM-1250F1. Power cabling is not included with the VISTA-21iPLTE system, so you must add your own. We recommend using 18-gauge wiring, or even better, a Honeywell LT-Cable.

We would also like to mention that the VISTA-21iPLTE supports two (2) partitions, along with a third common partition. It also supports other miscellaneous features like Quick Arming, Scheduling, up to 48 unique user codes, 100-event event log, two (2) low-current trigger outputs, chime functionality, and more.

The VISTA-21iPLTE System and the LTE-21V LTE Communicator are both available for purchase now from the Alarm Grid website. This system is great for anyone looking for a simple, yet effective hardwired panel. It will certainly serve as a long-lasting addition to your home or business and help keep you safe.

If you have any questions about the system, please email us at support@alarmgrid.com. We will check your email at our earliest convenience and reply as soon as possible. You may also call us at (888) 818-7728. Remember that our support hours are 9 am to 8 pm EST M-F. We look forward to hearing from you!

Tags: , , , , , , , , ,

Comments


Posted By

Hi DIYers! We're here with another video recap. We put out four (4) videos last week, all on September 27th. There is one video apiece from Jorge, Joe and Jarrett. I even rolled up my sleeves and did a video! Let's check out the newest instructional videos from the Alarm Grid Video Team!

Programming the VISTA-21iP To Use IP Only

Jorge explains how to make the Honeywell VISTA-21iP System use IP communication only. The VISTA-21iP has a built-in IP communicator for this purpose. In order to program the system for IP-only communication, you will need to enter programming using the system's Installer Code. Remember that the default Installer Code is 4112. Keep in mind that an internet outage will take your system offline if you do not have cellular backup. For that reason, you might want to consider getting a dual-path communicator for the system.


Enrolling the DSC PowerG PG9312 to the Qolsys IQ Panel 2 Plus

I show you how to program a DSC PowerG PG9312 Outdoor Contact to a Qolsys IQ Panel 2 Plus System. This sensor will work with any version of the IQ Panel 2 Plus, as long as the system is running Firmware Version 2.4.0 or higher. As an outdoor contact, this sensor is perfect for use on fences, gates, barn doors, and outdoor patio doors. One of its best features is its extra wide magnet spacing gap of up to 1.75 inches.


The Keypad Tamper Lockout Feature on the Lyric Security System

Joe discusses the keypad tamper lockout feature on a Honeywell Lyric Alarm System. This feature goes into effect if thirty (30) numeric keys are entered within a 15 minute period, without ever entering a valid code. Pressing any numeric key while the system is in its lockout mode will result in a long error tone. Honeywell designed this feature to prevent brute force entry into the Lyric System. The only way to disarm the system in this mode is to use a key fob or Total Connect 2.0.


Using a Honeywell Z-Wave Thermostat with a Qolsys IQ Panel 2 Plus

Everyone's favorite Alarm Grid Technician Jarrett shows off using a Honeywell Z-Wave Thermostat with a Qolsys IQ Panel 2 Plus. Since, the IQ Panel 2 Plus supports Z-Wave devices, you can really use any Z-Wave thermostat with the system. By enrolling a Z-Wave thermostat with the system, you will be able to control it from the panel and from Alarm.com. You can access the Alarm.com service using a web browser or remotely through the Alarm.com Mobile App. Remember that you will need a monitoring plan with access to Alarm.com!

Tags: , , ,

Comments


Posted By
Fill out my online form.

Hi DIYers! Last week, we sent a small team to Silicon Valley, California to check out the 2019 Qolsys Summit. Needless to say, we were absolutely blown away with what Qolsys will soon be offering. Today, we would like to focus on some of their new industry-changing products in the pipeline.


The biggest highlight of the Qolsys Summit was the opportunity to check out the newest upcoming panel from the company, the Qolsys IQ Hub. The IQ Hub represents the vision of Qolsys to bring home security closer and more accessible to the average consumer than ever before. This is truly the optimal system for any budget-conscious consumer who wants to bring state-of-the-art security and technology into their home. It is slated for a Q1 2020 release.

We do not have all the details on the Qolsys IQ Hub quite yet. But there is still a lot that we can talk about. The most obvious addition to the Qolsys IQ Hub is its prominent speaker on the front. Qolsys is expected to introduce some mind-blowing integrations for the system that will turn your alarm control panel into a compact entertainment center.

Remember that Alarm.com already offers an excellent Sonos integration. We are sure that the IQ Hub will take full advantage of this feature and truly put it to great use. Our team did get a chance to test the IQ Hub sound quality, and we can confirm it sounds just as good as any high-end portable speaker. This is highly impressive, and we expect many users to be thrilled that their alarm system can now essentially double as a party-starter.


The next aspect you will likely notice about the IQ Hub is its standout display screen. This is a 7" touchscreen display that appears to have even higher resolution than any existing security system on the market. We do not have the exact specifications on the screen just yet, but it certainly passes the eyeball test. And as you can see from the photo above, the slideshow feature returns. Get ready to show-off some of your best photos on the Qolsys IQ Hub!

As we mentioned earlier, Qolsys seems to be envisioning the IQ Hub as a way to make the home security market more accessible to the average consumer. The new system is not expected to replace the existing Qolsys IQ Panel 2 Plus, but it is anticipated to have a lower price point. We also expect many existing features to return to the IQ Hub, including built-in WIFI, Bluetooth connectivity, cellular LTE, and Z-Wave Plus functionality.

One thing that will not be returning to the IQ Hub is support for legacy sensors (e.g. 319.5 MHz, 345 MHz, and 433 MHz devices). The new system will be entirely PowerG, and you will need to use those sensors with the system. This is fine, as PowerG Sensors offer an impressive wireless range of up 2,000 feet when used with the IQ Hub in open air. They also utilize military grade 128-bit AES encryption in all their communication to ensure maximum wireless security.

Another interesting note about the panel is that it is not designed to be opened up. This is a significant change from most existing security systems, where you will occasionally need to open up the panel to make hardware changes. The battery on the IQ Hub is sled-replaceable, and it can easily be swapped out by the end user with little effort. All of the hardware is built right in, so you will never have to make any changes in that regard. Talk about DIY friendly!


Qolsys made other various enhancements to the IQ Hub System. They touted an improved integrated camera, and it can even double as a motion sensor by detecting changes in pixelation. We also expect this feature to be used in conjunction with Alarm.com so that you can take a peak-in at your home while you're on the go. You will also notice the LED light on the front of the panel. This light changes colors to let you know the current system status. How cool!

The system also features a built-in microphone that you can use to get alerts regarding loud sounds. You can even adjust the minimum sound level required to trigger alerts. This is perfect for parents who want to know if their baby is fussing or for owners of rental properties who may want to be alerted if their guests are throwing a loud party. It's just another way that Qolsys is working hard to keep you connected with your home.

We do expect that there will be some hardware limitations of the IQ Hub when compared with the IQ Panel 2 Plus, especially when you consider the anticipated lower price point. Qolsys most likely reduced costs by dropping legacy sensor support. It's also possible that the IQ Hub will support fewer zones than the IQ Panel 2 Plus (128 zones). But we cannot confirm the exact number of zone on the IQ Hub at this time. The IQ Hub is also slightly larger than the existing IQ2+ due to the added speaker.

As stated earlier, the Qolsys IQ Hub is scheduled for a Q1 2020 release. This groundbreaking new system is sure to make some big waves in the security industry, and we are confident that it will help many new users get their start with home security. We can't wait for its release, and we hope you're excited too!


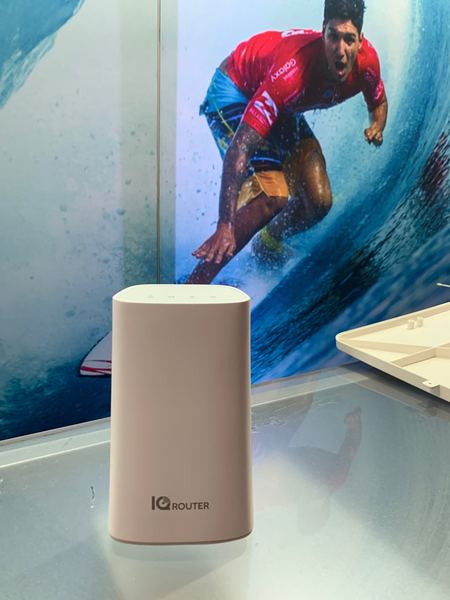
Qolsys also unveiled another interesting product at the event, the Qolsys IQ Router. At first glance, you might be wondering what's the big deal. What's so exciting about an IP router? Well Qolsys packed in some game-changing features that are sure to make the IQ Router the perfect addition to your IQ Hub or IQ Panel 2 Plus System. It is sure to make your life more convenient in many ways. And we can also confirm, it is dual-band with support for 2.4 GHz and 5 GHz!

At the basic level, the IQ Router is exactly what it sounds like, an internet router. It replaces the existing router for your home's IP network. But what you get with the router is pretty ingenious. Any Qolsys IQ Panel 2 System or Qolsys IQ Hub connected with the IQ Router can be accessed remotely by your alarm monitoring company for programming purposes. This is similar to what the DSC Iotega offers. But with the Qolsys Systems, it is optional rather than mandatory.

Of course, if you don't want your monitoring company accessing your panel, then you can disable the feature. But it's pretty nice if you want assistance with programming new devices. One thing you will certainly love is its ability to auto-discover your IQ Hub System and automatically enroll it with your WIFI network. You can even configure your IP settings right from the IQ Hub. This truly makes the IQ Hub the central controller for your entire network!

Another innovation from the IQ Router is the ability to auto-enroll guest WIFI devices. In other words you can get any visitors on your WIFI network, without making them enter a long, tedious password. The way this works is that your guest will request to join the network from their IP device. You will then approve the request from either your IQ Hub or an app on your phone. And just like that, your guest will be connected with your WIFI network. Super convenient!


As you will notice, the Qolsys IQ Router only has one (1) LAN port for connecting a hardwired ethernet device. This isn't a big deal, as most users might not even need one. If you need additional ports, then you can easily connect a network switch to the router and use it however you would like.

But one very exciting feature of the IQ Router is its ability to support up to eight (8) WIFI extenders or access points. This makes it truly suitable for even large commercial locations! The router facilitates a total mesh network to help ensure that all of your IP devices stay connected across even an incredibly expansive area. Whether your needs are big or small, you are sure to get great use out of the new IQ Router! Qolsys states that it should be out by the end of this year.

We would like to end this post with some smaller product announcements we heard at the Qolsys Summit. A PowerG 360-Degree Ceiling-Mount PIR Motion Sensor called the PG9862 was unveiled. This sensor is perfect for use in closets or in commercial locations where corner-mounting is not feasible. The PG9862 is available from Alarm Grid now, and you can get it right here.

Lastly, we heard rumors about a much-anticipated PowerG Wired to Wireless Converter. This is huge news, as it will allow you to takeover an existing hardwired system and use a Qolsys IQ Panel 2 Plus or Qolsys IQ Hub in its place. And of course, all your hardwired sensors will enjoy the amazing range and security of the PowerG wireless protocol. We do not have any other details on the PowerG Converter at this time, but we will definitely keep our eyes peeled.

We hope that you are eagerly awaiting all of these new products just like we are! This was truly an awesome event that Qolsys put on, and we are thankful that we got to be a part of it. We are hopeful that Qolsys hosts a similar gathering next year in 2020! For now, check out these new and upcoming products, and email us at support@alarmgrid.com if you have any questions or thoughts. Remember that our support hours are from 9am to 8pm EST M-F. As usual, we look forward to hearing from you!

Tags: , , , , , , , , , , , , , , , , , ,

Comments


Posted By

Hi DIYers! We have a quick video recap today, with four (4) new videos this week. Three videos featuring Jorge were uploaded on Thursday, September 19th. Another featuring Joe was uploaded a day later. We hope these videos help you out. Let's take a look at the newest videos from Alarm Grid!

Alarm grid inside security stickers

Finding the Installer Code on a VISTA-21iP

Jorge explains what to do if you do not know the Installer Code on a Honeywell VISTA System. You use the command [Installer Code] + [800] to enter programming. If you do not know the code, then you should first try the default code of 4112. If that doesn't work, then you might try to get in using the backdoor method. If the backdoor method fails, then you should try asking the previous monitoring company or system owner for the Installer Code.


Setting Up TC 2.0 on a Phone

Jorge shows you how to set up Total Connect 2.0 on a phone. The Total Connect 2.0 Mobile App is available for Android and iOS devices. You can get it for free from the Google Play Store or the Apple App Store. Once you have the app, you can login using your Total Connect 2.0 account, just like you would from the website. If you don't have access to Total Connect 2.0, then you might want to check out one of our monitoring plans to get access. Remember, TC2 is for Honeywell Panels only.


Linking a Honeywell Lyric Alarm System to HomeKit

Jorge explains the process for linking a Honeywell Lyric with Apple HomeKit. This will let you use the system with the rest of your HomeKit network. You can also get notifications regarding system activity, and you can control your system using Siri voice commands from your iPhone. For best results, you will want to have a proper HomeKit Hub established. You will also want to continue to use Total Connect 2.0 alongside HomeKit, as TC2 will provide more detailed alerts for the Lyric System than HomeKit.


Programming the 5800COMBO to a VISTA Panel

Joe teaches you how to enroll a Honeywell 5800COMBO with a Honeywell VISTA Panel. In order to use this wireless 345 MHz sensor from the Honeywell 5800 Series, you must add a wireless receiver to the system. This combination sensor will provide the smoke & heat detection, carbon monoxide detection, and freeze detection. Each function will require its own wireless zone on the system. You can also program a additional zones for maintenance detection and end of product life detection.

Tags: , , , , ,

Comments


Posted By

Hi DIYers! Today, we're taking a look at the new Interlogix Encrypted Sensors. There are three (3) sensors in this TX+ lineup. There is the Interlogix TX+DWS Door/Window Contact, the Interlogix TX+PIR Pet Immune Motion Sensor, and the Interlogix TX+2WAYFOB Key Fob. All are available now!

Interlogix tx e201 brown wireless door slash window sensor


First, we would like to give some background on these Interlogix TX+ Sensors. The wireless communication range for these sensors is listed at 500 feet when used in open air. They operate at an encrypted 319.5 MHz frequency, similar to the Qolsys S-Line Sensors. You can technically use these Interlogix TX+ Sensors with any 319.5 MHz system. This includes the Qolsys IQ Panel 2 Plus w/ 319.5 MHz Daughtercard and all of the Wireless Interlogix Panels.

However, these sensors will only utilize encrypted communication when paired with the Interlogix Simon XTi-5i System. If you don't know about this system, we actually started carrying it last month. Among its new features is the ability to support encrypted sensors. At the time, there weren't any encrypted sensors out for the system yet. Well now there are! When paired with any other compatible system, they will operate as non-encrypted wireless sensors.

The sensors themselves are straightforward and simple. The Interlogix TX+DWS Contact has a thin profile, and it will work great on nearly any door, window or cabinet. The Interlogix TX+PIR Motion Sensor offers a coverage area of 40 feet by 40 feet, as well as pet immunity for small animals weighing up to 80 pounds. Lastly, the Interlogix TX+2WAYFOB is a four (4) button key fob with buttons for arming, disarming, automation, and triggering an auxiliary panic.

We believe these sensors are a must-have for anyone with an Interlogix Simon XTi-5i System. Now you can take full advantage of the encrypted communication that the system offers! If you have any questions or if you want to learn more about these sensors, please reach out to us. The best way to contact us is to email support@alarmgrid.com. We will check your email at our earliest convenience and reply back as soon as soon as we can. We look forward to hearing from you!

Tags: , , , , , , , , ,

Comments


Posted By

Hi DIYers! It's time for our video recap again, this time covering September 9th thru 13th. We have five (5) new videos this time featuring Jarrett, Jorge, and myself. We have been getting some positive feedback regarding our videos lately, thank you so much! Let's check out the new ones!

Enrolling the 2GIG PAD1-345 Wireless Keypad to the 2GIG GC2

I show you how to enroll a 2GIG PAD1-345 with a 2GIG GC2 Security System. The 2GIG PAD1-345 is a relatively simple push-button keypad that is great for basic arming and disarming. You can keep it by a second entrance in your home or business so that you can arm and disarm as you come and go. It is also compatible with other 2GIG Systems. These include the 2GIG GC2e, the 2GIG GC3, and the 2GIG GC3e.


Using a WIFI Communicator with a Honeywell Alarm System

Jorge from Alarm Grid talks about using a WIFI communicator with a Honeywell System. This can be a great way to monitor your system if you have WIFI in your home or business. IP communication is known for being fast and relatively reliable for the most part. You just need to be wary of internet outages, as they will leave your system unmonitored. For that reason, you might want to get cellular backup for your system as well.


Using L7000 Alarm Panels Together

Team MVP Jorge explains how you cannot use two Honeywell L7000 Systems together. As a general rule, it is not possible to use multiple security systems together. You cannot pair one alarm control panel with another alarm control panel. This is true even if they are the same exact system. If you want a second controller for operating your alarm system, then you should get a keypad instead. A good keypad for the L7000 is the Honeywell 5828.


Self-Monitoring an Alarm.com Security System

Super Alarm Grid Hero Jarrett explains how you can self-monitor an Alarm.com Security System. The Alarm.com service is used with many security systems. This service will send you text and/or email notifications regarding any system activity. As a result, it is possible to use an Alarm.com System without it being connected with a central monitoring station. This practice is known as self-monitoring. Just remember, it will be up to you to contact the authorities if needed!


Defaulting a Resideo Lyric Controller

Wonder Boy Jarrett shows you how to default a Resideo Lyric Alarm System. Performing a factory default on a Lyric is normally only done if you are planning to get rid of the system, or as a last resort troubleshooting step. Doing this will reset the Installer Code back to 4112 if it was changed. All zones from the system will be cleared. It will reset the panel time. And all general system settings will be reset back to their default values.

Tags: , , , , , ,

Comments


Posted By

Hi DIYers! Just last week, we announced some of the new system kits that we are now offering on our site. Well today, we have even more kits to announce. We have new system kits featuring the DSC PowerSeries NEO, the 2GIG GC3e, and the 345 MHz and 433 MHz Versions of the IQ Panel 2 Plus.

Qolsys iq panel 2 at and t 10 1 kit alarm system kit w slash 10

DSC PowerSeries NEO Kits

The DSC PowerSeries NEO is a hardwired alarm system with some powerful features. It is generally best used in commercial settings, as it isn't going to be as DIY-friendly as a wireless alarm system. But if you need a hardwired system, then a DSC PowerSeries NEO might be the way to go. We are offering kits around the 16-zone, 32-zone, 64-zone, and 128-zone DSC PowerSeries NEO Systems. You can choose between AT&T LTE and Verizon LTE for all of the kits.


DSC HS2016NK 3-1 AT&T LTE Kit

  • 16-Zone DSC PowerSeries NEO
  • DSC HS2LCDRF9 N NEO Keypad
  • DSC TL880LEAT N AT&T LTE & IP Communicator
  • Three (3) DSC PG9303 PowerG Door/Window Contacts
  • One (1) DSC PG9914 PowerG Motion Sensor
  • Honeywell LT-Cable


DSC HS2016NK 3-1 Verizon LTE Kit

  • 16-Zone DSC PowerSeries NEO
  • DSC HS2LCDRF9 N NEO Keypad
  • DSC TL880LTVZ N Verizon LTE & IP Communicator
  • Three (3) DSC PG9303 PowerG Door/Window Contacts
  • One (1) DSC PG9914 PowerG Motion Sensor
  • Honeywell LT-Cable


DSC HS2016NK 10-1 AT&T LTE Kit
  • 16-Zone DSC PowerSeries NEO
  • DSC HS2LCDRF9 N NEO Keypad
  • DSC TL880LEAT N AT&T LTE & IP Communicator
  • Ten (10) DSC PG9303 PowerG Door/Window Contacts
  • One (1) DSC PG9914 PowerG Motion Sensor
  • Honeywell LT-Cable


DSC HS2016NK 10-1 Verizon LTE Kit
  • 16-Zone DSC PowerSeries NEO
  • DSC HS2LCDRF9 N NEO Keypad
  • DSC TL880LTVZ N Verizon LTE & IP Communicator
  • Ten (10) DSC PG9303 PowerG Door/Window Contacts
  • One (1) DSC PG9914 PowerG Motion Sensor
  • Honeywell LT-Cable


DSC HS2032NK 3-1 AT&T LTE Kit
  • 32-Zone DSC PowerSeries NEO
  • DSC HS2LCDRF9 N NEO Keypad
  • DSC TL880LEAT N AT&T LTE & IP Communicator
  • Three (3) DSC PG9303 PowerG Door/Window Contacts
  • One (1) DSC PG9914 PowerG Motion Sensor
  • Honeywell LT-Cable


DSC HS2032NK 3-1 Verizon LTE Kit
  • 32-Zone DSC PowerSeries NEO
  • DSC HS2LCDRF9 N NEO Keypad
  • DSC TL880LTVZ N Verizon LTE & IP Communicator
  • Three (3) DSC PG9303 PowerG Door/Window Contacts
  • One (1) DSC PG9914 PowerG Motion Sensor
  • Honeywell LT-Cable


DSC HS2032NK 10-1 AT&T LTE Kit
  • 32-Zone DSC PowerSeries NEO
  • DSC HS2LCDRF9 N NEO Keypad
  • DSC TL880LEAT N AT&T LTE & IP Communicator
  • Ten (10) DSC PG9303 PowerG Door/Window Contacts
  • One (1) DSC PG9914 PowerG Motion Sensor
  • Honeywell LT-Cable


DSC HS2032NK 10-1 Verizon LTE Kit
  • 32-Zone DSC PowerSeries NEO
  • DSC HS2LCDRF9 N NEO Keypad
  • DSC TL880LTVZ N Verizon LTE & IP Communicator
  • Ten (10) DSC PG9303 PowerG Door/Window Contacts
  • One (1) DSC PG9914 PowerG Motion Sensor
  • Honeywell LT-Cable


DSC HS2064NK 3-1 AT&T LTE Kit
  • 64-Zone DSC PowerSeries NEO
  • DSC HS2LCDRF9 N NEO Keypad
  • DSC TL880LEAT N AT&T LTE & IP Communicator
  • Three (3) DSC PG9303 PowerG Door/Window Contacts
  • One (1) DSC PG9914 PowerG Motion Sensor
  • Honeywell LT-Cable


DSC HS2064NK 3-1 Verizon LTE Kit
  • 64-Zone DSC PowerSeries NEO
  • DSC HS2LCDRF9 N NEO Keypad
  • DSC TL880LTVZ N Verizon LTE & IP Communicator
  • Three (3) DSC PG9303 PowerG Door/Window Contacts
  • One (1) DSC PG9914 PowerG Motion Sensor
  • Honeywell LT-Cable


DSC HS2064NK 10-1 AT&T LTE Kit
  • 64-Zone DSC PowerSeries NEO
  • DSC HS2LCDRF9 N NEO Keypad
  • DSC TL880LEAT N AT&T LTE & IP Communicator
  • Ten (10) DSC PG9303 PowerG Door/Window Contacts
  • One (1) DSC PG9914 PowerG Motion Sensor
  • Honeywell LT-Cable


DSC HS2064NK 10-1 Verizon LTE Kit
  • 64-Zone DSC PowerSeries NEO
  • DSC HS2LCDRF9 N NEO Keypad
  • DSC TL880LTVZ N Verizon LTE & IP Communicator
  • Ten (10) DSC PG9303 PowerG Door/Window Contacts
  • One (1) DSC PG9914 PowerG Motion Sensor
  • Honeywell LT-Cable


DSC HS2128NK 3-1 AT&T LTE Kit
  • 128-Zone DSC PowerSeries NEO
  • DSC HS2LCDRF9 N NEO Keypad
  • DSC TL880LEAT N AT&T LTE & IP Communicator
  • Three (3) DSC PG9303 PowerG Door/Window Contacts
  • One (1) DSC PG9914 PowerG Motion Sensor
  • Honeywell LT-Cable


DSC HS2128NK 3-1 Verizon LTE Kit
  • 128-Zone DSC PowerSeries NEO
  • DSC HS2LCDRF9 N NEO Keypad
  • DSC TL880LTVZ N Verizon LTE & IP Communicator
  • Three (3) DSC PG9303 PowerG Door/Window Contacts
  • One (1) DSC PG9914 PowerG Motion Sensor
  • Honeywell LT-Cable


DSC HS2128NK 10-1 AT&T LTE Kit
  • 128-Zone DSC PowerSeries NEO
  • DSC HS2LCDRF9 N NEO Keypad
  • DSC TL880LEAT N AT&T LTE & IP Communicator
  • Ten (10) DSC PG9303 PowerG Door/Window Contacts
  • One (1) DSC PG9914 PowerG Motion Sensor
  • Honeywell LT-Cable


DSC HS2128NK 10-1 Verizon LTE Kit
  • 128-Zone DSC PowerSeries NEO
  • DSC HS2LCDRF9 N NEO Keypad
  • DSC TL880LTVZ N Verizon LTE & IP Communicator
  • Ten (10) DSC PG9303 PowerG Door/Window Contacts
  • One (1) DSC PG9914 PowerG Motion Sensor
  • Honeywell LT-Cable


Qolsys IQ Panel 2 Plus Kits

Last week, we announced several "encrypted" Qolsys Kits that were based around the IQ Panel 2 Plus and PowerG Sensors. Today, we have some non-encrypted kits for the 345 MHz and 433 MHz IQ Panel 2 Plus models. Unlike the kits introduced last week, these kits use uni-directional "non-encrypted" sensors. We actually already had similar kits available for the 319.5 MHz IQ Panel 2 Plus, but now the 345 MHz and 433 MHz versions are joining the fray!

An added bonus about these kits - we actually do include an encrypted PowerG Motion Sensor. It's only the door/window contacts that aren't encrypted. These kits are good if you don't necessarily care about encryption, and you want to save money versus buying the fully encrypted kits.


Qolsys IQ Panel 2 Plus 345 MHz AT&T LTE 3-1 System Kit

  • 345 MHz IQ Panel 2 Plus System w/ AT&T LTE
  • Three (3) VERSA-2GIG Door/Window Contacts
  • One (1) DSC PG9914 PowerG Motion Sensor


Qolsys IQ Panel 2 Plus 345 MHz Verizon LTE 3-1 System Kit
  • 345 MHz IQ Panel 2 Plus System w/ Verizon LTE
  • Three (3) VERSA-2GIG Door/Window Contacts
  • One (1) DSC PG9914 PowerG Motion Sensor


Qolsys IQ Panel 2 Plus 345 MHz AT&T LTE 10-1 System Kit
  • 345 MHz IQ Panel 2 Plus System w/ AT&T LTE
  • Ten (10) VERSA-2GIG Door/Window Contacts
  • One (1) DSC PG9914 PowerG Motion Sensor


Qolsys IQ Panel 2 Plus 345 MHz Verizon LTE 10-1 System Kit
  • 345 MHz IQ Panel 2 Plus System w/ Verizon LTE
  • Ten (10) VERSA-2GIG Door/Window Contacts
  • One (1) DSC PG9914 PowerG Motion Sensor


Qolsys IQ Panel 2 Plus 433 MHz AT&T LTE 3-1 System Kit
  • 433 MHz IQ Panel 2 Plus System w/ AT&T LTE
  • Three (3) VERSA-DSC Door/Window Contacts
  • One (1) DSC PG9914 PowerG Motion Sensor


Qolsys IQ Panel 2 Plus 433 MHz Verizon LTE 3-1 System Kit

  • 433 MHz IQ Panel 2 Plus System w/ Verizon LTE
  • Three (3) VERSA-DSC Door/Window Contacts
  • One (1) DSC PG9914 PowerG Motion Sensor


Qolsys IQ Panel 2 Plus 433 MHz AT&T LTE 10-1 System Kit
  • 433 MHz IQ Panel 2 Plus System w/ AT&T LTE
  • Ten (10) VERSA-DSC Door/Window Contacts
  • One (1) DSC PG9914 PowerG Motion Sensor


Qolsys IQ Panel 2 Plus 433 MHz Verizon LTE 10-1 System Kit

  • 433 MHz IQ Panel 2 Plus System w/ Verizon LTE
  • Ten (10) VERSA-DSC Door/Window Contacts
  • One (1) DSC PG9914 PowerG Motion Sensor


2GIG GC3e AT&T LTE Kits

Last up, we have some new 2GIG GC3e Kits. As we announced yesterday, the 2GIG GC3e AT&T LTE Communicator is finally here, and that means mores GC3e Kits! These are just like the Verizon Kits we announced last week, only with a different communicator.


2GIG GC3e AT&T LTE 3-1 Kit
  • 2GIG GC3e System
  • 2GIG LTEA-A-GC3 AT&T LTE Communicator
  • Three (3) 2GIG DW10e Door/Window Sensors
  • One (1) 2GIG PIR1e Motion Sensor
  • Honeywell LT-Cable


2GIG GC3e AT&T LTE 10-1 Kit

  • 2GIG GC3e System
  • 2GIG LTEA-A-GC3 AT&T LTE Communicator
  • Three (3) 2GIG DW10e Door/Window Sensors
  • One (1) 2GIG PIR1e Motion Sensor
  • Honeywell LT-Cable


Reach Out To Us!

If you have any questions about these kits, or if you need help deciding on the best one, please reach out to us. The best way to contact us is at support@alarmgrid.com. Or if you prefer to call, you can reach us at (888) 818-7728 during our usual business hours of 9am to 8pm EST M-F. We look forward to hearing from you!
Tags: , , , , , , , , , , , , , , , , , , , , , , , , , , , , , , , , , ,

Comments


Posted By

Hi DIYers! We have been talking about the IQ Panel 2 Plus a lot lately. First we revealed the new Firmware Version 2.4.0 upgrade. Then we took an in-depth look at the new firmware. Today, we're going to examine the new Control4 Integration available for the IQ2 on Firmware 2.4.0 or higher.

Qolsys iq panel 2 plus verizon lte with powerg s line and legacy

By using the Control4 Integration, you can control basic security functions for your Qolsys IQ Panel 2 Plus System from your Control4 Touchscreen. This includes arming and disarming from the C4 System. In other words, your Control4 System will become somewhat of a secondary keypad for your IQ Panel 2 Plus System. Meanwhile, you can still use your IQ2 as a primary Z-Wave Controller and have full functionality with Alarm.com. How cool!

The C4 Integration will work with any Qolsys IQ Panel 2 or IQ Panel 2 Plus that is running Firmware Version 2.4.0 or higher. To get started, you will want to download the Qolsys IQ Panel 2 Driver to your Control4 System running OS Version 2.6.0 or higher. The driver can be found within the C4 Driver Database. From there, make sure your IQ Panel 2 and your Control4 System are on the same WIFI network.

Next, turn your attention to your IQ Panel 2 System. From the main screen, click the small grey bar at the top. Choose Settings > Advanced Settings > enter Dealer Code (default 2222) > Installation > Devices > WIFI Devices > 3rd Party Connections > enable Remote Device Access > OK. The panel will then reboot to apply the changes. Return back to the 3rd Party Connections Menu, and click on "Reveal Secure Token". Then apply the token at your C4 System to pair. Remember, you must use the Dealer Code (default 2222) to access this setting. It will not be displayed when using the Installer Code (default 1111).

As this integration is still very new, it is somewhat limited at the moment. Right now, we can only confirm that the integration allows for system arming/disarming from the C4 Panel. It's possible that new features and functions may be released in due time. Still, this is quite a nice integration for anyone with an IQ Panel 2 and a C4 Home Automation setup.

If you have any questions about this integration, please reach out to us. We offer free online and phone support for Alarm Grid monitored customers. The best way to reach us is by emailing support@alarmgrid.com. We will check your email as soon as we can and reply back promptly. If you prefer to call us, you can reach us at (888) 818-7728 during our usual business hours of 9am to 8pm EST M-F. We look forward to helping you with the new Qolsys Control4 Integration!

Tags: , , , , , , , , , , , ,

Comments


Posted By

Hi DIYers! We made a post last week that briefly discussed Firmware Version 2.4.0 for the Qolsys IQ Panel 2 and IQ Panel 2 Plus. We want to take a closer look at some of the great new features offered from this latest firmware update. Now is certainly a great time to get an IQ Panel 2 Plus!

Qolsys iq panel 2 verizon 7 security panel w slash z wave ready

Panel Scene Control

New with Firmware Version 2.4.0 is the ability to activate Alarm.com Smart Scenes directly from the IQ Panel 2. Previously, this could only be done from the Alarm.com website or mobile app. This is much more convenient than having to control each Z-Wave device and the system individually. You can also control scenes from the IQ Remote Keypad if you have one.

To get started, you will first need to have at least one smart scene created on your Alarm.com account. Remember, you can create smart scenes from the Alarm.com website or mobile app. When making the scene, make sure to include all of the relevant devices. This can include Z-Wave devices programmed with the system, as well as the system itself.

You must also enable the feature for the panel. This can be done at the panel itself. Start from the main screen of the panel, and click the small grey bar at the top. Choose Settings > Advanced Settings > enter Installer Code (default 1111) > Installation > Installer Settings > Check the box next to Scenes Support (you'll need to scroll down). Then return to the main screen by clicking the home button at the bottom.


You will now be able to run Alarm.com Smart Scenes from the panel itself. From the main screen, click the Scene Control button in the bottom-left corner:


Then choose the scene you want to run. We made a scene called "Test Scene", which locks a Z-Wave Lock, sets our Z-Wave Thermostat to 70 degrees Fahrenheit, and sets the system to Arm Stay. We can confirm that the new panel scene feature works perfectly!


IQ Remote Camera Streaming

One new feature we are sure that many users are sure to be excited about is the ability to live-stream Alarm.com Cameras from the IQ Remote Touchscreen Keypad. We have previously discussed the ability to live-stream compatible ADC Cameras from the panel itself. But now you can do it from the IQ Remote. This is great for anyone with a surveillance camera setup who uses the IQ Remote as a secondary keypad for the system.

The same restrictions for streaming from an IQ Panel 2 apply when streaming from an IQ Remote. This means that only Alarm.com Cameras that support the panel streaming feature can be streamed from the IQ Remote. Additionally, it is only possible to stream video from the IQ Remote. You cannot stream audio like you can on the IQ Panel 2. For more information on setting up the camera streaming feature, please review this helpful FAQ. You must have the main panel streaming feature enabled to be able to stream from the IQ Remote.

You also have to enable panel streaming for the IQ Remote. You can do this from the main panel. Start from the main screen of the system. Click the small grey bar at the top. Choose Settings > Advanced Settings > enter Installer Code (default 1111) > Installation > Installer Settings > Check the box next to Stream Live Video Cameras to IQ Remote. Then return to the home screen by pressing the picture of the house at the bottom.


You will then be able to access the same menu option from the IQ Remote that you use on the main panel to stream video. Just swipe left or right on the IQ Remote home screen until you reach the option to choose a camera. You will have to excuse our desk clutter, but the image looks just as good on the IQ Remote as it does on the IQ Panel 2. Quite awesome!


Wellness & Check In/Out Screens

This feature is pretty unique. You can have the main screen of the IQ Panel 2 serve as an Auxiliary Panic button for triggering a medical alarm. This also allows you to set up a Check In/Out function for the system. This is great for anyone with a business who may want to monitor when employees come and go. The panel will take a picture whenever a user checks in or out. You can also get text and/or email alerts regarding this activity from Alarm.com. It really goes to show that Qolsys is working hard to make the IQ Panel 2 Plus the premier security system for small businesses!

There are a few things to keep in mind when using this feature. First is that Check-In & Check-Out can only be enabled if the Wellness Page is enabled. Second, enabling Check-In & Check-Out feature will also enable Settings Photos from the panel camera. This is so that a picture can be taken when a user checks in or out. Finally, you cannot enable the Wellness Page if Partitions are enabled for the system.

Again, the feature must be enabled from the Installer Settings Menu. From the main screen of the system, press the small grey bar at the top. Choose Settings > Advanced Settings > enter Installer Code (default 1111) > Installation > Installer Settings > Check the box by Wellness Page > Check the box by Check-In / Check-Out. You can then return to the home screen by clicking the picture of the house at the bottom.


When you return to the main screen, you will notice that you are at the Wellness Menu. This is where you can trigger an Auxiliary Medical Panic on the system. To get to the usual Arming/Disarming screen, just swipe left once.


Any Questions?

If you have any questions about Firmware Version 2.4.0 for the IQ Panel 2 Plus, please do not hesitate to reach out to us! Remember that we offer free online and phone support for our monitored customers. The best way to reach us is to email support@alarmgrid.com. We will check your email as soon as possible and reply back at our earliest convenience. You may also call us at (888) 818-7728 during our normal business hours of 9am to 8pm EST. We look forward to hearing from you and telling you all about the IQ Panel 2 Plus System!

Tags: , , , , , , , ,

Comments


Posted By

Hi DIYers! Welcome to another Alarm Grid Video Recap, this time covering videos published on September 5th & 6th. We have a big recap this time, with eight (8) new videos being published. Jarrett, Jorge, and Joe all make appearances. Let's get right into it and check out the new videos!

Finding the CRC on a Honeywell-Resideo Wireless Alarm System

Jarrett explains how to find the CRC code for a wireless Honeywell or Resideo System. The CRC code is a 4-digit code that is unique to the panel's IP communicator. Along with the 12-digit MAC address, the CRC code is very important when activating a system for alarm monitoring service. You should make sure to write the code down and save it in a safe place once you have obtained it. You may need this code again at a later time.


Explaining the 6F Message on an Alarm Keypad

Jorge talks about the "6F" message that can appear on a wired keypad for a Honeywell VISTA Alarm System. This code is actually "bF", which stands for "backup failure". The message indicates that there is a problem with the system's communicator. The "bF" message will only appear on a Fixed English Keypad, like a Honeywell 6150. An Alphanumeric Keypad like a Honeywell 6160 will instead display "Check 103, Long Rng Trbl", which means the same thing.


Arming-Disarming the Qolsys IQ Panel 2 From Your Phone

Jorge shows you how to arm and disarm a Qolsys IQ Panel 2 Plus System using your phone. This is done using the Alarm.com service. The Qolsys IQ Panel 2 Plus includes integrated LTE and WIFI communicators for connecting with Alarm.com. You just need to have the system activated with an alarm monitoring plan that includes access to the Alarm.com platform. You can then use the Alarm.com Mobile App on Android and iOS devices to arm and disarm remotely.


Replacing a Honeywell 1321 Transformer with a 1361 Transformer

Joe is back, and he answers the question of whether or not you can replace a Honeywell 1321 Transformer with a Honeywell 1361 Transformer. The answer is that you can always replace a 1321 with a 1361. However, you cannot always replace a 1361 with a 1321. This is because the 1361 supplies more power than the 1321. A setup that was using a Honeywell 1361 Transformer for power might not receive enough power from a 1321 Transformer used in its place.


Displaying the MAC ID On a Honeywell Wireless Alarm System

Jarrett teaches you how to find the MAC ID on a Honeywell Wireless Alarm System. This applies to any Honeywell Panel with an IP communicator. To find the MAC address, you will need to enter programming. This requires providing the Installer Code for the system. Remember that the default Installer Code on most Honeywell System is 4112. The MAC address and MAC CRC are found within the Comm Diagnostics Menu. Clicking on Communication ID Numbers will display the codes at the top of the screen.


Devices Used With a 2GIG XCVR2-345 Transceiver on a Go!Control GC2

Jorge talks about the 2GIG XCVR2-345 and the devices that are used with it. The 2GIG XCVR2-345 is an add-on accessory for the 2GIG GC2 System. This communicator is what allows the system to work with bi-directional devices. These are devices that must both send and receive signals with the GC2 System. Some of the devices that require the use of a 2GIG XCVR2-345 include the 2GIG Go!Bridge IP Communicator and the 2GIG TS1 Touchscreen Keypad.


Monitoring and Controlling the Temperature On a Honeywell L5210

Jorge explains how you can monitor and control the temperature using a Honeywell L5210 Security System. For this to work, you will need a Honeywell L5100-ZWAVE Card installed inside the system. This is a Z-Wave controller that allows the system to support Z-Wave smart home devices. From there, you can enroll a Z-Wave thermostat with the system. This will allow you to monitor and control the temperature for the building directly from a Honeywell L5210 Alarm Panel.


Programming the Alarm Monitoring Account Information on a Honeywell L5210

Jorge covers the process for programming the alarm monitoring account information on a Honeywell LYNX Touch System. This is an important step for setting up a system for alarm monitoring service. Completing this process will allow the system to communicate with the central station. Normally, an end user will only complete this process themselves if they are bringing the system over to a new monitoring company. This process only needs to be completed if the communicator has not been released by the old monitoring company.

Tags: , , , , ,

Comments