Total Connect 2.0 Posts

Posted By

Hi DIYers. We have a relatively small video recap this time. Our team managed to make four (4) new videos. This includes three (3) from Jorge and one (1) from Jarrett. They are both ready and eager to help you learn your security system. Let's check out the new videos for this week.

Arming a Honeywell Alarm System Using Alexa

Jorge talks about how you can use Amazon Alexa to Arm your Honeywell Security System. This is made possible using Total Connect 2.0. You must open the Alexa App on your Android or iOS device and link your Total Connect 2.0 account. In order to use Total Connect 2.0, you will need an alarm monitoring plan that includes access to the service. You can use Alexa to Arm Away, Arm Stay and activate TC2 smart scenes. You cannot use Alexa to Disarm your system.


Low Battery Supervision On The 2GIG TAKE-345

Jorge explains how if your 2GIG TAKE-345 has a low backup battery, then all the associated zones will show a low-battery trouble condition. The 2GIG TAKE-345 is a wired to wireless converter designed for use with 2GIG Security Panels. Hardwired sensors connect with the TAKE-345. The module then sends a 2GIG 345 MHz Signal to the panel. The system sees these sensors as wireless sensors. If the 2GIG TAKE-345 has a low battery, then the associated wireless zones will show low battery. You cannot use hardwired life-safety sensors with the TAKE-345.


Getting Power To The Lyric Security System

Jarrett teaches users how to power the Resideo Lyric Alarm System. The system receives primary power from a plug-in DC transformer. If the electricity goes out, a backup battery will keep it powered on. There are 4-hour and 24-hour backup battery options available. We recommend using a Honeywell LT-Cable to connect the panel to its transformer. You can also use 18-gauge, 2-conductor wire to complete the connection. The system will power off if it is not receiving plug-in or battery power.


Testing My Alarm Panel Through Alarm Grid

Jorge explains how Alarm Grid customers can test their security systems. We recommend testing your system monthly. You must test your system once per year to receive an updated certificate of alarm (CoA). By receiving a CoA from Alarm Grid, you can save money on your homeowner's insurance. You must always put your system on test mode before testing your system. You can put your system on test mode by contacting us, contacting our central station partner Criticom, or use the MyAlarms.com feature.

Tags: , , , ,

Comments


Posted By

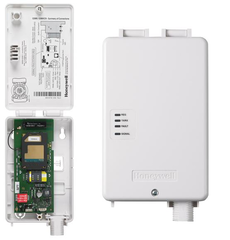
Resideo will be pushing down an over-the-air (OTA) firmware update for all AlarmNet LTE Communicators later this month. This update will go through automatically, and it should not affect your monitoring service in any fashion. The update will be applied sometime later this month.

Honeywell lte xv alarmnet verizon lte cellular communicator

This update only affects the communicator, not the panel itself. The updates will be applied automatically in batches until it has been applied to every Resideo LTE Communicator. First the Verizon LTE Radios will be updated, followed by the AT&T LTE Radios. Resideo will start each update cycle with batches of units that were registered first. The company will follow a sequential order, finishing with batches of units that were registered last. Any new unit that is activated will be placed at the end of the cycle.

It is possible that your system may reboot as part of this update process. However, it should resume normal operation after the update is complete. Additionally, you may notice the following contact ID codes in your Event Log on Total Connect 2.0:

Contact ID
Meaning
E365 Update Started
R365 Update Finished
E366 Update Failed

Resideo says that this update will allow their LTE communicators to interact more effectively with the cellular network. Users should expect this update to go through sometime later this month. We do not have an exact date as to when the update process will begin. If you have any questions about this update, please contact us at support@alarmgrid.com for more information.

Tags: , , , , , , , , , , , , , , , ,

Comments


Posted By

Hi DIYers! It's time for another video update from Alarm Grid. This time we're covering the videos from May 30th and 31st. We have six new videos this time. Joe has four, while Jorge and Jarrett each have one. The Alarm Grid boys are back to help you learn your system. Let's check them out.

Connecting an LTE-XV to a VISTA-21iP

The ever-friendly Joe teaches you how to connect a Honeywell LTE-XV to a Resideo VISTA-21iP Security System. The Honeywell LTE-XV is a Verizon LTE Communicator for VISTA Series Systems. It follows the same setup process as the Honeywell LTE-XA, which is the AT&T LTE Communicator. Please note that by adding an LTE-XV or LTE-XA to a VISTA-21iP, you will disable the integrated IP communicator for the system. If you want to use an external dual-path communicator with a VISTA-21iP, you should add a Honeywell LTE-IV instead.


The ADC-V522IR Audio Features

Joe explains the two-way audio capabilities of the Alarm.com ADC-V522IR Security Camera. If you use this camera with the Qolsys IQ Panel 2 Plus, you can livestream the audio and video directly from the panel. You can also get live audio and video from the Alarm.com Mobile App. This app can be conveniently accessed right from your Android or iOS device. You can even speak through your Android or iOS device and have your voice come through the camera. This will allow you to have a live two-way conversation with whoever is at the other end.


Connecting the August Smart Lock Pro to WIFI

Joe helps you connect your August Smart Lock Pro to a WIFI network. To do this, you will need an August Connect WIFI Bridge. Getting your August Smart Lock Pro connected with WIFI is recommended if you want to use the device with Apple HomeKit. However, it is not required. The only other way to use HomeKit with the August Smart Lock Pro is to have your HomeKit Hub within Bluetooth range (10 to 15 feet) of the lock. Your HomeKit Hub can be an iPad, HomePod or AppleTV (4th Generation or higher).


Arm Stay vs. Arm Instant

Fan-favorite Jarrett explains the differences between Arm Stay and Arm Instant. The major difference is that Arm Instant ignores all Entry Delay settings. This means that any Entry/Exit Zones will effectively operate as Perimeter Zones. If you fault an Entry/Exit Zone while the system is Armed Instant, then an immediate alarm will occur. If you want to Disarm the System while it is Armed Instant, you will need to do so without activating an Entry/Exit Zone. We recommend using a Security Key Fob or an interactive service platform like Alarm.com or Total Connect 2.0.


Response Types Supported by the SiXPIR

Jorge discusses the Response Types that can be used with the Honeywell SiXPIR Motion Detecting Sensor. The only available Device Type for a SiXPIR Zone is "Motion Sensor". This restricts the Response Types that can be used. You cannot set the Device Type to "Other" to gain access to the full list of Response Types. As a result, the only Response Types you can use with the SiXPIR are Interior Follower, Perimeter, Day/Night, Interior With Delay, Resident Monitor, Resident Response, General Monitor, and General Response.


Using the August Smart Lock Pro with Apple HomeKit

Joe talks about using the August Smart Lock Pro with Apple HomeKit. By including the August Smart Lock Pro with your Apple HomeKit network, you can operate the lock from anywhere using your iOS device. There are two ways to use the lock with HomeKit. The first is to pair the August Smart Lock Pro with the August Connect WIFI Bridge. This will allow the lock to connect with a WIFI network so that you can access it remotely. The other option is to have the lock within Bluetooth range of your HomeKit Hub. This can be an AppleTV (4th Generation or higher), iPad or HomePod.

Tags: , , , ,

Comments


Posted By

Hi DIYers! We are happy to announce that we are offering a sale on the iGSMV4G and the iGSMV4G-TC2 effective immediately. The iGSMV4G can be purchased for $50. The iGSMV4G-TC2 is available for $60. These are AT&T 4G Cellular Communicators that allow VISTA Panels to connect with AlarmNet360.

Honeywell igsmv4g honeywell dual path alarm monitoring communica

Earlier this year, AT&T announced the sunset of their 3G and 4G networks. By February 2022, it will no longer be possible to use an AT&T 3G/4G with your alarm system. You must upgrade to an LTE communicator by then. Additionally, AlarmNet will no longer allow activations for AT&T 3G Communicators and AT&T 4G Communicators starting Wednesday June 26th, 2019.

We still have some iGSMV4G and iGSMV4G-TC2 products in stock. We want to get rid of them before they become unusable. This is a perfect opportunity to get your Resideo VISTA System online for a very low price. With these communicators, you can access Total Connect 2.0 and use all of the available features. Please note that you will need a Gold Plan or higher to activate a cellular communicator with Alarm Grid. Also, we cannot offer overnight orders for these products.

If you do get one of these communicators, you must activate the module before June 26th. After that date, it will be impossible to activate the cellular portion of the communicator. Additionally, if you deactivate the communicator or discontinue service for any reason, you will not be able to reactivate this unit for cellular service after June 26th. You will still be able to use the communicator for Internet Communication only after this date.

Resideo has stated that more recently manufactured modules will be able to be activated for up to 180 days after June 26th. However, we cannot guarantee that a new iGSMV4G will be able to be activated after that date. For your own planning, you should not expect an AT&T 3G or 4G communicator to be activated after June 26th.

The Honeywell iGSMV4G is a dual-path AlarmNet Communicator for Resideo VISTA Series Systems. It uses AT&T 4G and hardwired ethernet to connect with the AlarmNet Servers and provide access to Total Connect 2.0. This module will provide fast and reliable connectivity until February 2022. The cellular portion of the module will no longer work after February 2022. At that time, you will want to upgrade to a newer LTE communicator. We are offering the iGSMV4G for $50.

The Honeywell iGSMV4G-TC2 is a bundled kit that includes the iGSMV4G module, as well as the necessary PROM Chip upgrades for the VISTA-15P and VISTA-20P Alarm Systems. You should purchase this kit if your 15P or 20P System is running a firmware version of at least 2.0, but less than 9.12. Any 15P or 20P system running less than version 9.12 will not be able to be used with Total Connect 2.0. We are offering this kit for $60.

If you aren't sure what firmware version your system is running, you can check the current PROM Chip. This is a small black chip located in the middle of the system. This FAQ can teach you how to replace an old PROM Chip if needed.

Here is an example of a PROM Chip for a VISTA-20PSIA System. This is basically a VISTA-20P System with some added features put in place to prevent false alarms. Note that this system is running v10.23, which is high enough to use TC2.


If you want to future-proof your VISTA System with an LTE communicator, then we can certainly help you with that as well. We currently offer the Honeywell LTE-XA (AT&T LTE), the Honeywell LTE-XV (Verizon LTE) and the Honeywell LTE-IV (dual-path Verizon LTE and IP ethernet). All of these communicators will extend the life of your VISTA System well into the very distant future.

Keep in mind that a VISTA-15P or VISTA-20P System will need to be running at least firmware version 9.12 to support Total Connect 2.0. A VISTA-21iP must be running at least version 3.13 to support TC2. We offer PROM Chip upgrades for VISTA-21iP Systems here. We do not offer bundled kits for VISTA-21iP PROM Chips. The PROM Chips included in the iGSMV4G-TC2 Kit are for 15P and 20P Systems only.

Remember, we cannot offer overnight orders for either the iGSMV4G or the iGSMV4G-TC2. You must activate these communicators before June 26th. They can remain active until February 2022. After that, you must upgrade to an LTE communicator or use IP only communication. If you have any questions about this sale or these communicators, please contact us at support@alarmgrid.com. We look forward to hearing from you.

Tags: , , , , , , , , ,

Comments


Posted By

Hi DIYers! We hope that you had a safe and fun Memorial Day weekend. Our video team managed to produce eight (8) new videos last week. Joe was featured in five (5) new videos, mostly covering the August Smart Lock Pro. Jorge and Jarrett both had a video apiece, and I made one as well.

Connecting an August Smart Lock Pro with the August Home App

Joe explains how to connect your August Smart Lock Pro with the August Home App. This is one of the first things you will do with the August Smart Lock Pro. The August Home App allows you to operate your lock from your smartphone. You can control the lock through Bluetooth if you are within 10 to 15 feet. You can also operate the lock remotely from almost anywhere if you have the August Connect WIFI Bridge.


Including the August Smart Lock Pro

Joe shows users how to include the August Smart Lock Pro with a Z-Wave network. This is important if you want to control the August Smart Lock Pro from an interactive service platform from Total Connect 2.0 or Alarm.com. The pairing process is completed through the August Home App. You will need to have the lock paired with the app before you can pair it with a Z-Wave network. You will also need access to your Z-Wave hub or controller.


Defaulting the August Smart Lock Pro

Joe teaches users how to perform a factory default for an August Smart Lock Pro. To perform a factory reset, you will need to access your August account through the August Home App. Doing this will clear any Z-Wave and WIFI settings for the lock. You will need to reprogram the lock from scratch using the app. You should only perform a factory reset if you plan on giving away the lock or as a final troubleshooting step.


Excluding the August Smart Lock Pro

Joe covers the process for excluding the August Smart Lock Pro from a Z-Wave network. Unlike most Z-Wave devices, you don't need to clear the August Smart Lock Pro before adding it to a Z-Wave network. Instead, you will only do this if you are clearing the device from the network so that you can add it to a new one. You can complete the exclusion process through the August Home App. If you don't have access to your Z-Wave hub, you will need to perform a Z-Wave factory reset.


Getting an Alarm or Zone Open or Close to Activate a Honeywell IP Camera

Joe talks about how you can create notifications to have your Resideo IP Cameras activate when sensors are faulted or during alarm events. Normally, these cameras will only activate when they detect motion or sound. You can create these notifications through Total Connect 2.0. It is also possible to set specific hours when a camera can initiate a recording. This way, even if a zone is faulted, the camera will only capture clips during certain predetermined hours.


Temperature Sensor Notifications from a Lyric via Apple HomeKit

Jorge explains how you cannot receive temperature sensor notifications from Apple HomeKit when used with a Resideo Lyric Alarm System. HomeKit will only provide specific alerts for intrusion zones on the Lyric. For all other zones, only a General Lyric System Alert will be displayed. This makes it impossible to determine exactly which zone was faulted. However, you can still use HomeKit alongside Total Connect 2.0. The TC2 service will provide specific alerts for any faulted zone.


Is AlarmGrid Compliant with Nationally Recognized Industry Standards?

In a very rare video appearance, I talk about how Alarm Grid is compliant with Nationally Recognized Industry Standards. Nearly all of the systems and sensors that we sell are certified by Nationally Recognized Testing Laboratories. Additionally, our central monitoring partner Criticom Monitoring Services is UL Listed and FM Approved. While we may occasionally have equipment on our site that is still in the process of being approved by a NRTL, we stand behind our manufacturers and are confident in their offerings.


Finding the Firmware Revision on a Lynx Touch

Coming through with a video at the very last minute, Jarrett teaches users how to find the Firmware Revision on a Resideo Lynx Touch System. If you want to perform a firmware update for these systems, then you will need the LYNXTOUCH-MSD Updater Tool. It is no longer possible to push an update over-the-air (OTA). Getting these systems on the latest firmware is important if you plan to use an LTE cellular communicator. Please note that you will also need an alarm monitoring plan that includes cellular connectivity.

Tags: , , , , , , , , ,

Comments


Posted By

Hi DIYers! We have learned that Resideo has updated Total Connect 2.0. The update is Version 2.12.4. The biggest offering from this update is the ability to control smart home devices more easily. It is also now easier to see the status for smart home devices across multiple locations.


Any Total Connect 2.0 user with multiple locations can see the status for their programmed smart locks and smart thermostats from the Locations Menu. This feature allows users to more quickly review the current status for these smart devices all at once. If you have multiple homes or businesses, this is a great way to easily check your various smart locks and thermostats all at once.

Additionally, the System Administrator and Master Users can now access TC2 to modify the ability for Panel Only Users to control Z-Wave Locks. Before this most recent update, this ability could only be modified directly from the panel. Now you can access TC2 to give a Panel Only User the ability to control Z-Wave locks using their code or take the ability away.

Update 2.12.4 also provides various fixes. This includes correcting a problem that prevented Internet Explorer users from using the New Users Spreadsheet to create multiple new users at once. The update also fixes a problem on the Camera Settings page where the WIFI signal strength indicator for C-Series HD Cameras was displayed incorrectly. Finally an old problem with the End User License Agreement (EULA) on Internet Explorer has been corrected.

You may also notice a new design from the login screen:


If you have any questions about this new update, please reach out to us at support@alarmgrid.com. We look forward to answering any questions you might have.

Tags: , , , , ,

Comments


Posted By

Hi DIYers! We have many customers who wonder what happens if their security system is destroyed when an intruder breaks into their home. Fortunately, alarm manufacturers considered this possibility. They put protective measures in place to deal with this issue. Enter Crash & Smash and APL.

2gig gc3 diy wireless security system w slash 7 screenCrash and Smash (C&S) for Alarm.com and Advanced Protection Logic (APL) for Total Connect 2.0 are both features designed to provide an added layer of protection in case an alarm panel and/or its communicator are destroyed during a home invasion. These features help ensure that the police are still dispatched and that the end user receives the help they need. An intruder might think they're okay because they have destroyed the panel, but the system is smart enough to overcome this issue.

Just last week, we made a post covering Entry and Exit Delays. Well it turns out that the Entry Delay period plays a big part in C&S and APL. As we discussed last week, if an Entry/Exit Zone is faulted while the system is Armed, an Entry Delay countdown begins. This period gives the end user a chance to Disarm their system before an alarm occurs. But what if the panel gets destroyed during this countdown? After all, the panel won't be able to send out an alarm signal. But this is where Crash and Smash and APL take priority. How they do this is actually quite smart.

Whenever a system goes into Entry Delay, it immediately sends out a signal to the Alarm.com Servers (ADC) or the AlarmNet Servers (TC2). This signal just lets the server know that the system is now in an Entry Delay period. The servers are smart enough to know that since the system is now in an Entry Delay period, a Disarm or an Alarm must follow. If neither event follows, then logically the panel must have been destroyed. The server will then know to send a signal to the central station to let a trained dispatcher know that the panel has been destroyed and dispatch is needed right away.

Please note that the Alarm.com Servers and the AlarmNet Servers do not send signals to the central station as soon as the usual Entry Delay period expires. These servers also account for delays in sending signals. A little more than a minute of additional time is added beyond the normal Entry Delay period before a C&S or APL signal is sent to the central station. This is done to prevent false alarms.

Advanced Protection Logic and Crash & Smash also work during alarms that do not follow Entry Delay periods. If the system has Alarm Report Delay enabled and an intrusion alarm occurs, then the system will not actually alert the central station the very instant that the alarm occurs. The system will actually enter into a short Alarm Report Delay period that is usually less than a minute in length. This delay period gives the user a chance to Disarm the system and cancel the alarm to stop the signal from being sent out. If an intruder destroys the system during this Alarm Report Delay period, APL or C&S will ensure that emergency dispatch is still sent out. Alarm Grid encourages users to disable Alarm Report Delay on their panel if possible.

It's also worth mentioning that the Alarm.com Servers and the AlarmNet Servers send all C&S and APL signals directly to the central station. The end user does not receive an alert from Alarm.com or Total Connect 2.0 when these signals are sent out. In other words, C&S and APL do not work with self-monitored customers. You need a central station monitoring plan to use these features. Also, C&S and APL do not work with phone line monitoring. You need an IP communicator or a cellular communicator. UPDATE: Alarm.com can now alert a user directly via a Push Notification on their phone when a C&S event occurs.

If you have any questions about Crash & Smash or Advanced Protection Logic, or if you want to learn more about our monitoring service, please reach out to us! The best way to contact us is to send an email to support@alarmgrid.com. We will check the email at our earliest convenience and respond as quickly as possible. If you prefer to speak on the phone, we are available from 9am to 8pm EST M-F at (888) 818-7728. We look forward to hearing from you!

Tags: , , , ,

Comments


Posted By

Hi DIYers! We hope you had a great Mother's Day weekend. Last week, our video team put up a bunch of new videos, 9 to be exact. All were posts on Thursday and Friday. We love helping users get the most out of their alarm systems and smart home networks. Let's take a look at the new videos!

Updating the Firmware on a Lyric Alarm System's SiXFOB

Jarrett kicks things off by showing you how to update the firmware for a Honeywell SiXFOB Key Fob. This key fob is designed exclusively for use with the Honeywell Lyric Controller. Unlike most SiX Series devices, the SiXFOB needs to receive firmware updates manually. The Lyric should be running the latest firmware version before performing the update. Updating the firmware for the SiXFOB will ensure that it works as effectively as possible. Updating the firmware will affect any zones associated with the SiXFOB.


Including a Schlage Z-Wave Lock

The ever friendly and helpful Joe shows you how to include a Schlage Z-Wave Lock into your local Z-Wave network. Pairing your Z-Wave lock is necessary for getting the most out of the device. You need to do this to control the lock remotely and to use it with smart scenes. Pairing a lock with an alarm panel is often a great option. You can then use it with an interactive service platform like Total Connect 2.0 or Alarm.com. Please note that you will need a monitoring plan with access to one of these services.


Excluding a Schlage Z-Wave Lock

Joe helps you some more by showing how to exclude your Schlage Z-Wave Lock from a Z-Wave network. This is an important step if you plan to transfer the lock from one Z-Wave hub to another. You should also do this before completing the initial pairing process. Many Z-Wave smart home devices are paired with Z-Wave networks before they even leave the factory for testing purposes. Clearing the lock first will ensure that you can pair it successfully.


Adding a Siren to the Qolsys Hardwire 16-F

Joe is back again, and this time he's gonna show you how to add a siren to a Qolsys IQ Hardwire 16-F. This is a wired to wireless converter that allows you to use hardwired sensors with a wireless 319.5 MHz system. The module was specifically designed with the Qolsys IQ Panel 2 Plus in mind. What's unique about the Qolsys IQ Hardwire 16-F is that it includes siren terminals and a built-in siren relay which can be controlled wirelessly by the panel. No external relay is needed for the connected siren, as long as the Qolsys IQ Panel 2 has a hardware RF PIC version 11.1.4 G2 or higher.


Powering the Honeywell Vista-20P

If you just can't get enough of Joe, then you're in luck! He will show you how to provide power to your Honeywell VISTA 20P Hardwired Security System. The panel receives power through two sources. Its primary power source is a plug-in transformer, specifically the Honeywell 1321. If the electricity goes out, then the system can remain powered on through its backup battery. We recommend using an UltraTech 1240 for this purpose. All of this equipment can be purchased from the Alarm Grid site.


How Alarm Systems Work

Hey look, it's Jorge! He's going to explain how alarm systems work. The centerpiece of every alarm system is the control panel. This panel receives signals from sensors that are used throughout the premises. There are sensors for letting the system know if a door or window is opened, if there is movement in the area, if glass is broken, if there is a fire, or really almost any troubling condition that warrants your attention. The system then responds based on the zone configuration and its current arming state.


The Tuxedo Touch - Not An AlarmNet Communicator

If you think the Tuxedo Touch WIFI is an AlarmNet Communicator, then you are sorely mistaken. Jorge is here to set the record straight and explain that the Tuxedo Touch is not a communicator. It is just a touchscreen keypad used with VISTA Series Systems. The keypad uses WIFI connectivity to transmit Z-Wave home automation signals to and from Total Connect 2.0. But you will still need a separate communicator for connecting your system with the AlarmNet Servers.


Programming Report Codes For a Self Monitoring Plan With Alarm Grid

Let's say you sign-up for a self-monitoring plan with Alarm Grid. Great! But since you are self-monitored, you don't need your system reporting out to a central monitoring station. Jorge will show you how to disable the reporting codes for your system so that it functions properly. This process is only necessary for self-monitored systems that use Total Connect 2.0. You do not need to disable report codes for Alarm.com Systems, since Alarm Grid can do it from their end.


Defaulting a Schlage Z-Wave Lock

Joe returns to tell you how to default a Schlage Z-Wave Lock. By performing a factory reset, the lock will be restored to its factory default settings. This will clear any Z-Wave settings, as well as any codes programmed for the device. You will need to re-add the lock to your Z-Wave network. You should check the programming sticker on the lock to find the default user codes. The programming sticker is found underneath the device's main cover.

Tags: , , , , , , ,

Comments


Posted By

Great news DIYers! The Total Connect 2.0 Service used with Honeywell and Resideo Alarm Panels now supports If This, Then That, otherwise known as IFTTT. This is huge for TC2, as a plethora of new integrations and features are now possible! TC2 users can visit this page to get started.


As you may know, Total Connect 2.0 is an interactive service platform used with Resideo Alarm Systems. The service can be used with any compatible panel that has an AlarmNet Cellular or IP Communicator installed and activated. Once a user has a Total Connect 2.0 account, they can access the platform through the Total Connect 2.0 website or through a mobile app on their Android or iOS device.

Accessing TC2 allows an end user to perform various system functions. These functions include Arming and Disarming their system, checking current system status, controlling connected Z-Wave smart home devices, viewing connected Resideo IP Cameras and more. The end user will need an active monitoring plan that includes access to the TC2 platform. Users who are not currently monitored should check out our monitoring page for more information about alarm monitoring service.

It was already possible to use Total Connect 2.0 to trigger security system and Z-Wave actions based around certain predetermined events and time schedules. But IFTTT support adds a world of new possibilities. Thanks to IFTTT, end users can now quickly and easily integrate peripherals like Lutron Smart Lights, Sonos Speakers, Phillips Hue Lights, Roomba devices, Rachio Sprinklers, MyQ Garage Doors, Somfy Blinds and more.

IFTTT works by using Triggers and Actions. Basically when a certain "Trigger" occurs, an "Action" will follow. Currently, IFTTT only allows TC2 "Triggers" caused by changing the arming status of your system, or an alarm event on your system. We are hopeful that IFTTT will allow specific sensor triggers sometime in the future. Additionally, IFTTT can be used to create Triggers based on date & time or a predetermined schedule. The Action that follows a Trigger could be something like telling your Sonos Sound System to start playing music, your Lutron Lights to all turn off, or your Rachio Sprinkler System to start watering the grass.

What's great about IFTTT is that it is ultra-customizable and offers nearly any possible combination of connected devices and responses. You can have multiple Actions corresponding to the same Trigger, or multiple Triggers to cause the same Action. And despite being extremely intricate in terms of possible combinations, creating individual commands in IFTTT is actually quite easy. We are sure that end users will love this new integration and the ease of use that it provides.

We expect to release new content in the near future to help users get started with IFTTT for TC2. This will likely include all-new FAQs and videos designed to walk users through the process of creating new Triggers and Actions for use with their Resideo Alarm Systems and their connected smart devices. Stay tuned for more content coming soon!

For now, if you want to learn more about IFTTT and how it can be used with TC2, the best way is to reach out to us. We recommend sending an email to support@alarmgrid.com with your question or concern. We will check your email at our earliest convenience and respond back as quickly as possible. If you prefer to call us, you can do so at (888) 818-7728 during our normal business hours of 9am to 8pm EST M-F. We look forward to hearing from you and helping you learn all about IFTTT.

Tags: , , , , , , , , , , , , , , , , ,

Comments


Posted By

Hi DIYers! Last week was interesting for us, as we scrambled to get up some new content by the end of the week. We managed to upload seven new videos. This includes five from Joe, who was this week's MVP. We hope that you enjoy our latest videos and how they help you use your equipment.

Viewing an ADC-SVR122 Remotely

Joe explains how users can view video footage stored on an Alarm.com ADC-SVR122 Stream Video Recorder remotely. The ADC-SVR122 stores footage so that it can be viewed on Alarm.com. The footage can be viewed from Alarm.com, both through the website and through the mobile app. The ADC-SVR122 will need to be integrated with the user's Alarm.com account for this to work. The integration must be done from the Alarm.com website by choosing the option "Add Video Device". Up to eight (8) Alarm.com Cameras can be used with a single ADC-SVR122.


Excluding a Kwikset Z-Wave Lock

Joe teaches users how to exclude a Kwikset Z-Wave Lock from a Z-Wave network. There are a few different instances when you may want to exclude a Z-Wave lock. This step is important to perform before trying to the device to the network. Even if the lock is brand-new, it may have been previously paired with a network for factory testing purposes. You might also try excluding a lock and then re-adding it to the network as a possible troubleshooting step.


Factory Defaulting a Kwikset Z-Wave Lock

Joe demonstrates how to factory default a Kwikset Z-Wave Lock. Performing a factory reset is normally performed when a user inherits the lock from someone else and they want to start fresh with factory default settings. A user may also perform a factory default as a last ditch method for troubleshooting the device. Performing a factory default will clear all programmed user codes and remove all Z-Wave settings. The lock will need to be re-enrolled after performing the default.


Including a Kwikset Z-Wave Lock

Joe covers the process for including a Kwikset Z-Wave Lock into a Z-Wave network. This requires a Z-Wave controller or hub. By pairing a Z-Wave lock, you will be able to control it remotely from an interactive service platform on your smartphone. This is great if you ever need to let someone inside your home while they are away. You can then remotely lock the device after they leave. Z-Wave devices can also be set to activate based on a schedule or with certain predetermined events.


Glass Break Simulators

Joe talks about glass break simulators and how they are used. These devices will produce a sound that is specifically designed to activate glass break detectors. This is great for testing glass break sensors and making sure that they are detecting sounds and working properly. Most security equipment manufacturers have their own glass break simulators that they recommend for use with their equipment. Alarm Grid offers three (3) glass break simulators, which are the Honeywell FG701, the DSC AFT-100 and the Interlogix 5709C-W.


Carbon Monoxide Sensor Notifications from a Lyric via Apple HomeKit

Jorge discusses why a user will not receive specific carbon monoxide sensor notifications from Apple HomeKit when the CO sensor is used with their Lyric Alarm System. When HomeKit is used with the Lyric System, HomeKit will only provide specific notifications for burglary and intrusion zones. HomeKit will not provide specific alerts for life-safety zones. Instead, the user will only receive a General Lyric System Alert. That is why it is important to use Total Connect 2.0 alongside HomeKit. Unlike Apple HomeKit, Total Connect 2.0 will let you know exactly which zone was faulted, regardless of Response Type.


Programming Options Accessible Via Installer Code on the Lyric Alarm

In his triumphant return, Jarrett explains the programming options that can be accessed from the Installer Tools Menu on the Honeywell Lyric Controller. This menu is accessed using the system's Installer Code, which should be kept at its default of 4112. The Installer Tools Menu offers many options that allow the user to make changes to the system settings. This includes adding new sensors and configuring the communication path settings for the panel. You can also access Installer Tools to perform a factory default or to reset the Master Code to 1234.

Tags: , , , , ,

Comments