Home Security Blog

Posted By

Alarm Grid is starting off your week right with a pair of new weatherproof mounting boxes now available on our website. We have the Potter PL-BBK1 and the Cooper Wheelock WBB available for purchase right now. These convenient mounting boxes are great for protecting sirens and strobes.

These so-called "bell boxes" are used to secure and contain sirens and strobe lights and protect them against environmental damage from rain, wind, UV light, dust, and other unfavorable outdoor hazards. You have likely seen them used with fire alarm equipment, and these are typically considered as fire-safety products.

Both of our new offerings provide a tough, rugged plastic construction that will keep any internal sirens, sounders, and strobes active and operational for a very long time. Depending on the jurisdiction your location is in, or the type of system you have, you may be advised to purchase the Potter PL-BBK1, which comes in red. This red color may be required for your installation as part of fire code mandates. Meanwhile, the Cooper Wheelock WBB does not come in red, but rather it is solid in White (WBB-W) and Silver (WBB-S) variants.

Beyond color, the only other difference you will likely notice between these products is their size. The Potter PL-BBK1 measures 5.6"L x 4.3"W x 1.9"D, while the Copper Wheelock WBB has dimensions of 4.1"L x 4.1"W x 2.1"D. The difference isn't that pronounced, but the PL-BBK1 is unmistakably larger. Of course, you should go with whichever one is better-suited for your installation. You may want to check with your local fire marshal if the application involves fire safety.

We have been putting out quite a few new products lately! Remember late last week we announced that the Honeywell Home PROA7 and the Resideo PROA7C are now both available for purchase. Is there any product that you're dying to see on the Alarm Grid site? Or are you wanting to learn more about our monitoring services? Leave a comment down below with your requests. We look forward to hearing from you!

Tags: , , ,

0 Comments


Posted By

We are happy to announce that the Honeywell Home PROA7 and the Resideo PROA7C are now available. You can consider these as entry level versions of the Honeywell Home PROA7PLUS and the Resideo PROA7PLUSC.

The best way to think of the PROA7 and PROA7C is that they are the PROA7PLUS without a Honeywell Home PROWIFIZW, no Bluetooth capabilities, and no front panel camera. It's the same as the PROA7PLUS, just with no WIFI, no Z-Wave, no optional automatic Bluetooth disarming, and no disarm photos. You can always add the PROWIFIZW Module later on to add WIFI and Z-Wave Plus, but Bluetooth and the front camera can never be added. Basically, you will always be working with a lesser version of the PROA7PLUS.

If you want to get a PROA7 or PROA7C monitored, then you will need to add a PROWIFIZW Module and/or one of the compatible LTE cellular communicators, which are the Honeywell Home PROLTE-A AT&T LTE Communicator and the Honeywell Home PROLTE-V Verizon LTE Communicator. Getting the system monitored will also allow you to use Total Connect 2.0 to control the system remotely, provided that access to the service is included with your monitoring plan.

Remember that since the ProSeries System does not yet support local end-user programming, you will not be able to enroll any sensors with the PROA7 or PROA7C until you get it monitored. The Honeywell Home PROSIX and Honeywell SiX Series Sensors return as compatible encrypted peripherals for the systems, and you can also add a Honeywell Home PROTAKEOVER Module for legacy RF sensor support.

Any one of several older manufacturer's sensors can be used with the PROTAKEOVER Module. These include Honeywell 5800 series, 2GIG 345 MHz (non-encrypted), Qolsys/Interlogix 319.5 MHz, DSC, and Bosch which both use a variation of 433 MHz. Up to 250 zones in total can be used with the PROA7 or PROA7C.

As you may have guessed, the only difference between the Honeywell Home PROA7 and the Resideo PROA7C is that the PROA7 says "Honeywell Home" across its front, while the PROA7C says "Resideo" across its front. Other than that, they really are the same panel. Which one do you like more? Let us know in the comments down below. And remember to reach out to us with any questions you might have. As always, we look forward to hearing from you!

Tags: , , , , , , ,

0 Comments


Posted By

Total Connect 2.0 users may have recently noticed some Push Notifications showing that certain events originated from "[External] ApiGee". This is the result of an integration that Resideo is configuring. These alerts usually originate from a third-party integration.


Resideo, also known as Honeywell Home, is constantly working to improve the user's Total Connect 2.0 experience. They're working in the background to implement suggested improvements provided by both customers and alarm dealers. ApiGee appears to be one of those integrations. We don't have any details about what expanded features this may include, but the work they are doing in the backend has caused a few odd Push Notifications to be generated.

In most cases, we've seen these push notifications associated with using Alexa in conjunction with the Total Connect 2.0 skill. You probably noticed if you are using Alexa to access and control your system that when you enabled the TC2 Skill you had to provide your Total Connect 2.0 Login and Password. This creates what's called a server-to-server integration. Once the skill is enabled and proper login credentials have been entered, you'll see an option to enable the skill for the alarm panel and automation devices and then the skill is ready to go. If you have multiple locations being used with a single TC2 login you'll only be able to select one location to access using this particular Alexa account.

When you ask Alexa, for example, "Alexa, ask Total Connect 2 what the status of my alarm system is." The server at Amazon uses the credentials you provided at the time you set up the skill to actually log into Total Connect 2.0 and query the system status. This, of course, happens very quickly. Currently, this log-in appears to sometimes be viewed as a user logging in and is therefore triggering a push notification. This will only happen if you have Administration type notifications enabled. Administration notifications include Login, Logout, Login Instlr-Read Only, and so on. However, rather than Alexa's access being logged as the person whose credentials were used for the integration, it is instead being logged as [External] ApiGee.

At the time of this writing, March 3, 2021 at around 6:00 pm, it appears the issue with push notifications may have been resolved. We attempted to cause one of these notifications so that we could obtain a screenshot, but we were unable to do so. It appears that in the Activity screen if you select the icon to Show Admin Logs at the top, you will still be able to see these events being logged. The Admin Logs is the screenshot shown at the top of this post. It's probable that these events are meant to show up here, but were never meant to produce a push notification. Hopefully, this relatively minor issue has been resolved, and whatever this new feature may be, it will be available soon.


Tags: , , ,

0 Comments


Posted By

If you have been keeping up with the Alarm Grid blog, then you have likely seen us discussing Alarm.com Doorbell Cameras at some point or another. Today, we're breaking down the three (3) most popular options of doorbell cameras for Alarm.com to help you determine which one is best for you.


The three Alarm.com Doorbell Cameras we will be discussing today include the Alarm.com ADC-VDB770 Video Analytics Doorbell Camera, the SkyBell Slim Line II 720p Doorbell Camera, and the SkyBell Round 1080p WIFI Doorbell Camera. While we can straight away say that the ADC-VDB770 is the premium option here and offers the most impressive features, some users might not need such a loaded device, and they might instead prefer one of the other options. But if you want a quick and dirty answer as to which doorbell camera is the "best", then most security experts are going to steer you towards the ADC-VDB770. Still, there are so many avenues to explore here, that it's really worth looking at the devices from an in-depth perspective.

Before diving into the specifics of each Alarm.com Doorbell Camera, it important to understand one key aspect. Unlike regular Alarm.com Security Cameras, you do not need a true video monitoring service plan to use one single Alarm.com Doorbell Camera device on your Alarm.com account. This is great news for Alarm Grid Gold Plan members with access to Alarm.com, because you can add a single doorbell camera to your account, without having to upgrade your monitoring plan. There are some video "clip limits" to keep in mind, but most users rarely find them to be an issue.

If you go with the Alarm.com ADC-VDB770, you will get 1,200 monthly and 1,200 total clips. For the other doorbell options, it's just 400 monthly and 400 total clips. Most users find 400 to be plenty and they are rarely in danger of reaching their limit. But getting 1,200 clips with the ADC-VDB770 can be a nice bonus. For more information on Alarm.com Clip Limits, please review this FAQ. Please note that if you do use doorbell devices in conjunction with a true video monitoring plan, then each doorbell will count as a full Alarm.com Camera, with its clips counting towards the monthly limit.

One last thing we want to say is that each of the three (3) doorbell cameras we will be discussing today has its own omni-directional microphone, and you will be able to use the device for two-way audio when configured with Alarm.com. This is universal across all three (3) devices, as is getting push notifications to your phone, so we figured we would address that aspect before getting into the individual specifications.

Now, with that out of the way, let's start actually discussing the devices in-depth. We will start with the Alarm.com ADC-VDB770.

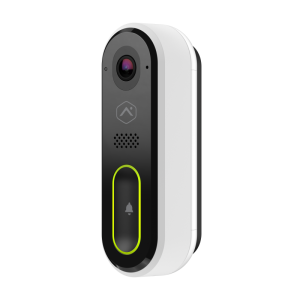
If we're looking purely at recording capabilities, the Alarm.com ADC-VDB770 is the clear winner here today, It offers a live recording resolution of up to 1440x1920, though the resolution will often be turned down to prevent any lags or disruptions on a live camera stream due to upload bandwidth requirements. Recorded clips are also available in 1440x1920 resolution. The camera's field of view (FoV) is also quite impressive, at 150° Vertical, 115° Horizontal. It's also the only Alarm.com Doorbell Camera with High Dynamic Range (HDR). Alarm.com also says that it offers "rapid people detection" and a "premium build quality". Infrared (IR) Night Vision ensures that the camera works well in the dark.

But there are a few intangible considerations with the Alarm.com ADC-VDB770 that aren't necessarily factors with the other doorbell cameras shown here. First, the Alarm.com ADC-VDB770 is often marketed for its ability to be used as a "touchless doorbell". You can add on accessories like a "Do Not Touch" Cover, and a "Stand On Mat To Ring Doorbell" Door Mat. It really changes your experience in using and interacting with the device. Of course, you don't have to set up the device this way, you can keep its doorbell button exposed and fully functional. But in the wake of the COVID-19 Pandemic, the need for a "touchless" product makes sense.

The ADC-VDB770 is also the only Alarm.com Doorbell Camera at the time of this writing in March 2021 that supports any form of Alarm.com Video Analytics. To be clear, the ADC-VDB770 is compatible with a very limited form of Video Analytics, in which there can only be one Video Analytics recording rule per device. There can only be one (1) Ground Zone recording rule, and only "People" can be set as the trigger. The camera does not have a motion detector, and you are required to set up Video Analytics to get the camera to function how you want. This is where the "rapid people detection" feature comes from.

One interesting "quirk" for the ADC-VDB770 is that it actually has a noticeably more narrow operating temperature than the other doorbell camera devices we will soon be discussing. For cold weather, the ADC-VDB770 is only safe down to -22°F, unless you obtain the "cold weather collar" accessory (sold separately), which will bring the low-end operating temperature down to -40°F. We've never heard of a "temperature collar" for any security system equipment before, but sure enough, the Alarm.com ADC-VDBA-TC is a real thing. The other doorbell cameras do not have an equivalent "collar". They just work in the colder -40°F without an add-on. Meanwhile, on the other end for "hot" temperatures, the ADC-VDB770 Doorbell Camera is listed at a surprisingly low 104°F. We know that many users live in areas where it regularly gets hotter than that. For that reason, you may want to be a bit wary of the device's operating temperature. Meanwhile, the other two doorbell cameras have "higher" operating temperatures of 122°F and 140°F, respectively. You shouldn't run into many issues there. But 104°F may have you sweating as you wonder if your doorbell camera investment can withstand the heat of a hot summer day.

In our experience, we have seen most customers who get the Alarm.com ADC-VDB770 ultimately have good success setting up the Video Analytics feature, and they are highly satisfied with the device's overall performance. But there are some users out there who simply don't care for the fine-tuning and precision setup that comes with Alarm.com Video Analytics.

These users just want a simple doorbell camera that interfaces nicely with their smartphone. Visitors can press the button to ring the doorbell or it also has a passive infrared motion detector that, if enabled, tells the camera when to start recording because someone has walked into the viewing area. If that is the case for you, then we're sure you will be very happy with one of these two (2) alternative options to the leading ADC-VDB770.

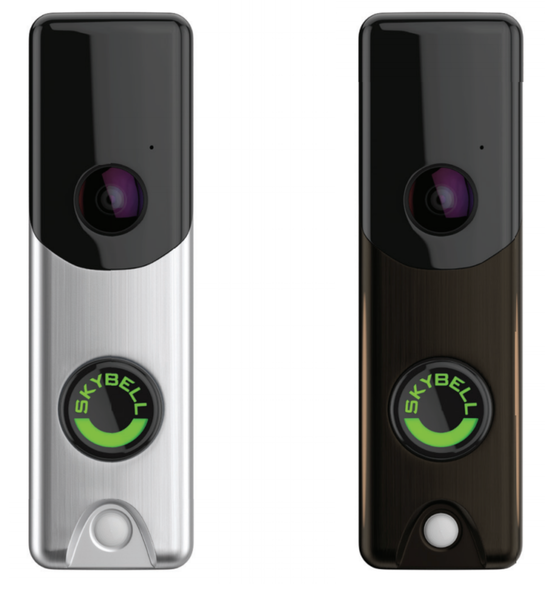
The SkyBell Alarm.com Slim Line II Doorbell Camera, also known as the ADC-VDB105X (Satin Nickel) or ADC-VDB106X (Bronze), certainly makes a compelling argument if you are just wanting something slightly more basic but effective as a doorbell camera. We often see this with Alarm.com equipment. Their premium line is fantastic, but then one step below it they have a more "entry-level" option that is actually quite excellent in its own right. And that's really the case with the SkyBell Slim Line II Doorbell Camera. It's a great entry-level doorbell camera, overshadowed by the flashy, high-tech offerings of the ADC-VDB770.

With the SkyBell Alarm.com Slim Line II, you only get 720p live-streaming, and 720p recorded footage. Again, the live-streaming quality can be toned down to adjust for low-bandwidth and whatnot, but 720p is where it maxes out. This is still very clear footage, and you can pair it with the camera's wide field of view (170° Horizontal, 110° Vertical) for some truly excellent results. And you still get features and functions like push notifications on your phone regarding doorbell camera activity. Plus, you get the same great IR night vision capabilities. Overall, you aren't losing out on too much by going with the Slim Line II, so certainly consider it as a viable option. And you can't go wrong with that simple, yet modern rectangular slim design.


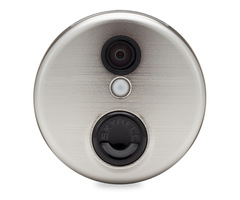
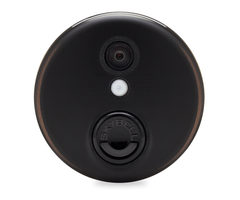
Last up, we'll discuss the Alarm.com Round SkyBell, also known as the ADC-VDB101 (Satin Nickel) and the ADC-VDB102 (Bronze). Honestly, there's not much reason to choose this model over the Slim Line II, unless you're particularly fond of the round design. The round model can also achieve a higher live video resolution (1080p vs 720p), though it is still limited to 720p for recorded clips. The camera of the round model offers an impressive 180° Field of View, and the night vision recording range is still about 15 feet in full color. This one doesn't use IR for night vision, so the more ambient light in the area, the better the nighttime images will be. Just like before, you can get push notification doorbell camera alerts on your phone, which is the main benefit of these devices.

Here is a breakdown of the doorbell cameras:


ADC-VDB770
Slim Line II
Round
Image(s)


Video Analytics
- (1) Ground Zone Recording Rule.
- Only "People" Set As Trigger.
None None
Motion Detection
From Video Analytics PIR PIR
Touchless Functionality
Yes (Cover & Mat Sold Separately) No No
Streaming Video Resolution
Up to 1440x1920 Up to 720p Up to 1080p
Recorded Video Resolution
Up to 1440x1920
Up to 720p Up to 720p
Horizontal Field of View
115° 170° 180° w/ auto-scaling
Vertical Field of View
150° 110° 180° w/ auto-scaling
High Dynamic Range (HDR)
Yes No No
Night Vision
Infrared (IR) ~15 Feet Infrared (IR) ~15 Feet
Full Color ~15 Feet
Microphone for Two-Way Audio
Omni-Directional Omni-Directional Omni-Directional
Power Requirements

16-30VAC, 10VA

15VDC, 8W (533mA)

10-36VAC, 10VA

12VDC, 0.5-1A

10-36VAC, 10VA

12VDC, 0.5-1A

Operating Temperature
-22°F to 104°F
-40°F to 104°F (w/ Temperature Collar)
-40°F to 122°F
-40°F to 140°F
Operating Humidity
Less than 95% RH, Non-Condensing 10% to 80% RH 0% to 100% Condensing
Clip Limits w/o Video Monitoring Plan
1 Video Doorbell Device Per Account.
1,200 Monthly Clips
1,200 Total Clips
Cannot Increase w/o Video Plan.
1 Video Doorbell Device Per Account.
400 Monthly Clips
400 Total Clips
Cannot Increase w/o Video Plan.
1 Video Doorbell Device Per Account.
400 Monthly Clips
400 Total Clips
Cannot Increase w/o Video Plan.

Have you used any of these doorbell cameras with Alarm.com? Please let us know about your experiences in the comments section below. Also, let us know if there are any other Alarm.com features you would like us to cover in a future blog post. We look forward to hearing from you!

Tags: , , , , , , , , , , ,

0 Comments


Posted By

We have added some new products to the Alarm Grid website. These include two (2) additional polycarbonate plastic enclosures for safely storing and protecting alarm system equipment, plus a convenient mini piezo electric sounder for boosting keypad volume. Let's check out these products!

First up we have two (2) new polycarbonate protective enclosures from Mier, including the Mier BW-BWL1086 (10"L x 8"W x 6"D) and the Mier BW-SL14126C (14"L x 12"W x 6"D). You may recall the two (2) similar polycarbonate enclosures from STI that we discussed last week. These new offerings from Mier essentially accomplish the same thing, but we wanted to give our customers even more great options to choose from. Polycarbonate enclosures are great for protecting any wired to wireless converter modules and wireless receivers that may not function properly in a traditional metal enclosure. Polycarbonate enclosures are also safe to use outdoors, and they are a great option if you need to set up equipment in an area where it will need to withstand outside elements. This includes protection against harmful UV rays. Please note that the Mier BW-SL14126C is translucent and see-through for easy monitoring of interior LED lights. But the Mier BW-BWL1086 is opaque and not see-through. Keep that in mind if you decide to purchase.

Alarm Grid also now offers the Amseco PAL-328N. This is a small, but very versatile piezo-electric sounder that can be used with an operating voltage ranging from 3VDC to 28VDC, while only drawing 20mA of current. Applying more voltage will increase the maximum volume of the unit. If you only provide the minimum 3VDC, then the volume will be about 68 dB. But as you increase the voltage up to 28VDC, then the max volume raises to beyond 100 dB. While you probably won't use the Amseco PAL-328N as a siren, you can configure it on many panels to mimic some keypad sounds to increase the volume of those sounds. This can be very helpful for ensuring that you hear any Entry and Exit Delay sounds produced by your system's keypad. This can also be good for increasing the volume of system zone faults and chimes. We have seen the Amseco PAL-328N work great with wired systems, and it can also be used very nicely with many wireless all-in-one alarm panels, including the Honeywell LYNX Touch Systems. If you have been looking for an easy way to increase the sound of certain keypad sounds, then this might be the solution you need.

Do you have any products you want to see added to the Alarm Grid website? Please comment below and let us know. You might just see it in a future update. Stay tuned to our blog for more security news and updates from Alarm Grid, and we'll see you next time!

Tags: , , , , ,

0 Comments


Posted By

Alarm.com announced that they are planning to release a firmware update for the Alarm.com SkyBell Slim Line II Door Bell Cameras. This includes the ADC-VDB105X (Satin Nickel) and the ADC-VDB106X (Bronze). These devices will be updated through an automated overnight FW upgrade process.


You may recall us announcing the release of the Alarm.com Slim Line II Doorbell Cameras just a few weeks ago. It's no surprise that Alarm.com is now working to improve the doorbell camera with a convenient firmware update. While the new update, Version 4083, doesn't include anything too earthshattering, it is still strongly recommended for all users. You won't need to take any special action to have the update applied. Just have your ADC-VDB105X or ADC-VDB106X online and set up with your Alarm.com account. Your doorbell camera will be updated sometime in the coming weeks as part of the overnight updating process. Please note that some of these devices will be automatically updated to an intermediate firmware, Version 4081, before ultimately being updated to the advertised Version 4083.

As we mentioned before, Version 4083 doesn't include anything too noteworthy. The biggest benefit is the new version will do a more effective job of enhancing brightness in shots with dark foregrounds and bright backgrounds. This can be very important if you have noticed that your Alarm.com SkyBell Doorbell Camera was struggling to produce clear shots during certain times of the day. There is no charge for this automatic OTA update, and no action is needed on your part. Just be patient, and remember that it may take a few weeks for the update to reach your particular SkyBell Doorbell device.

This update is for the Slim Line II Alarm.com SkyBell devices only. If you have the older ADC-VDB105 or ADC-VDB106 (no X in the SKU), then this update is not for you. Additionally, if your ADC-VDB105X or ADC-VDB106X is not online when the update is originally pushed down, then you can always have your monitoring company apply it later on by pushing it down manually. You can check the installed firmware for your device by logging into the Alarm.com website (not the mobile app), and choosing Video > Video Device Settings > select the device using the dropdown > Video Device Info. Customers can request the update themselves by choosing Update Firmware next to the displayed Firmware Version on the Video Device Info page.

Tags: , , , , , , , ,

1 Comment


Posted By

We have some exciting news from Alarm.com. The latest version of the Alarm.com Mobile App for iOS (Version 4.18) will make your enrolled smart locks compatible with Siri Shortcuts. This means that you will be able to control your smart locks with spoken voice commands. How convenient!


If you aren't familiar with Alarm.com Siri Shortcuts, they represent an innovative way to control your system and its integrated accessories using spoken voice commands. Each command is customized so that it performs the exact actions you want. Siri Shortcuts are available for iOS 12 and higher, so make sure your iOS device is on a high enough version before trying to set them up. We very strongly recommend reading this post from a couple years prior to refresh your memory on Siri Shortcuts and how they can be used. Overall, we think the Siri Shortcuts feature serves as a nice alternative to Apple HomeKit, which isn't compatible with Alarm.com or its associated security systems.

From what we can tell, the only way that a Siri Shortcut could control a smart door lock prior to Alarm.com iOS Version 4.18 was to do so indirectly through a smart scene. In other words, the user must create a smart scene that tells a door lock to LOCK or UNLOCK, and then create a customized Siri Shortcut to run that smart scene. Of course, a user would need separate scenes for LOCKING and ULOCKING, and they would need different scenes for each individual lock if they wanted complete control over their entire network of door locks. But with the update in iOS Version 4.18, smart lock control is made much more convenient and more easily accessible.

Thanks to the update, users can now create Siri Shortcuts that deal with locks directly, rather than being part of a smart scene. Each Siri Shortcut can control a single door lock, or a user can control all their locks at the same time with one single command. For a single lock, it's as simple as asking Siri to LOCK or UNLOCK a door based on the name of the lock. For example, you might say,

  • "Hey Siri, UNLOCK the FRONT DOOR."
  • "Hey Siri, LOCK the BACK DOOR."

Or if you wanted to control multiple doors,

  • "Hey Siri, LOCK all the doors."
  • "Hey Siri, UNLOCK every door."

Keep in mind that this door lock control for Siri Shortcuts is being made available in Alarm.com iOS Version 4.18. This update isn't available quite yet, but we expect it to be released in the coming days. At the time of this writing, the newest iOS Version we see is 4.17.3. You can check the version you're running by logging into the Alarm.com iOS App, and then choosing the Menu button (three horizontal bars) in the upper-left corner, and then selecting About in the bottom-left, and then About Alarm.com. The App Version will be displayed in white text across the top orange bar.


Remember to check the Apple App Store for the release of Alarm.com iOS App Version 4.18. Then open Settings within the Alarm.com Mobile App to access Siri Shortcuts. That is where you can enable the "Share Activity with Siri" settings and build customized Siri Shortcuts for use with your door locks. Remember that you can only control door locks that are enrolled with your Alarm.com account. Z-Wave door locks work great for this, and we have plenty of options available for purchase on our site if you are looking to get started.

Remember to check out our monitoring page if you are interested in starting monitoring service for access to Alarm.com. And please don't hesitate to reach out to us if you need help getting started with Alarm.com Siri Shortcuts for door locks. We're here to help you get the most out of your door locks and your Alarm.com service.

Tags: , , , , , , , , , , , , ,

0 Comments


Posted By

If you have a hardwired security system with wired sensors, then it's likely you have set up some End Of Line Resistors (EOLRs) with your equipment. Today, we're taking a quick look at these pieces of equipment to explain how they get their name and why they're important for your system.


The simplest way to understand resistors (end of line or otherwise) is that they reduce the flow of electrical current. These devices have many potential uses, but today we will be focusing on how they are used with wired alarm systems to supervise connected sensors. Basically, the presence of an End Of Line Resistor tells a system that no sensors have been tampered with on a zone.

On a wired alarm system, you may have many hardwired zones. If you look at a single wired zone, there can be multiple sensors of the same or similar type connected to it, all in a line. From the alarm panel input moving outward, you will find the first sensor in the line, then the second sensor, and so on, until you reach the final sensor. That sensor is the end of the line. At that last sensor, you will have the end of line resistor (EOLR).

The reason why you have the resistor at the end of the line is because cutting any of the sensors leading up to the last sensor will cause the system to lose track of the EOLR. Basically, by putting the resistor at the very end, the system knows that all the sensors leading up to it are still in-place. The entire line, the entire series, if you will, has its current slowed, or resisted, by the EOLR. Once you either remove any of the connected sensors or attempt to short out any of them, current will then stop flowing through the circuit. The system will detect this and know that, at somewhere in the circuit, something has been tampered with, and the user needs to be informed.

Remember, this is also how the zone works normally. In a circuit where the sensors are normally closed and the EOLR is wired in series at the end of the line, opening a sensor, such as when you open a door, also prevents the system from seeing the resistor, which is what causes the zone to display a fault condition. In most cases, burglary zones will only show a fault when a zone has been tampered with. Rarely will they cause a trouble condition, though in some cases, it is possible to configure a zone especially for this type of behavior.

In many cases, resistors are actually installed at the terminals on the panel. The reason this is a bad idea is that when the resistor is at the panel, a burglar could put a short across any point in a normally closed zone, and the only way the user would be able to detect it would be if they noticed that a particular point on the zone was open, a window for example, and should have been showing a fault, but that no fault was actually being displayed on the keypad. If this happened on your system, would you take notice right away? Granted, this assumes the burglar had access to the system while it was disarmed, and was able to set this up in advance.

The above scenario would imply that the protected premise is a business or a home with a good deal of service personnel coming in and out. We use this scenario just to illustrate why proper resistor placement is so important. This same vulnerability exists on hardwired zones that are programmed as normally closed, or normally open. Though with a normally open zone, the intruder would cut the circuit anywhere between the panel and the first sensor, rather than shorting it.

It should be noted that an EOLR will be wired according to the behavior of the zone type. That is, an EOLR will be wired in Series (in line) for a Normally Closed (NC) zone, or it will be wired in Parallel (across) for a Normally Open (NO) zone. Keep that in mind when configuring the EOLRs for the different zones on your alarm system. And if you have a zone without any connected sensors, then you can still have a resistor at the end of the line, but that "end of line" would just be across the zone terminals themselves. This is a good practice in order to keep up with any unused resistors, in the event that you want to add a supervised wired zone to the system at a later time.

We hope that this quick lesson in end of line resistors may be helpful to anyone who is new with alarms, and perhaps working with a wired alarm system or wired sensors for the first time. If you have any questions about setting up a wired security system, or if you are hoping to learn more about Alarm Grid monitoring services, please send an email to support@alarmgrid.com. We're here to check your emails from 9am to 8pm ET M-F. We look forward to hearing from you!

Tags:

0 Comments


Posted By

One product that we have yet to discuss in great detail is the Honeywell Home PROINDMV Indoor Motion Viewer. This is a very promising accessory for PROA7PLUS users, especially those who are looking for a more affordable alternative to Honeywell IP Cameras and true video surveillance service.


If you are familiar with image sensors, then the Honeywell PROINDMV Indoor Motion Viewer is exactly that, plus a bit more. It is part of the Honeywell Home PROSIX Lineup of wireless sensors, so perhaps PROSIXINDMV would have been a more appropriate name. But nomenclature aside, this is a very handy and useful sensor for anyone with a PROA7PLUS Alarm System, especially if your monitoring plan doesn’t include video surveillance, and you are looking to keep your monitoring costs down.

You can think of the PROINDMV as a PIR motion detection sensor, combined with a video camera. It should basically be treated as an interior motion. If its PIR sensor is triggered while the PROA7PLUS System is Armed Away or Armed Night with the PROINDMV listed as active, the system will go into alarm, and the PROINDMV Camera automatically produces either a 10-second video clip or a still-motion image. The clip or image is made available at the PROA7PLUS Panel under the Camera Log, and it can also be seen on Total Connect 2.0. We expect that an update allowing the image or video clip to be automatically forwarded to the central station will be made available sometime in the not-too-distant future. The PROINDMV will also produce an image or video clip if its PIR is tripped during the Entry Delay Period, but in that case, the image or video clip will be held, and only sent out if the system isn’t disarmed in time and ultimately enters alarm.

The PROINDMV will only capture an image or video clip if it is triggered while the system is Armed Away or Armed Night, or in an Entry Delay Period. At this time, there is no way to request a manual “peek-in” like you can for Honeywell IP Cameras. However, we are hopeful that this feature will be made available in a later update. Anyone with access to Total Connect 2.0 can use at least one (1) PROINDMV. And if your TC2 account includes automation (Alarm Grid Silver Plan or higher), then you will be able to add up to eight (8) PROINVMD devices. Only the ten (10) newest clips or images are available, and they are automatically deleted after thirty (30) days. Images and clips can be sent via IP (WIFI) or cellular.

Overall, we think the Honeywell Home PROINDMV is a great product if you aren’t quite ready to make the leap to full video surveillance with Honeywell IP Cameras and an Alarm Grid Platinum Plan. The video camera records in 10 frames per second (FPS), so it isn’t anything too fancy. But it’s certainly good enough for verifying alarms and identifying suspects in a true break-in event. The PIR sensor covers more than 39 feet by 54 feet, with a 90° detection angle, making it suitable for large rooms in your home or business It even offers Pet Immunity for small animals weighing up to 80 lbs, provided that you follow the mounting guidelines. It will be nice for Resideo to finish making all the features available, as the lack of a “peek-in” is sorely missed. We also eagerly await the ability for clips and images to be automatically forwarded to the central station, as that is very important for alarm verification in certain jurisdictions.

You can purchase the Honeywell Home PROINDMV right now from the Alarm Grid website. Remember, this device only works with the PROA7PLUS ProSeries 7” All-In-One Panel from Resideo and Honeywell Home. We will be sure to keep you updated on this blog as new features for the PROINDMV are made available. We’re sure that Resideo has some great ideas in mind for this device, and looks to be promising sensor. If you have any questions about the PROINDMV Motion Viewer, or if you are interested in alarm monitoring services for access to TC2 so that you can get started with your own PROINDMV, send an email to support@alarmgrid.com. We’re here to check your email from 9am to 8pm ET M-F. We look forward to hearing from you!
Tags: , , , , , , , ,

0 Comments


Posted By

Welcome to the second Alarm Grid video recap of 2021. It has been awhile since our first recap of the year, but we really hope to make this a regular thing like it was before. Technical difficulties have slowed us down, but we're going to be back in the swing of things very soon!


Only two (2) new Alarm Grid videos were uploaded in the past week, both of them on Monday, February 15th. They cover the Alarm.com ADC-T2000 Thermostat and the DSC PG9905 Temperature Sensor, respectively. Both videos featured myself as the actor. We hope to have our other video stars back as soon as possible, but it looks like you may have to settle with just me for the foreseeable future. Expect more videos coming really soon. Anyway, onto the newest Alarm Grid videos!

Setting an ADC-T2000 Back to Factory Default

I show you how to restore an Alarm.com ADC-T2000 Z-Wave Plus Thermostat to its factory default settings. All settings and configurations for the thermostat will be set to the same values as when the device was brand-new and fresh out of the package. You normally only factory default the ADC-T2000 Thermostat if you are selling it or giving it away to someone else. You may also perform a factory reset as a last-resort troubleshooting step if nothing else seems to fix an issue.


Programming DSC PG9905 to Qolsys IQ Panel 2 Plus

I show you how to program the DSC PG9905 Temperature Sensor to a Qolsys IQ Panel 2 Plus Alarm System. If your IQ Panel 2 Plus System is monitored with access to Alarm.com, then you can receive alerts for when your PG9905 Sensor is activated. However, if you set up the zone so that reports are sent out for Alarm.com alerts, then you will only be able to configure the PG9905 zone for either high temperature or low temperature alerts. The only way you can have a single PG9905 alert the system for both high and low temperatures is if you set the zone so that it does not report out to Alarm.com. Any temperature thresholds can be adjusted on the system as desired.

Tags: , , , , , , , , , , , , ,

0 Comments