DIY Security Systems Posts

Posted By

Get ready DIYers! We're here to inform you that next week is the International Security Conference & Exhibition West, more commonly known as ISC West. Our content and video teams will be in Las Vegas, NV to cover all the exciting action and the latest news from the security industry!

Alarm grid inside security stickers

ISC West is the largest converged security industry trade show in the United States. This year's edition runs from Wednesday, April 10th thru Friday April 12th. Our content and video teams will be exploring the massive convention and talking to some of the brightest and sharpest minds in the security industry. We will learn all about the upcoming products and offerings from the industry's leading security and home automation manufacturers - products that you can expect on Alarm Grid soon. And you can be sure that we will keep you posted on all our findings. Expect exclusive pictures, videos, interviews and more, as we bring ISC West directly to you!

From Wednesday thru Friday of this week, you can expect multiple posts per day covering our findings at ISC West 2019. You will certainly want to be checking our blog often, as our goal is to get any important news out quickly. And don't worry if you need help or support during this time! Our support and planner teams will still be at Alarm Grid headquarters to provide you with any assistance you need. Remember, the best way to reach Alarm Grid is to email support@alarmgrid.com. If you need to call us, you can do so at (888) 818-7728 from 9am to 8pm EST M-F. Please don't hesitate to reach out to us, as we love supporting our monitored customers!

Let's get ready for a great ISC West 2019, and make sure to stay tuned for more updates!

Tags: , , , , , , , ,

4 Comments


Posted By

We have learned that Version 5.8.5 of the Total Connect 2.0 Mobile App for iOS has a bug that affects WIFI thermostats. The update leaves users unable to control their WIFI thermostats with the mobile app. However, iOS users can still control their WIFI thermostats through the TC2 website.


Many users have found that upon updating to the latest version of Total Connect 2.0, they have been left unable to operate their WIFI thermostats through the app. This includes any Honeywell Lyric Round Thermostats and any WIFI thermostat that pairs with TC2 through a Total Connect Comfort, Honeywell Home or Redlink integration.

Please note that the bug only affects the iOS version of the Total Connect 2.0 Mobile App. Android users are not affected. Additionally, Z-Wave Thermostats are also unaffected. If you are currently running iOS Mobile App Version 5.8.5, then you can still use the TC2 website to control your WIFI thermostat. You should be able to access the website using the standard web browser on your iPhone or iPad.

We expect that Resideo will release an update to fix this bug in the near future. But it may take some time before this happens. Until then, Alarm Grid monitored customers should reach out to support@alarmgrid.com with any questions. Alarm Grid will provide an update when we learn that the bug has been fixed.

Tags: , , , , , , , , , , ,

0 Comments


Posted By

Hi DIYers! Today, we're taking a look at our best wireless recessed door contacts. These devices are great for when you want sensors that are completely hidden and not visible when the door is closed. They take a little bit of extra effort to install, but it's worth it for many users!

Honeywell 5818mnl wireless recessed door sensor and window senso

When you have a recessed contact, you actually need to drill holes into the door and its frame. The hole in the frame is larger and sized to support the main sensor. The hole in the door is smaller and designed to support the magnet. Some recessed contacts use extremely small magnets that can be mounted without drilling holes. There is also the Honeywell 5800RPS, which uses a plunger switch rather than a magnet.

The key with wireless recessed contacts is knowing which ones are compatible with your system. This depends on the wireless receiver that your system has installed. If you have a hardwired panel with no wireless receiver, then you cannot use wireless sensors. It's really no different than any other wireless sensor. You might also want to know the size of the holes you will need to drill. For your convenience, we put together a nifty table that outlines nearly all of the information you could want:

Sensor Name & Picture
Wireless Frequency
Hole Size for Sensor
Hole Size for Magnet
Notes
Honeywell 5818MNL
Honeywell 5818mnl wireless recessed door sensor and window senso
345 MHz 3/4" Diameter, 3" Deep 3/8" Diameter, 1/2" Deep Honeywell 5800 Series Sensor. Compatible with all Honeywell and 2GIG Panels and 345 MHz IQ2+
Honeywell 5800RPS
Honeywell 5800rps wireless recessed door and window plunger sens
345 MHz 3/4" Diameter, 1.25" Deep None needed! Honeywell 5800 Series Sensor. Recessed plunger switch. Needs inner 1/4" hole in center of existing hole for antenna. Compatible with all Honeywell and 2GIG Panels and 345 MHz IQ2+
2GIG DW20R
2gig dw20r wireless recessed door slash window contact
345 MHz 11/16" Diameter, 2.6" Deep 11/16" Diameter, 1/2" Deep 2GIG 345 MHz Sensor. Compatible with all 2GIG Panels, Honeywell Lyric Controller and 345 MHz IQ2+
Interlogix TX-E221
Interlogix tx e221 wireless recessed door slash window sensor
319.5 MHz 3/4" Diameter, 2.5" Deep 3/4" Diameter, 1/2" Deep Interlogix/GE Sensor. Compatible with all Interlogix/GE Systems, legacy Qolsys Systems and 319.5 MHz IQ2+
Qolsys IQ Recessed Door-S
Qolsys iq recessed door s recessed door slash window sensor for
319.5 MHz 3/4" Diameter, 2.25" Deep 3/4" Diameter, 5/8" Deep Qolsys S-Line Sensor. Compatible with all Interlogix/GE Systems, legacy Qolsys Systems and 319.5 MHz IQ2+. Encrypted when paired with Qolsys IQ2 or IQ2+.
DSC EV-DW4917

433 MHz 11/16" Diameter, 3" Deep 3/4" Diameter, 5/8" Deep Legacy DSC Sensor. Compatible with all DSC Systems and 433 MHz IQ2+. Screw mount and press fit installation options available.
DSC PG9307

915 MHz 0.75" Diameter, 2.66" Deep None needed! PowerG Sensor. Uses a 2 mm magnet that requires no hole. Uses 128-bit AES encryption. Compatible with DSC PowerSeries Neo Panels, DSC Iotega, every IQ2+.

If you're monitored with Alarm Grid, or if you're interested in monitoring, our team would be happy to help you find the best wireless recessed contact for your needs. The best way to reach us is to email support@alarmgrid.com. You may also call us at (888) 818-7728 from 9am to 8pm EST M-F. We look forward to helping you find the perfect security equipment to protect your home or business!

Tags: , , , , , , , , , , ,

0 Comments


Posted By

Hi DIYers! As you may know, testing your equipment is an integral part of owning an alarm system. But your testing should go beyond just making sure your sensors work properly and that your panel communicates with the central station. Testing your sirens and sounders is also important.

Honeywell 5800wave wireless siren for lynxtouch series panels

When you activate your monitoring service with Alarm Grid, there will undoubtedly be some testing involved. Our team will be checking to see if your system sends out signals successfully. This is a vital part of receiving a certificate of alarm so that you can get a discount on your homeowner's insurance. And as a DIY installer, you will be checking to make sure that all your sensors work properly. This includes things like walking through a room to see if your motion sensor notices your presence and opening and closing your doors and windows to check that your contact sensors perform correctly. But what about your sirens?

Look, we know that testing your sirens isn't the most fun. They're loud. They scare pets. They make children cry. With that in mind, it's no surprise that some users decide to disconnect their sirens during system testing. This is perfectly fine in theory. After all, your system will still be able to communicate out, and its sensors will still work properly. You might think that you can just add your sirens later after testing. However, we're here to tell you that testing your sirens and having them activate is a step that every alarm system owner should take.

But why should you test your sirens? The reason actually goes beyond the obvious answer of making sure the sounders and strobes work. It's also smart to have a good idea of exactly what your system's sirens sound like. That way if an emergency does occur, you will have a better chance of knowing immediately what is going on. Keep in mind that not all sirens are created equal. They can differ in terms of volume and pitch. By taking the time to listen to your siren, you are more likely to be ready if there ever is an emergency.

Another thing that many users don't realize is that there are usually different noises for different types of alarms. For example, an activated smoke detector will typically produce a temporal 3 sound (three consecutive tones, then a pause, repeated), while an activated carbon monoxide detector will typically produce a temporal 4 sound (four consecutive tones, plus a pause, repeated). There are also continuous tone alarms (one long, steady tone) that are commonly used for burglary and intrusion alarms. Knowing what each alarm sounds like can potentially save your life in an emergency. For example, how you respond to a break-in won't necessarily be how you respond to a fire!

At Alarm Grid, we want all our customers to be prepared when alarms occur. This includes knowing what sounds your equipment makes. If you're a monitored customer, we are happy to help you however we can. The best way to reach us is to email support@alarmgrid.com with your questions. You may also call us at (888) 818-7728 during our normal business hours of 9am to 8pm EST M-F. We look forward to helping you get the very most out of all your alarm system equipment. That includes your sirens, sounders and strobes!

Tags: , , , , , , , , , , , , , ,

0 Comments


Posted By

Hi DIYers! We have learned that Resideo put out a new feature for Total Connect 2.0 in the form of "No Activity Alerts". Users can now receive text and/or email alerts when no system activity occurs after a set period of time. This can be great for making sure that a loved one is active.


The No Activity Alert feature represents an ideal method for keeping tabs on a relative or loved one and ensuring that they are moving around and using their system like normal. The feature can be be set to send notifications after every hour, four hours, eight hours, 12 hours or 24 hours. If no system activity occurs after the set period of time, then a notification will be sent to out to any phone number or email address listed as a recipient.

Total Connect 2.0 previously made it possible to send out a notification if a specific event did not occur within a set period of time. Users had to create individual notifications for each activity that did not occur. This general No Activity Alert feature is more of a "catch-all" to eliminate the need for setting up a series of notifications.

Additionally, this new feature will continue to send out notifications every time the set period passes without activity occurring. For example, if you have the feature set to send alerts after four hours of no activity, you will receive a first notification after four hours of no activity, then a second notification after eight hours of no activity, and so on.

Users should keep in mind that No Activity Alerts will only be sent out when the system is in a Disarmed state. If the system is Armed, then No Activity Alerts will not be sent out. The list of activities that can prevent a No Activity Alert from being sent out is extremely extensive. No notification will be sent out as long as at least one of the following events occurs during the set time period:

  • Sensor Open
  • Sensor Closed
  • Sensor Trouble
  • Sensor Trouble Cleared
  • Sensor Alarm
  • Sensor Alarm Cleared
  • Sensor Bypass
  • Sensor Bypass Cleared
  • Sensor Tamper
  • Sensor Tamper Cleared
  • Sensor Supervision
  • Sensor Super. Cleared
  • Sensor Low Battery
  • Sensor Low Batt Cleared
  • Sensor Close Left Open
  • Sensor UnMask
  • Disarmed
  • Armed Away
  • Armed Away (Bypass)
  • Armed Stay
  • Armed Stay (Bypass)
  • Armed Away Instant
  • Armed Away Instant (Bypass)
  • Alarm
  • Alarm (Bypass)
  • Armed Stay Instant
  • Armed Stay Instant (Bypass)
  • Disarmed (Bypass)
  • Fire
  • Alarm Cancelled
  • Disarmed Not Ready
  • CO Alarm
  • Alarm Silenced
  • Exit Alarm
  • Night Stay
  • Night Stay (Bypass)
  • Night Stay Instant
  • Night Stay Instant (Bypass)
  • Armed Custom
  • Armed Custom (Bypass)
  • Armed Custom Instant
  • Armed Custom Instant (Bypass)
  • Comm Fail
  • Comm Fail – Resolved
  • AC Restored
  • System Battery Restored
  • Phone Line Restored
  • Program Exit (New Config)
  • Arming
  • Disarming
  • Cover Tamper
  • Cover Tamper Restored
  • Duress Alarm
  • Partition Removed

Overall, this feature is particularly useful for making sure that loved ones are using their system like they are supposed to. You can set it up for an elderly or disabled user to make sure they haven't fallen down or experienced an injury. It's also great for making sure that your kids or your spouse has returned home safely.

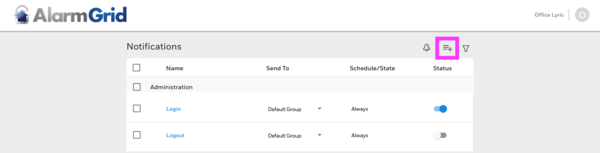
You can set up this feature from the Total Connect 2.0 website or mobile app. For this post, we're going to show the feature on the website. Start by logging into your Total Connect 2.0 account, and then choose the Notifications tab on the left, followed by List. Then choose the Add Notification button:


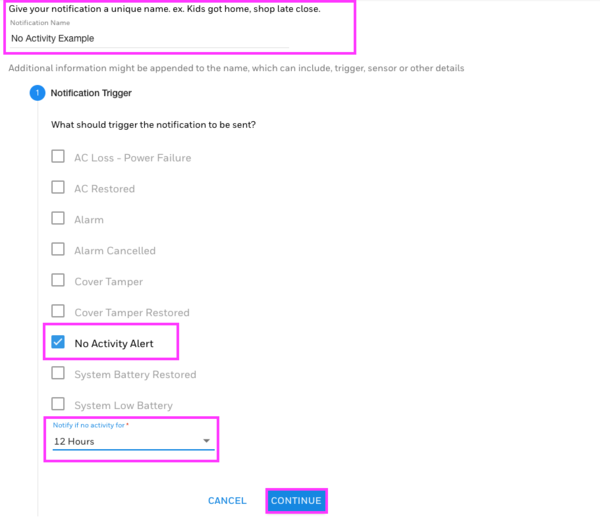
Choose Security > System. Then provide a Notification Name. In our example, we chose "No Activity Example". Then select No Activity Alert. Finally, choose the time interval for when a notification should be sent out. We chose 12 Hours in our example. Press Continue when you have finished:


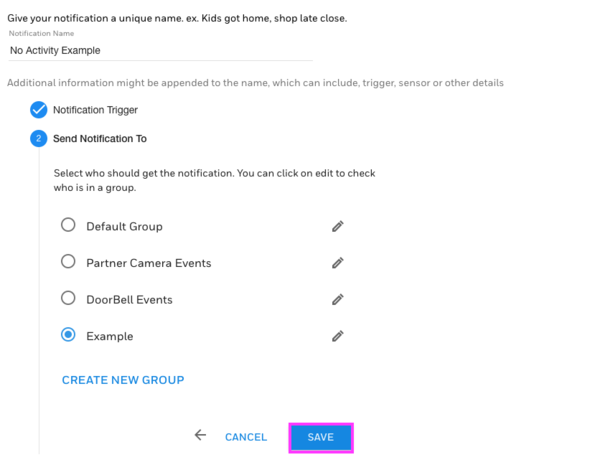
Next you will choose who will receive the notification. You can use an existing group, or you can create a new one. In our case, we used a group called "Example", but you can set yours accordingly. Press Save when finished, and then press Yes to confirm:


Your new notification should then appear somewhere in your list under the Security section:


If you are an Alarm Grid monitored customer with questions about this new feature, please do not hesitate to reach out to us. You may email us at support@alarmgrid.com, or call us at (888) 818-7728 during our normal business hours of 9am to 8pm EST M-F. We look forward to hearing from you!

Tags: , , ,

0 Comments


Posted By

Hi DIYers! We are happy to announce that the Honeywell LYNX Touch Updater Tool is now available for purchase on our website. This easy-to-use module allows users to conveniently update the firmware for any Honeywell L5210 or L7000 and get it running on the latest software version.


As you may recall, LTE Communicators for the L5210 and L7000 were released last year. There is the LTE-L57A for the AT&T LTE Network and the LTE-57V for the Verizon LTE Network. But these systems require a minimum firmware version to support these modules. The LTE-L57A requires firmware version 9.00.209 or higher, while the LTE-L57V requires firmware version 9.00.201 or higher. Any newly manufactured L5210 or L7000 will already be running a high enough firmware version. However, older L5210 and L7000 Systems may require a firmware update.

It used to be possible to push down an over-the-air (OTA) firmware update to an L5210 or L7000. However, this is no longer the case. All firmware updates for these two systems must be applied using the Honeywell LYNX Touch Updater Tool, officially known as the Honeywell LYNXTOUCH-MSD. This tool allows users to update the firmware for their L5210 or L7000 System at their own leisure. It will also come in handy if Resideo decides to release any future firmware updates for these systems at some point.

Alarm Grid has already released an FAQ to help you use this new device to upgrade your L5210 or L7000 System. We also invite you to check out the Installation Guide for the module for even more information. Remember, you will want to get your LYNX Touch System connected with an LTE network sooner rather than later. The 3G sunset is rapidly approaching, and LTE connectivity will allow you to greatly extend your system's lifespan!

If you are an Alarm Grid monitored customer with any questions about the Honeywell LYNXTOUCH-MSD Updater Tool, or if you would like to know why upgrading to LTE is important, we encourage you to reach out to us. You may email us at support@alarmgrid.com or call us at (888) 818-7728 during our normal business hours of 9am to 8pm EST M-F. We look forward to hearing from you and answering any questions you might have!

Update: As of October 2019, the LYNXTOUCH-MSD Updater Tool can also be used with an L5200 Panel. See this blog post for more information.

Tags: , , , , , , ,

5 Comments


Posted By

We have received news that San Jose, CA has recently repealed its Verified Response policy for emergency dispatch. The city will now respond normally to a dispatch request from a central monitoring station. This is great news for customers in San Jose who depend on reliable dispatch.

For anyone who does not know, Verified Response is a policy in which a dispatching center will not send out emergency police response unless a crime is confirmed visually or audibly. The purpose of these policies is to reduce false alarms and to save costs by not sending out potentially unnecessary dispatch.

As a monitoring service provider, Alarm Grid is opposed to Verified Response policies. We want all our customers to receive reliable emergency dispatch in the event of a potential crisis. We understand the need to limit false alarms and not waste the time and resources of our valued local law enforcement. That being said, we take several steps to eliminate false alarms with our central station partner, Criticom.

Some of the actions that Criticom takes to reduce false alarms include check-in calls, false alarm passwords, and allowing end users to place their systems on test mode. A Verified Response policy only makes it more difficult for an end user to get the help that they need in a timely manner, and it does not sufficiently reduce occurrences of false alarms.

The truth is that the vast majority of false alarms come from a very small percentage of overall alarm users. Putting burdensome requirements in place before allowing the authorities to properly respond and failing to work directly with the end users and alarm companies that create false alarms leads to a less safe environment for all.

We are sure that our San Jose customers will appreciate this action, and they will enjoy greater peace of mind in knowing that Criticom Monitoring Services will now be able to successfully request emergency police dispatch to their homes and businesses. Additionally, we have noticed a trend that many Southwestern US Cities have started reversing Verified Response policies that were all put into effect somewhat recently. Alarm Grid will provide updates as we receive more information.

If you receive alarm monitoring service in an area where a Verified Response policy is still in place, there are some actions you can take to ensure that emergency help is sent out during a crisis. The best option is to install security cameras or use image sensor modules to provide a visual look-in for any activity at your home or business. End users might also consider using panels with a built-in camera, such as a Honeywell Lyric Controller or a Qolsys IQ Panel 2.

Remember that when using cameras, you must be able to respond to calls from the central station and let them know that any given alarm is legitimate. If you cannot do this, then you will not receive the authority response you expect. For these users, the best option is often to use a local guard service that handles the dispatch and alerts the local police after they arrive on the scene and confirm that a crime is taking place. Alarm Grid customers in Verified Response areas can contact us about arranging for a local guard service to protect their homes and businesses.

We encourage every Alarm Grid customer to check with their local jurisdiction to find out if any Verified Response policies are in effect in their area. If you have any questions about Verified Response policies, you can always reach out to us. We are available via email at support@alarmgrid.com. You may also call us at (888) 818-7728 during our regular business hours of 9am to 8pm EST M-F. We look forward to hearing from you!

Alarm grid inside security stickers

Tags: , , ,

0 Comments


Posted By

Hi DIYers! We have received news from Honeywell that Lyric Firmware Update MR8 is now available! This is the latest firmware update for the Honeywell Lyric Controller, and it is currently available for free download. End users can expect a few minor system improvements with the update.

Honeywell lyric controller encrypted wireless security system

From an end user's perspective, the following changes can be expected with Firmware Update MR8:

  • The WIFI indicator in the upper-left corner will now display a red X if WIFI connectivity goes down.
  • The Honeywell SiX Series Sensors now have a shorter RF transmission supervision interval. It is now six hours for all burglary devices, four hours for the Honeywell LKP500 Keypad, and two hours for all life-safety devices. Previously, the RF transmission supervision interval was 12 hours on all devices.
  • In the SiX Programming Menu, the Zone Number will now be shown in Red if the zone is faulted. Additionally, a tamper message will be displayed in Red if the zone is tampered.
  • The SiX Programming Menu now shows every enrolled SiX Series device for quick access. Newly enrolled sensors will be labeled "Newly Enrolled", which will be displayed in place of the Zone Number.
  • The Honeywell LKP500 Keypad will no longer beep after performing an update.
  • The Honeywell LKP500 Keypad will no longer announce Night Stay when Voice is disabled.
  • Eaton Cooper Z-Wave Light Switches are now supported.

Additionally, the update includes various changes that will make it easier for your alarm company to monitor your system. That is why performing the update is crucial for all Lyric System owners.

Performing the update is very easy. First, you must make sure that your Lyric System is ready and has no trouble conditions, including any tamper cover and low-battery messages. It must be actively monitored with a working communication path. Start from the main screen of the system, and choose Security, followed by Tools. Then enter your system's Installer Code, which is 4112 by default. Then click on the Update Firmware button. The button should grey out to indicate that it has been selected.

You can then return to the home screen, and the update should be applied automatically. It will typically go through in a few minutes with a WIFI connection, but it may take up to an hour with cellular only. Once the update is ready, the system will reboot to complete the process.

You can check the system revision to confirm the update. Go to Security > Tools > Master Code (default 1234) > Advanced > System Information. Then check the revision to make sure it reads 01.08.


If you are an Alarm Grid monitored customer with any questions about the the MR8 Firmware Update, you can email support@alarmgrid.com for more information. You may also call us at (888) 818-7728 from 9am to 8pm EST M-F. We look forward to hearing from you!

Tags: , , , , ,

3 Comments


Posted By

Hi DIYers! Today, we're presenting another basic security tip. This tip is to never Arm or Disarm your system using your Installer Code. That system code should only be used for programming, and it should be kept at its default to prevent you from being locked out of programming later.

Honeywell lyric controller encrypted wireless security system

If you go to Arm your system, you will often be prompted to enter a system code. Normally, you will use your Master Code or a standard user code to complete the Arming process. However, you will notice that your can technically Arm using your system's Installer Code. By doing this, you will make it possible for you to Disarm using that same code later on. But if you use your Master Code or a user code to arm, then you will not be able to disarm using your Installer Code.

The problem with using your Installer Code to Arm and Disarm is that an intruder may know the code and use it to gain access to the system. Default Installer Codes are usually common knowledge, and an intruder will often try one of these codes in a quick attempt to disarm. While keeping the Installer Code at its default is good practice, you will never want to use this code on a regular basis. Instead, you should only use the Installer Code to enter programming when the system is already Disarmed.

The default Installer Codes for many popular security systems are as follows:

If you are using one of these codes to Arm and Disarm your system, then you should stop this practice immediately. Instead, you should use your system's Master Code to arm and disarm. Make sure you change the Master Code from its default before using it to control your system. Set it to a unique code that is difficult for others to guess, but easy for you to remember. Then use that unique and personalized code to Arm and Disarm when needed. If you need to create any additional system codes, make sure they are not obvious for an intruder to guess. You can Arm and Disarm using a standard user code just like you would a Master Code.

If you are an Alarm Grid customer with questions about system codes, please reach out to us. We want to make sure you are using a secure code to Arm and Disarm your system and that you are not putting yourself at-risk for a security breach. Please email us at support@alarmgrid.com, or call us at (888) 818-7728 during our normal business hours of 9am to 8pm EST M-F. We look forward to hearing from you.

Tags: , ,

0 Comments


Posted By

Hi DIYers! Our team is back with another video recap. We have six new videos this week, as it was a dead even split between Joe, Jarrett and Jorge. Each of our talented actors had two new videos apiece. Let's take a look at the latest videos from the Alarm Grid Video Production Team!

Factory Resetting the Honeywell Lynx Touch L7000

Jarrett puts on a smile as he shows users how to perform a factory reset on a Honeywell L7000 System. This is accomplished by loading one of the Default Configurations. By performing a factory reset, the entire L7000 System will need to be reprogrammed from scratch. All sensors will need to be relearned with the panel, and all system settings will be reset to their default. Additionally, the Master Code will be reset to its default of 1234, and the Installer Code will be reset to its default of 4112.


Bypassing a Sensor in Total Connect

Jarrett happily demonstrates how to bypass zones in Total Connect 2.0. When you bypass a zone, the associated sensor will remain inactive and be unable to cause a system alarm. For example, if you bypass a door sensor when arming your system, then people will be able to open and close that door without causing an alarm. However, all other system zones will still remain active as usual. Sensors must be bypassed individually for each Arming session.


Addressing a Honeywell Alarm Keypad

Joe explains how to address a Honeywell Alarm Keypad with a Honeywell VISTA Security System. Touch-button keypads use addresses 16 thru 23 on VISTA P-Series Panels. Address 16 is always enabled, while addresses 17 thru 23 must be specifically enabled within programming. Meanwhile, an Advanced User Interface (AUI) device will use address 1, 2, 5 or 6. Touchscreen keypads are considered AUI devices and will use one of these slots. Remember that the Total Connect 2.0 platform itself takes up an AUI slot.


Using the Lynx Touch with a 3rd Party Z-Wave Controller

Joe talks about how how you can use a Honeywell LYNX Touch System as a secondary Z-Wave controller. This is done by pairing the system itself with a different Z-Wave hub. All Z-Wave devices from the primary hub will be automatically pushed over the LYNX Touch System. They can then be controlled from both the primary controller and from the LYNX Touch. However, you will need to use the primary controller to learn-in new Z-Wave devices. You must install an L5100-ZWAVE Card in the LYNX Touch System to support any Z-Wave functionality.


IP Fault Time Setting on the Lyric Alarm Panel

Jorge with his colorful hair discusses the IP Fault Time Setting on the Honeywell Lyric Controller. This setting will have the system display a trouble condition whenever the WIFI goes down for a certain period of time. That way, the user will know later that the system was unable to communicate with the AlarmNet Servers. An IP Fault Time trouble will only appear on the panel if WiFI is set as the only communication path. If the system has a cellular backup, then only the central station will receive an E350 Communication Path Failure on Zone 951.


Programming a Honeywell 5800CO Into an All-in-One Panel

Jorge walks users through the process of programming a Honeywell 5800CO with a wireless alarm system. The Honeywell 5800CO is a carbon monoxide detector that operates at 345 MHz. It is primarily used with Honeywell Systems, but it will work with nearly any panel that accepts the 345 MHz frequency. The sensor will cause an instant system alarm when activated. All building occupants should vacate the premises immediately if a CO alarm occurs. When programmed as a 24-Hour Carbon Monoxide Zone, the 5800CO Sensor cannot be bypassed.

Tags: , , ,

0 Comments