Welcome to our PROA7PLUS Cheatsheet! This document will cover various procedures and information associated with the Honeywell Home PROA7PLUS, Honeywell Home PROA7, Resideo PROA7PLUSC, and Resideo PROA7C. First, we'll cover a preface, and then we'll dive deep into various system processes.

Table of Contents
The PROA7PLUS, along with its variants, represents the latest alarm panel from Honeywell Home and Resideo. Sometimes referred to as the ProSeries 7" All-In-One Systems, these are wireless all-in-one panels that connect with AlarmNet for alarm monitoring service. They can also be set up for use with the Total Connect 2.0 interactive platform, provided that access to the service is included in the user's alarm monitoring plan. Since AlarmNet supports IP-only alarm monitoring, cellular-only alarm monitoring, and dual-path alarm monitoring with both IP and cellular, you can technically use the PROA7PLUS and its variants with any alarm monitoring plan from Alarm Grid. To learn more about the Alarm Grid Monitoring Plans, please review this helpful post.
It should be mentioned that end-user programming for the ProSeries Panels is not available as of May 2021. The feature is currently in beta development and only available to those in the alarm industry. That is how we are able to provide information on how end-user programming looks and how it works. It is expected that the feature will be made available to the general public via a firmware update in the very near future. But please note that if your ProSeries System has not yet been updated to the firmware version that supports end-user programming, then the feature will not be available on your panel.
Right out of the box, the ProSeries Panels can support all of the Honeywell Home PROSIX Series Sensors and the Honeywell SiX Series Sensors that were originally built for use with the Honeywell Lyric Alarm System. It is important to note that once you pair a SiX Series Sensor with a ProSeries Panel, it will receive a firmware update and can never be reverted back to be used with a Lyric again. Once it goes to ProSeries Panel, it can never go back. The ProSeries Panels each have (127) zones available for the encrypted PROSIX and SiX Series Sensors.
Legacy sensor support is also available for the ProSeries Panels. If you add a Honeywell Home PROTAKEOVER Module to the panel, then you can pair sensors from one (1) of five (5) possible legacy frequency. The legacy frequency you decide to use is selected via an adjustable dial on the PROTAKEOVER Module. The available options include Honeywell 5800 Sensors (but not 2GIG), 2GIG 345 MHz Sensors (but not Honeywell), 319.5 MHz Sensors (Qolsys, Interlogix, GE), 433 MHz Sensors (DSC), and Bosch Sensors. You can only add one (1) PROTAKEOVER Module to a ProSeries Panel, so only one (1) legacy frequency can be used with the system at any given time. Up to (123) legacy zones are available on the ProSeries Panels. When combined with the encrypted zones for PROSIX and SiX Sensors, a maximum total of (250) zones are available on one of these systems.
One key characteristic of the PROA7PLUS is that the system is split into four (4) different variants, based on two (2) deciding factors, with each factor having two (2) options. First, you must decide whether you want the PLUS version or the BASE version. Most users ultimately go with the PLUS version, as the BASE version is more limited and requires an added communicator to get the system monitored. Second, you must decide whether you want the Honeywell Home version for residential use or the Resideo version for commercial use. Unlike the first decision, this second one really comes down to personal preference, and it won't really affect the performance of the system in any way.
PLUS vs. BASE
Most users who buy a ProSeries System opt for a PLUS Model. There are a few differences to be discussed between the PLUS Models and the BASE Models. A PLUS Model comes with a Honeywell Home PROWIFIZW Module already built-in for WIFI and Z-Wave Plus support. A BASE Model does not have this, but you can add one separately. If you only want WIFI support, and you don't care about Z-Wave Plus for home automation, then there is also a Honeywell Home PROWIFI that provides WIFI, but no Z-Wave Plus. Honeywell has chosen to go with a very modular design, so that users don't have to pay for features they may never intend to use.
A PLUS Model can be set up for IP-only monitoring (WIFI) right out of the box. You only need to add a cellular communicator if you want to set up a PLUS Model for dual-path monitoring with both IP and cellular. Conversely, a BASE Model cannot be set up for alarm monitoring right out of the box, as it does not have a built-in communicator. You must add an IP communicator and/or a cellular communicator to get the system monitored. If, for example, you want cellular-only monitoring, it may make sense for you to buy the BASE Model, and a cellular communicator, but only if you don't want any of the other features that are supported only on the PLUS Model. We'll cover those features in just a bit.
For reference, the IP communicators are WIFI modules that support wireless WIFI connectivity, and they cannot be used for wired ethernet connectivity. The options include the Honeywell Home PROWIFI, which adds WIFI only, and the Honeywell Home PROWIFIZW, which adds both WIFI and Z-Wave Plus. As of May 2021, only LTE modules are available for cellular connectivity. The options include the Honeywell Home PROLTE-A (AT&T LTE) and the Honeywell Home PROLTE-V (Verizon LTE). It's possible that a 5G cellular module might be released for the system someday, but that is not an option now.
There are two (2) other big differences between the PLUS Models and the BASE Models. One, a PLUS Model has a built-in camera for taking disarm photos on the system, while a BASE Model does not have an integrated camera. There is no way to add a panel camera to a BASE Model, so this will always be a feature you miss out on if you decide to get a BASE Model. Two, a PLUS Model supports Bluetooth LE connectivity for automatic Bluetooth disarming, while a BASE Model does not support Bluetooth. There is no way to add Bluetooth connectivity to a BASE Model, so again, this will be a feature you miss out on if you opt for a Base Model.
Honeywell Home vs. Resideo
Unlike the PLUS vs. BASE debate, the Honeywell Home vs. Resideo decision is more of a personal preference decision. The difference here is that the Honeywell Home Models say "Honeywell Home" across the front, while the Resideo Models say "Resideo" across the front. Other than that, they are exactly the same. Technically speaking, the Honeywell Home Models are intended for residential use, while the Resideo Models are intended for commercial or industrial use. But there is actually nothing stopping you from using a Resideo Model inside a home, or a Honeywell Home Model inside a business. For more information on the subject, we recommend checking out this blog we wrote on the subject.
General System Information
Below is some of the general information for the Honeywell Home and Resideo ProSeries Panels:
-
Panel Type: Wireless All-In-One
-
Voltage Input: 9VDC, 2.5A Transformer (Included - P/N 300-10260)
-
Backup Battery: 24 Hour Rechargeable Lithium Ion 3.6/4.2V, 5200mAH (Included - P/N 300-11186)
-
Total Zones: 250 Security Protection Zones
-
PROSIX and SiX Series Zones: 127 Zones
-
Legacy RF Support: 123 Zones, 319.5 MHz, 345 MHz, 433 MHz, or Bosch (with added takeover module)
- Legacy RF Notes: Uni-Directional Only; Requires PROTAKEOVER Module
-
KeyFob Slots: 32 (ProSix & SiX Fobs)
-
User Codes: 96 (Master Code Hardcoded to Slot 1)
- Partitions: 4
- Automation: Z-Wave Plus (Automatically Included with PLUS Models Only)
- Z-Wave Device Limit: 78 (Automatically Included with for PLUS Models)
- Compatible Keypads: Resideo PROSIXLCDKP, Resideo PROWLTOUCH (Requires PROWIFIZW or PROWIFI)
- Maximum Keypads: 8 per Partition
- Event Log: 4,000 Events
- Other Features: WIFI. The following features are supported on the PLUS Model only: Integrated Camera, Automatic Bluetooth Disarming, Wiselink (PROINDMV & PROOUTMV)
- Package Contents: Panel, PROWIFIZW Module (installed, PLUS Models Only), Transformer (9VDC, 2.5A), Backup Battery, Manuals, Mounting Hardware w/ Wall Plate
- Dimensions: 5.75"L x 7.875"W x 1.0"D
- Mounting Options: Wall Mount or Desk Mount (Sold Separately)
- Default Master Code: 1234 (should change for security purposes)
- Default Installer Code: 4112 (recommended to keep at default)
The ProSeries Alarm Panels include a transformer for powering on the system, but a user must supply their own wiring. The use of a prepared wire, such as a Honeywell LT-Cable is advised. However, traditional wiring is perfectly suitable. You should use a wire gauge between 16-gauge and 22-gauge. If you decide to use traditional wiring that you have prepared yourself, then please observe the following strict wire limits:
|
Wire Gauge
|
Max Wire Run
|
| 16 AWG
|
110 Feet
|
| 18 AWG
|
70 Feet
|
| 20 AWG
|
45 Feet
|
| 22 AWG
|
25 Feet
|
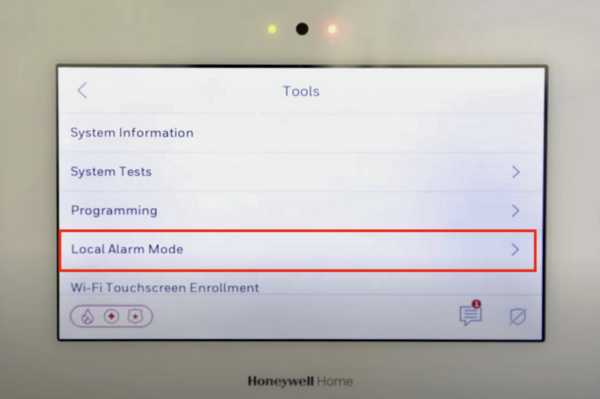
Local Alarm Mode is used when the system needs to be set up and tested, but it's not yet registered with the AlarmNet server. The PROA7PLUS is meant to be monitored in some fashion. If Local Alarm Mode is not enabled, then as soon as the panel powers up, it reaches out to the AlarmNet360 server in an attempt to register and retrieve its communicator programming. If an account does not yet exist on the server for the panel, it will return a communicator error which will not clear until registration occurs. When Local Alarm Mode is enabled, the communicator for the panel is disabled, and this process of attempting to register does not occur. Therefore, no communicator error will be displayed. To enable or disable Local Alarm Mode, select the Menu Icon from the bottom-center of the home screen, then scroll down to Tools. Enter the Installer Code (Default is 4112) when prompted for a code, then select Local Alarm Mode. The feature is toggled ON or OFF from this screen. Bear in mind, when this setting is changed the panel will reboot, and this process can take several minutes.
Arming the security system puts it into a secured state. If activity is detected while the system is armed (e.g. a door/window being opened, movement being detected, etc.), then the system may go into immediate alarm or require that a user verify their identity with a valid code to prevent an alarm. Please note that this does not apply to 24-Hour Zones, which will trigger an immediate alarm when activated, even if the system is in a disarmed state. Common examples of 24-Hour Zones include smoke detectors, carbon monoxide detectors, and emergency exit doors.
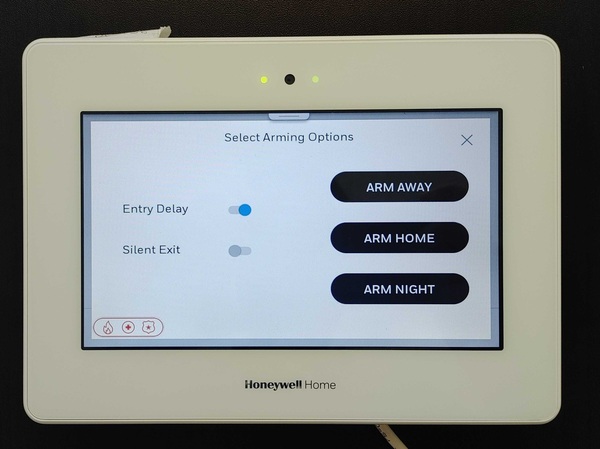
To arm a ProSeries Panel, click the ARM button on the main screen. Then choose the arming type to arm the system. You can Arm Away or Arm Home, with Arm Home being the system's version of Arm Stay. The difference between these arming modes is that interior sensors are automatically bypassed (ignored) when you choose Arm Home. This allows anyone still inside the building to move around freely, without triggering a false alarm. But in Arm Away, interior sensors are active and able to cause alarms on the system. There should be nobody remaining inside the building after you have enabled Arm Away mode. Please note that at least one (1) Entry/Exit Zone must be faulted during the Exit Delay countdown when Arming Away, or else the system will revert to Arm Home mode instead. This is because the system will assume no one left after arming, and that the user must have meant to Arm Stay. This is known as Auto-Stay Arming, and it is a false alarm prevention feature.
Keep in mind that if multiple partitions are set up with the system, then you will be able to select which partition you want to control before you press the ARM button on the main screen. You can select any of the four (4) partitions that are enabled on the system. A partition dropdown selection option will only be shown if multiple partitions are configured on the system. If partitions have not yet been configured, and the system still only has a single partition, then this dropdown option will not be displayed. Partitions are covered in greater detail later in this cheatsheet.
A feature called Quick Arm is enabled by default, but can be disabled by partition, in each partition's settings. This affects what happens after selecting your preferred arming method (Home or Away). When this feature is enabled, the PROA7PLUS will not prompt for a user code to complete arming. This can save time when arming. This also allows anyone to be able to arm the alarm. A valid user code is still always required to disarm. This poses little to no risk, as long as you remember your user codes. When armed with Quick Arm, the panel's event log shows that it was armed by a generic user. Some choose to disable this feature because they prefer to know who exactly armed the system. When disabled, the actual user number will be logged as the user who armed the partition.
Another option called Arm Night will also be available if you have at least one motion sensor programmed on the system with the Arm Night feature enabled. Arm Night is a more secure version of Arm Home (Stay), in which any interior motion sensor with the Arm Night feature enabled will NOT be automatically bypassed. That is, if that sensor detects activity while in Arm Night mode, it will trigger a response (e.g. an alarm) on the system. Meanwhile, motion sensors that have Arm Night disabled will be bypassed and ignored by the system.
Also when arming the system, you can choose to enable or disable Entry Delay and Silent Exit. The default selection is to enable Entry Delay, and disable Silent Exit. If Entry Delay is disabled it will result in the system going into immediate alarm when an Entry/Exit Zone is faulted, as opposed to going into an Entry Delay countdown, during which the user can disarm the system before an alarm occurs. Silent Exit being enabled will result in the panel not producing any sounds as the Exit Delay countdown occurs. Please note that if Silent Exit is enabled, then the Exit Delay countdown timer will be automatically doubled for that arming session. This will give the user extra time to vacate the building, as there won't be any countdown timer reminding them that they need to exit immediately.
Please note that you can also arm the system via Total Connect 2.0 if the system is monitored and set up with the service.
System Disarming
Disarming the system takes it out of a secured state and puts it into a Disarmed mode, in which only 24-Hour Zones are able to trigger system alarms. You can only disarm the system while it is in an armed mode. Please note that if you have Armed Home or Armed Night, then an option for Quick Exit will be available. This feature allows a user inside a location that is Armed Home or Armed Night to briefly step outside, for instance, to take out the trash, or to retrieve something from their car. When you press Quick Exit, the system begins the normal Exit Delay countdown. During this time, any Entry/Exit door can be opened without causing an alarm. As long as the door is secured again before the countdown expires, the system will return to its prior arming state at the end of the countdown. This prevents the user from having to disarm, then arm again.
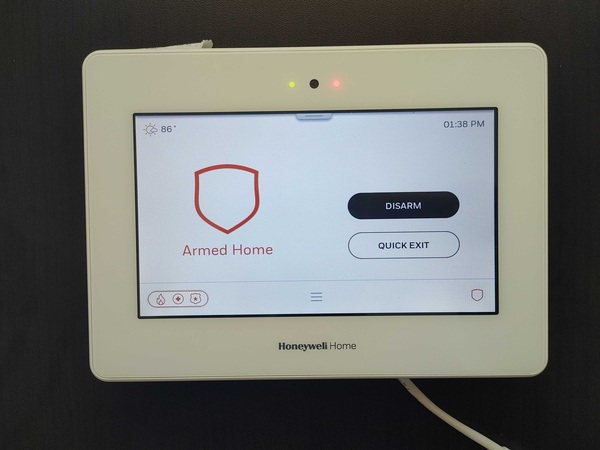
In Arm Away mode, the only available option is to Disarm.

To disarm the system, you must have a valid code. This can be a regular user code, or the Master Code. Click the Disarm button to pull-up a numeric digital keypad. Then enter the valid code into the digital keypad. The system will disarm. Don't forget that if you need to disarm a different partition than the one displayed on the screen, then you should first select that partition from the dropdown menu and provide a user code with authority for the selected partition. This dropdown menu will only be present if multiple partitions are set up on the system.
Please note that you can also disarm the system via Total Connect 2.0 if the system is monitored and set up with the service.
To add a zone to a ProSeries Panel, you must have access to end-user programming. Otherwise, all zone programming is completed remotely by your monitoring company. To access the system's auto-enrollment mode, start from the main screen and click the small menu button (three horizontal bars) at the bottom of the home screen, and then choose Tools, enter the Installer Code (default 4112), and then choose Programming, and then choose Peripherals, and then press the + button at the top of the screen to put the system into its auto-enrollment mode.
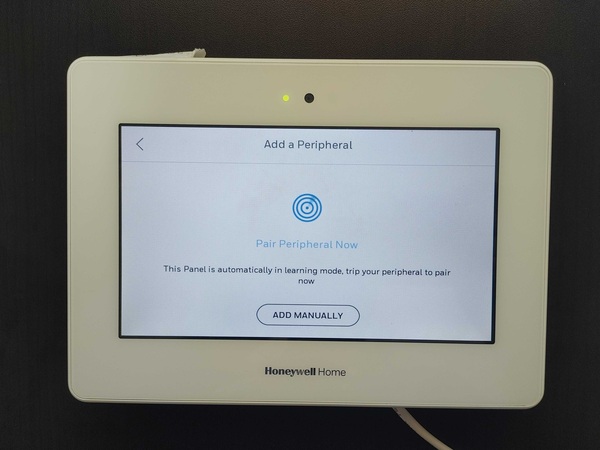
With the system in this mode, you can then fault (activate) a sensor to get it to auto-enroll. You will be taken to the Edit Sensor screen where you can configure the zone settings. The following programming fields are available:
-
Sensor Type: Set automatically during auto-enrollment. This is the model of sensor that was enrolled (e.g. SIX-Contact, SIX-Motion, etc.)
-
MAC: Set automatically during auto-enrollment. This serves as a Serial Number identifier for PROSIX and SiX Sensors. Please note that if you enroll a legacy sensor using the PROTAKEOVER Module, then this will instead be a Serial Number or a Sensor DL ID Field.
- Partition: Allows you to assign the sensor to a specific system partition. Only enabled partitions can be selected.
- Service (with grey background): Available on certain types of SiX and PROSIX Sensors. Allows you to add an additional (secondary) function for the sensor. An example is adding support for an external NC Contact that is wired into a PROSIXCT or SiXCT terminals when its primary function is the Reed Switch.
- Zone Number: Cannot be changed. Shows which Zone Number the sensor is being assigned. Remember that the system supports (127) encrypted PROSIX and SiX zones, plus (123) non-encrypted legacy zones, for a total of (250) zones.
- Service (with white background): Available on certain types of PROSIX and SiX Sensors. This allows you to set the primary function for the sensor. An example would be choosing between the Reed Switch function and the External Contact function on a PROSIXCT or SiXCT. If the Reed Switch is the primary function, the Contact Terminals would then be the secondary function.
- Zone Descriptors (1 & 2): Used for naming the zone. The ProSeries Panel will speak the Zone Descriptors, plus the Device Type, when the sensor is faulted. For example, if you have Zone Descriptor 1 set as "East", Zone Descriptor 2 set as "Door" and Device Type as Door, then the panel will speak "East Door Door" when the sensor is faulted. In this case, Zone Descriptor 2 is unnecessary. Please note that you do not technically need to provide any Zone Descriptors for the zone. You can leave one or both of the fields blank. Many users will just program Zone Descriptor 1 and leave Zone Descriptor 2 blank. If you leave both of them blank, then the zone will only be known as whatever is set for Device Type.
- Device Type: This is used to set the type of sensor you are adding (e.g. Door, Window, Flood, etc.) Along with the Zone Descriptors, the Device Type is spoken by the panel when voice annunciation is enabled and the sensor is faulted. Depending on the Device Type you choose, only certain types of Response Types will be available. If you want access to a certain Response Type that isn't available for the sensor's normal Device Type, then you may consider setting the Device Type to "Other", which will result in all Response Types being available. Please note that if you set the Device Type to "Other", then it will not be spoken when the sensor is faulted and voice annunciation is enabled. For example, if you had Zone Descriptor 1 set as "East" and Zone Descriptor 2 set as "Bedroom" and the Device Type set as "Other", then the panel would only speak "East Bedroom". Available Device Types include Door, Window, Garage Door, Other, Police, Environmental, Glassbreak, Flood, Medical, Motion Sensor, and Temperature.
- Response Type: This option determines what action the system will take when the sensor is faulted or activated. Depending on the Device Type you set, only certain Response Type options will be available. If you want to choose from every available Response Type, set the Device Type to "Other", and you will have a complete selection of possible Response Types. Available Response Types include: Not Used, Entry Exit 1, Entry Exit 2, Perimeter, Interior Follower, Day/Night, 24 Hour Silent, 24 Hour Audible, 24 Hour Auxiliary, Interior Delay, Monitor, Trouble, Arm Stay, Arm Away, Disarm, No Response, Silent Burglary, Garage, Garage Monitor, and Local Alarm.
- Supervised: Toggle ON or OFF. When Supervised is ON, the system will expect the sensor to check-in periodically to ensure that it is working properly. If Supervised is ON, and the sensor fails to check in (due to environment or range issues, the unit being powered down, or having a dead battery, or the device having been removed), then the system will display a trouble condition to alert the user.
- Alarm Report: Toggle ON or OFF. When Alarm Report is ON, the system will report to AlarmNet when the zone causes an alarm on the system. AlarmNet then forwards the signals to the user's Central Station. This is assuming that the system is being monitored. If Alarm Report is OFF, then no alarm signal will be sent out if the zone causes an alarm on the system. However, if Total Connect 2.0 is enabled for the user, an email or text notification can still be sent.
- Version: Cannot be changed. Shows the firmware version of the programmed sensor.
- Chime: This is the sound the panel will make when the sensor is faulted. Choose from a variety of Chime options, or set to Disabled to turn OFF the chime for the zone.
- Armed Night: Only available if a Device Type of Motion Sensor is selected. Toggle option for ON and OFF. If Armed Night is ON, then the sensor will remain active when the system is set to Armed Night mode, as opposed to being automatically bypassed as an interior sensor. Please note that you must have at least one programmed motion sensor with Armed Night turned ON in order for the Arm Night option to be selectable from the arming screen.
- Supervision Time: Cannot be adjusted from this screen. If a sensor fails to check in with the system for longer than this period of time, the system will put that sensor into a Trouble or Check condition. The panel is literally telling you to check on that sensor.
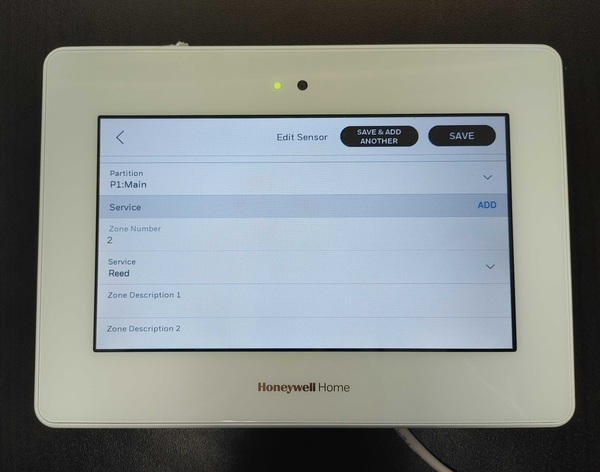
When you are finished adjusting the zone settings, choose either Save or Save & Add Another to save the change. If you choose Save, then you will be taken to the Peripherals List. If you choose Save & Add Another, then you will be taken back to the Add a Peripheral Screen so you can enroll another sensor. You can edit the zone settings later by selecting the sensor within the Peripherals List.
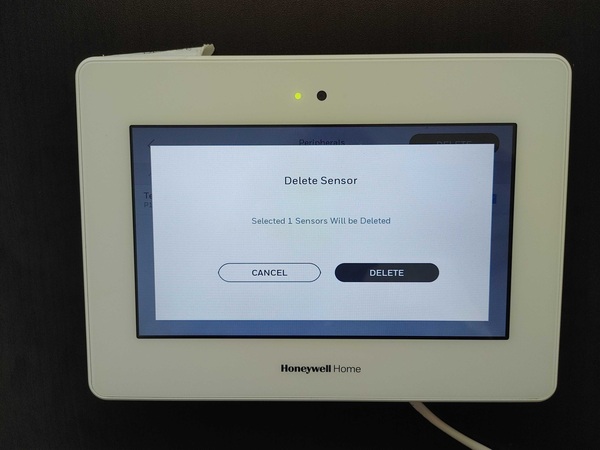
If you need to delete an existing zone, start from the main screen of the system, and click the menu button (three horizontal bars) at the bottom of the screen. Then choose Tools, and enter the system's Installer Code (default 4112). Then choose Programming, followed by Peripherals. This will access the Peripherals List. Find the zone you want to delete and check the box on the right-hand side. If you are deleting multiple zones, then check the box for each zone you want to delete. With all the necessary boxes checked, click the black "Delete" button in the upper-right corner. The system will ask you to confirm. Choose Delete on the right-hand side to confirm that you want to delete the sensor(s).
You can only add a Z-Wave device if there is a PROWIFIZW Module inside of the ProSeries Panel. The PROA7PLUS and PROA7PLUSC have this module included out of the box, but it must be added separately to the PROA7 and PROA7C. When you add a Z-Wave device to the system it can then be controlled both locally at the panel and remotely from Total Connect 2.0 if the system is monitored with a plan that includes automation services. You can also include Z-Wave devices with smart scenes so that they activate automatically based on a set schedule or with predetermined system events.
To add a Z-Wave device, start from the main screen of the system, choose the menu button at the bottom (the three horizontal bars), followed by Tools. Enter the Installer Code for the system (default 4112). Choose Programming, and then Z-Wave Peripherals. It is advised that you clear (Exclude) the device from the panel first to wipe out any residual Z-Wave network data. You can do this even if the Z-Wave device in question is not enrolled with a Z-Wave controller. Many Z-Wave devices will have residual Z-Wave network data left over from the factory, so "excluding" first is almost always a good idea. Choose Exclusion Mode to put the panel into a mode for clearing Z-Wave devices. Then activate the inclusion/exclusion function on your Z-Wave device. There may be a button on the Z-Wave device for this purpose, or you may need to enter a specific programming code. Refer to the manual for your Z-Wave device for more information. The panel should show a device as excluded. Press done after the device has been excluded. Then choose Inclusion Mode to put the panel into a mode for adding Z-Wave devices. Activate the inclusion/exclusion function for the Z-Wave device again. This may be the same function you used when clearing the device from the network. The panel should show that a Z-Wave device was added. Press the done button when finished.

Deleting a Z-Wave device will clear it from the network so that it is no longer paired with the ProSeries Panel. You can then pair the Z-Wave device with a new Z-Wave network. Please note that deleting a Z-Wave device may also be referred to as clearing the device or excluding the device. Z-Wave devices are typically cleared from the network before pairing to ensure that any remaining Z-Wave network data is properly wiped out.
To delete a Z-Wave device, begin from the home screen of the panel, select the menu button at the bottom (the three horizontal bars), and then press Tools. Provide the Installer code for the system (default 4112). Select Programming, and then Z-Wave Peripherals. Choose Exclusion Mode to put the system into a mode for clearing Z-Wave devices. From there, activate the Inclusion/Exclusion function on the Z-Wave device. This process will vary depending upon the Z-Wave device in question. It may have an inclusion/exclusion button, or there may be a different process. Check the manual for the Z-Wave device to find out for sure. The panel should show that a device has been cleared from the network.

A ProSeries Panel will have a default Master Code of 1234. You will want to change this code for security purposes. Choose a different code that is easy for you to remember, but difficult for someone else to guess. To begin, start from the main screen of the panel. Click the menu button (the three horizontal bars), and then choose Settings. Select User Management. Then provide either the Master Code (default 1234) or the Installer Code (default 4112) for the system. This will allow you to access the Users Menu.
Click on the Master option from within the user list. This will take you to the Master User settings screen. Find the field for pin, and click the pencil icon on the right-hand side of that field. You will be asked to provide a new pin. Be sure the 4-digit code you enter is unique within the system. Enter the desired pin code. Then confirm that pin code by entering it a second time. Then press Save in the upper-right corner. You will be asked to enter the Master Pin to save. You should enter the EXISTING Master Code at the screen. If you are changing the code from the default of 1234, then you will enter in that 1234 default, and not the new code that you changed the Master Code to. After you enter the existing Master Code, the change will be saved and applied. The Installer Code can be used to get into this programming area, but it cannot be used in the final step, the existing Master Code must be known in order to change it.

There are (96) user slots available on the ProSeries Panels. When you add a new user code, you will be able to use that code for arming and disarming. To get started, click the Menu button (the three horizontal bars) at the bottom on the home screen of the panel, and then choose Settings, followed by User Management. Provide either the Master Code (default 1234) or the Installer Code (default 4112) to gain access to User Management. Click the + icon in the upper-right corner to begin adding a user. You will then provide a name for the user. After you save the name, you will be taken to a settings screen for that user. Make sure to provide and confirm a pin code for the user. Then at the bottom, you will need to set which partition(s) the user has access to. Make sure to set the partition access, or else the user code will not have any authority. In fact, the system will not let you add a code until you have set both a pin code and access authority. You can also set options for Bluetooth Disarming and Z-Wave Lock Control at this time, or you can save that for later. When you are finished, press Add in the upper-right corner. You will be asked to provide a pin to confirm the adding of the new user. Enter in the system's Master Code (default 1234). The Installer Code will not work for this. The new user will be added to the Users List. If you click on the user name, then you can edit its settings.

After you delete a user, that code will no longer be able to disarm the system. To delete a code, you must access the User Management Menu. Begin from the main screen of the system. Click the three horizontal bars menu button at the bottom of the screen. Choose Settings, followed by User Management. Provide either the Master Code (default 1234) or the Installer Code (default 4112) to gain access. You will enter the User Management Menu. Find the user that you want to delete, and click the checkmark box on the right-hand side of that user. You can also delete multiple users at once by checking the box for every user you want to delete. Once you have selected the user(s), press the Delete button in the upper-right corner. You will be asked to provide the Master Code to confirm deletion. After entering the code, the user(s) you had selected will be deleted. Those user slots will be opened and available for assigning new codes.

Automatic Bluetooth Disarming will allow the system to disarm from Armed Away mode automatically upon detecting a paired Bluetooth-compatible phone. Up to six (6) Bluetooth-compatible phones can be set up with this feature. Each of the 6 phones must be associated with a different user. The Master User can also be set up with a Bluetooth Phone for automatic disarming. A phone will only be able to disarm the system if it is removed from the area before the system is fully armed. If the Exit Delay countdown expires and the phone is still detected in the area, then it will be disabled and ignored for that arming session and unable to disarm the system. This prevents the system from disarming immediately due to someone forgetting their phone and accidentally leaving it behind. The feature will go into effect, and the system will immediately disarm upon the user faulting an Entry/Exit Zone with the phone properly connected across Bluetooth. You must set up the feature before it can be used. The feature is completely optional, and it can be turned OFF at any time.
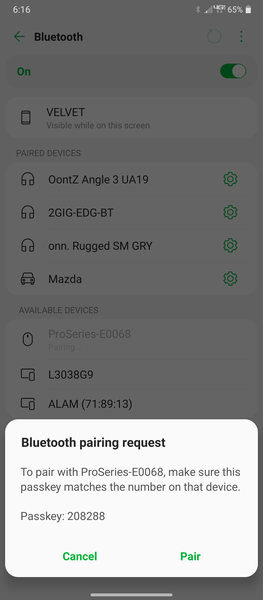
You set up the Bluetooth Disarming feature within the User Management Menu. Begin from the main screen of the system. Click the three horizontal bars menu button at the bottom of the screen. Click Settings, followed by User Management. Provide either the Master Code (default 1234) or the Installer Code (default 4112). Click on the user you want to set up for Automatic Bluetooth Disarming. Then choose the field for Disarm With Bluetooth. At this time, you should activate Bluetooth pairing mode for the phone that is being paired. Press the blue Pair button in the top-right corner of the ProSeries Panel. On the phone, find the ProSeries Panel and click on it. The panel and the phone will both display pairing messages and a pairing key. Click pair on both devices to complete the pairing process. When you back out to the user settings screen, make sure to press Save in the upper-right corner. If you are saving the Master User, then you will be asked to provide its code for confirmation.

If you are unfamiliar with security system partitions in general, please read this FAQ. Basically, partitions allow you to "section-off" your alarm system so that certain sections (partitions) of the system can be armed or disarmed, while the other sections (partitions) remain in their current armed or disarmed state. Up to four (4) partitions can be configured on a ProSeries Panel. By default, only the first partition is enabled. Partition 2, Partition 3, and Partition 4 will only be used and in effect after they have been added. You need to first access the partition settings menu. Begin from the main screen of the ProSeries Panel. Click the three (3) horizontal bars menu button at the bottom. Then choose Tools, and enter the system's Installer Code (default 4112). Click Programming, followed by Partitions. The list of enabled partitions will be shown on the screen. To add a new partition, click the + icon in the upper-right. You will then be able to configure various settings for the partition. These are mostly arming settings that you should configure as needed based upon how the system is being used. You want to set Entry/Exit Delays to proper settings so that no false alarms occur on the system. When you are finished, press Save in the top-right. If you ever need to delete a partition, you can access the Partitions Menu, click on the checkmark box on the right-hand side of any partition that is being deleted to select it, and then press Delete in the top-right. Please note that you cannot delete the main Partition, which is Partition 1.
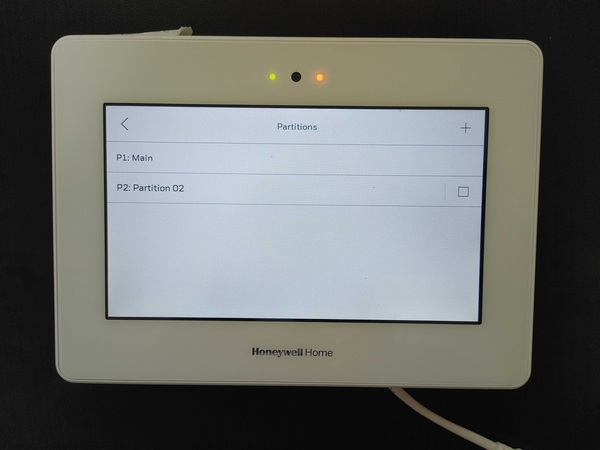
Whenever you are at the main screen of the system, you can set which partition you want to control. There will be a dropdown menu you can click on to choose a different partition to switch to. Whenever you go to switch partitions, you must provide a code with access to that partition. You can also provide the Master Code which has global authority and access to any system partition. Note that only enabled partitions will be present.

The Advanced Settings Menu is a programming menu that includes sub-categories for Communicator, System, and Reporter. Many of these options are fairly complex, and it is suggested that you not change them unless instructed by your monitoring provider, or you are formally trained in alarm systems and you know what you are doing. To access this menu, begin from the main screen of the system. Click the three horizontal bars menu button at the bottom. Press the Tools option. Provide the system's Installer Code (default 4112). Choose Programming. Then choose Advanced Settings. You will then be in the Advanced Settings Menu to make system changes. Once finished, press the Save button in the top-right to save any changes you have made.

This section will very briefly cover other settings that haven't been covered earlier in this cheatsheet. This includes setting the WIFI network for the panel. To access the Settings Menu, begin from the main screen of the system. Click the three horizontal bars menu button at the bottom. Then choose Settings. You will have options for WI-FI, User Management, and Secondary Keypad. You may be asked to provide the Master Code (default 1234) or Installer Code (default 4112) before configuring these settings.
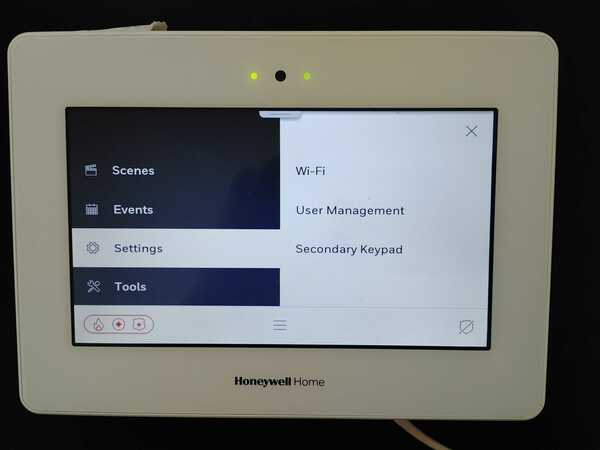
Please note that you can also configure settings for Backlight Timeout, Voice, Chime, Brightness, Volume, and Screen Cleaning right from the main screen. Just click or drag down the bar from the top of the system's home screen to access the primary settings. No access code is needed!

Total Connect 2.0 is the interactive security notification and automation platform used with the ProSeries Alarm Panels. You can access Total Connect 2.0 remotely using a web browser or by using the free Total Connect 2.0 Mobile App that you can download from the Google Play Store or Apple App Store. Your system must have some type of monthly monitoring plan to be used with Total Connect 2.0. Your monitoring company will help you get started with the Total Connect 2.0 service, usually by sending you a Total Connect 2.0 activation email after you are activated for alarm monitoring service. You will need to create a username and password for logging into Total Connect 2.0. For Alarm Grid customers, your username will typically be the email address associated with the monitored account. You can use Total Connect 2.0 to arm and disarm the system, check its current status, control programmed Z-Wave devices, and more!


We hope that you found this Honeywell Home PROA7PLUS Cheatsheet to be useful! We want you to get the very most out of your Resideo Alarm System. And keep in mind that this post may be updated in the future to include new information. It's very likely that Resideo will be updating the ProSeries Panels in the future to include new features and functions, and we will make sure to provide you with the resources you need to take advantage of whatever is offered. Also, if there's anything else that YOU would like to see included in this cheatsheet, please leave a comment down below, and we just might add it in. This is a living, breathing document, and we will likely update it as we learn more. And stay tuned to the Alarm Grid Blog for more great content coming soon!


