Alarm.com Posts

Posted By

Alarm.com was given the opportunity at the 2020 CMS President's Forum to present some of their upcoming features that will soon be made available. The discussion was led by Alarm.com Product Manager Jennie Lee. We are sure that Alarm.com users will love these features that are coming soon!


These upcoming features are designed to prevent Alarm.com users from needing to contact the central monitoring station and instead manage their own security systems more effectively. This is helpful to Criticom Monitoring Services (CMS) in improving response times, and it also provides a more engaging end user experience. Needless to say, we are very excited about what Alarm.com is bringing to the table!

First, Alarm.com is offering an in-app panic feature that makes it possible to trigger a panic alarm right from the Alarm.com Mobile App. This is great if you ever need to discreetly call for help in the event of an emergency. End users can also use the Alarm.com Mobile App to cancel an alarm or verify that an alarm is legitimate. These features must be enabled by your alarm monitoring company. Alarm Grid customers can contact us at support@alarmgrid.com to get started. But please remember that if you are ever experiencing a confirmed burglary or fire while you at the monitored premises to instead call 911 immediately.

Another upcoming feature that Jennie Lee mentioned is the ability for end users to view their central station event logs directly from the Alarm.com Mobile App. End users will be able to see prior alarm events, as well as any emergency dispatches that may have been ordered. By implementing this feature, Alarm.com is hoping to make things more convenient for end users and prevent them from having to contact the central station directly for simple tasks. This feature should also prove to be very useful for system testing purposes.

Jennie Lee also discussed the upcoming in-app test mode feature that will soon be made available for the Alarm.com Mobile App. End users will be able to access the Alarm.com Mobile App to put their systems on test mode when needed. When the system is in test mode using this service, alarm notifications will still be forwarded to the central station. However, any central station operators will know not to dispatch, and no false alarms will occur. An end user can set the time for their system to remain in test mode, and the system will automatically exit test mode once the set time has expired.

Alarm.com is also going to be putting out some useful tools for alarm technicians that should help to improve the customer experience. Technicians will be able to perform zone syncs on Alarm.com customer accounts. This is needed whenever changes are made to system zones and whenever sensors are added, edited, or removed. Another feature that will be made available to technicians is the ability to quickly and conveniently put a system into test mode on behalf of the end user. Technicians will also soon be able to initiate a Walk Test on an end user's behalf for testing specific sensors and zones. The technicians at Alarm Grid will surely appreciate these great new features!

Lastly, Criticom Monitoring Services President Tony Wilson mentioned that CMS will soon have the ability to see images directly from the DSC PG9934P and DSC PG9944 PowerG Image Sensors. These image sensors are widely used with security systems that support PowerG, including the Qolsys IQ Panel 2 Plus. Currently, images produced by these devices are visible from Alarm.com, but they aren't made available to Criticom. But that will soon change, as Alarm.com will be able to automatically forward the produced images to the central monitoring station. The PowerG Image Sensors are only able to capture images during alarm events, so as to maintain privacy for the end user. When the system goes into alarm, the image sensor will produce an image every half-second for five (5) seconds straight, for a total of ten (10) images. The first of these images will be sent immediately to Alarm.com and CMS, while the other nine (9) will be made available to the central station operator as a stop-motion video shortly thereafter.

Overall, our team is very impressed with what Alarm.com will soon be putting out. We think that these upcoming features will really help improve the lives of end users, and they will also make the jobs of our support technicians much easier. If you are interested in starting service with Alarm Grid for access to Alarm.com, you can check out our monitoring page for more information. Also remember that you can email us at support@alarmgrid.com to get started. We maintain support hours from 9am to 8pm ET M-F. We look forward to hearing from you!

Tags: ,

Comments


Posted By

Welcome to the first post of February 2020 from Alarm Grid! Our video team wrapped up January quite nicely by releasing four (4) new videos right at the end of the month. We have three (3) new videos from Joe, plus one (1) from Jorge. We hope that you find them helpful. Let's check them out!

Qolsys IQ Panel 2 Can be Self-Monitored

Jorge explains how the Qolsys IQ Panel 2 Plus can be self-monitored using Alarm.com. Self-monitoring means that the system is not connected with a central monitoring station, and the user sets up text and/or email notifications regarding system events. It will then be up to the end user to contact the authorities if any help is needed. Alarm Grid offers self monitoring plans, which can be seen on our alarm monitoring page. These self plans are great for users who don't necessarily benefit from central station monitoring, but who still want to be alerted to system events.


Calibrating an Alarm.com Camera for Video Analytics

Joe demonstrates the process for setting up an Alarm.com Camera for Alarm.com Video Analytics. This process is required for the Alarm.com ADC-V622-WELL and the Alarm.com ADC-V723. The calibration process helps ensure that ADC Video Analytics works as effectively as possible and that alerts will be sent as desired. You can likely complete the calibration process in just a few minutes, though it can be helpful to have an assistant work with you too, as having a second pair of hands can really come in handy!


Installing a Honeywell 7847i On A VISTA P-Series Panel

Joe completes the process of installing a Honeywell 7847i IP Communicator on a Honeywell VISTA P-Series Panel. This module allows the system to communicate with the AlarmNet Servers for monitoring service. The user will also be able to control their system through Total Connect 2.0 if the service is included in their alarm monitoring plan. The communicator uses a hardwired ethernet connection for IP service. It is also possible to use this module for wireless internet connectivity by adding an ethernet to WIFI bridge.


Installing a Honeywell 7847i On A VISTA Turbo Panel

Joe adds a Honeywell 7847i IP Communicator to a VISTA TURBO Panel. Examples of VISTA TURBO Panels include the Honeywell VISTA-128BPT and the Honeywell VISTA-250BPT. The Honeywell 7847i connects with a VISTA TURBO Panel using a 4-wire connection. Keep in mind that this communicator is for IP only. An internet outage will take the system offline, as this module does not offer any cellular backup. You may want to get a backup battery for your IP router to keep it online during power outages.

Tags: , , , , ,

Comments


Posted By

Alarm.com users have a lot to look forward to in the coming days. The security and automation platform is expected to soon release updated versions of its Android and iOS mobile apps. Additionally, updated weather text messaging features are now available for the Qolsys IQ Panel 2.


Whether you use the Alarm.com Android App or the Alarm.com iOS App, you should expect to upgrade to a new version in the coming days. The new Alarm.com Android App version is 4.10.16, while the new Alarm.com iOS App version is 4.11.1. Once available, the Android version can be downloaded for free from the Google Play Store, and the iOS version can be downloaded for free from the Apple App Store. You likely have a section on your phone where you can update your existing app, or your phone may perform the update automatically if enabled.

There aren't many major changes coming to the Alarm.com Mobile App with this update. However, it is still strongly recommended that you download the latest version, as some stability and performance issues have been addressed. Additionally, the new app versions feature a brand-new dashboard card and screen for shade automation control. This is great news for Alarm.com users who use Z-Wave shade controllers, such as the Somfy ZDMI or Somfy ZRSTi, which are both compatible with certain Somfy curtain motors. In previous app versions, curtain motors were controlled from the same card and screen used for smart lighting.

In other news, Qolsys IQ Panel 2 users can now receive updated weather-related text message alerts from Alarm.com. This update provides improved clarity for existing weather descriptions to ensure that end users can better understand their local weather forecasts. Weather texts are sent in English, though improved translations for Spanish and French are also available from Alarm.com.

The Alarm.com IQ Panel 2 weather text alerts are available for any Qolsys IQ Panel 2 or IQ Panel 2 Plus System running Firmware Version 2.4.0 or higher. The system must be connected with Alarm.com, and the Weather to Panel Service Package Add-On must be applied to your account. If you do not have this feature applied, talk to your alarm monitoring provider about having the feature added to your account. Alarm Grid customers can have this feature applied at no additional charge to their existing monthly monitoring fee.

If you don't have access to Alarm.com, then now is a great time to get started. You will first need a security system with a compatible Alarm.com Cellular Communicator. Right now, our most popular Alarm.com Security System is the Qolsys IQ Panel 2 Plus. This system comes dual-path ready right out of the box with a built-in Alarm.com Cellular Communicator and a WIFI card. This is important, as you will not need to add a communicator to the system. You will also need a compatible monitoring plan to access Alarm.com. Alarm Grid customers can choose from any of our Gold or Platinum Level Plans (Self or Full). More information is available on our monitoring page.

If you have any questions about Alarm.com or our monitoring service, please email us at support@alarmgrid.com. We are happy to answer any questions you might have and assist you with getting set up with a security system to meet your unique needs. Remember that our support hours run from 9am to 8pm ET M-F. We look forward to hearing from you!

Tags: , , , , , , , , ,

Comments


Posted By

Alarm.com users have another reason to be pleased, as the platform's Google Nest integration has made its triumphant return! Customers can once again include their Google Nest Thermostats in with their Alarm.com accounts. We're sure that many Alarm.com users are extremely excited!


In order to complete the Google Nest integration on Alarm.com, you must have the feature enabled on your Alarm.com account. This is something you will need to contact your monitoring company about. If you are monitored through Alarm Grid for Alarm.com service, then you can email us at support@alarmgrid.com to have us apply the integration. If you are not yet monitored with Alarm Grid, then you can check out our monitoring page here.

Once you have the feature applied to your Alarm.com account, you can manually add your Nest device through the Alarm.com website. After logging-in, choose Settings, followed by Add Device. Then choose Thermostat, and select Google Nest Thermostat. You will then begin the installation, during which you must provide your Google account information to complete the integration. It may take a few minutes for Alarm.com and Google to both update so that the feature works as desired.

It is important to understand that only a limited selection of features can be performed for a Google Nest Thermostat through Alarm.com. The integration allows for control of the target temperature, thermostat mode, fan mode, and scene thermostat control. Unfortunately, the integration does not allow for any Alarm.com rule-based automation features, scheduling for thermostat and fan schedules, battery level reporting, or advanced configuration settings including Eco Mode display. All thermostat schedules will need to be configured through the Google Nest platform like before.

If you are still looking for a viable thermostat option for use with Alarm.com, then we personally recommend the Alarm.com ADC-T3000 Smart Z-Wave Plus Thermostat. The ADC-T3000 will offer more features and a more complete experience than what is possible with any WIFI thermostat used with Alarm.com. We like to steer our customers towards Z-Wave thermostats whenever possible, as they tend to integration more nicely with security systems. But if you already have a Google Nest Thermostat and are happy with its performance, then integrating the device with your Alarm.com account is an excellent option.

Remember, if you need us to enable the Nest feature, or if you have any questions about the feature or our monitoring plans in general, please email us at support@alarmgrid.com. Keep in mind that our support hours run from 9am to 8pm ET M-F. We look forward to hearing from you!

Tags: , , ,

Comments


Posted By

We're back with another weekly video recap! This time, we have four (4) new videos to show-off. All of them were uploaded right at the end of the week. Good for our video team for rallying! There are three (3) videos with Joe, and one (1) with Jarrett. Let's take a look at the videos!

Overview - Alarm.com Video Analytics

Joe bows before providing a helpful overview of Alarm.com Video Analytics. This is a feature offered with most of the newer Alarm.com Security Cameras, and it is something you will definitely want to take advantage of if you use Alarm.com for video monitoring. By using Video Analytics, you can have Alarm.com alert you for suspicious activity, while ignoring routine events that don't warrant your attention. Please note that you will need to have the feature enabled by your monitoring company that provides you with Alarm.com service.


Using a Honeywell 4219 Zone Expander on a VISTA-50P

Joe explains how you cannot use a Honeywell 4219 Zone Expander with a Honeywell VISTA-50P Security System. The Honeywell VISTA-50P is a polling loop system that can support addressable V-Plex Polling Loop Sensors when a compatible polling loop zone expander is added to the system. Only compatible polling loop expanders can be added to the VISTA-50P. You cannot add a regular hardwired zone expander like the Honeywell 4219. The Honeywell 4219 is for VISTA Low P-Series Panels only. Compatible polling loop zone expanders for the VISTA-50P include the Honeywell 4208SN and the Honeywell 4208U.

Demonstration of Glass Break Simulator

Joe shows you how to use a glass break simulator to test your glass break sensors. A glass break sensor will activate upon hearing the low-pitched "thud" of an object striking against glass, along with the high-pitched "shattering" of glass breaking. By using a glass break simulator, you can properly test your glass break sensors, without having to actually break any glass. This is the best way to test your glass break sensors. The glass break simulator Joe uses in this video is the Honeywell FG701.

Disabling the Internal Siren on a Qolsys IQ Panel 2

Scrublord Jarrett takes time out of his busy schedule to show you how to disable the siren for your Qolsys IQ Panel 2 Plus System so that it no longer activates. This will affect the system's internal sounder, as well as any external sirens you have added to the system. By disabling the siren, your Qolsys IQ Panel 2 Plus System will not make any sounds during alarm events. In order to disable the siren, you will need to know either the Installer Code or the Dealer Code for the system. These codes are 1111 and 2222 by default, respectively.

Tags: , , , , , ,

Comments


Posted By

Alarm.com users now have a new feature at their disposal, as a special full-screen two-camera mode has been added to the Live Video page on the Alarm.com customer website. By accessing your Alarm.com account through the website, you can take advantage of this all-new viewing experience.


As you can see from the picture above, we have already tested this new feature to great success. We tested the dual-camera full-screen viewing option using the Alarm.com ADC-V723 Outdoor Camera (the top picture) and the Alarm.com ADC-V522IR Indoor Camera (the bottom picture). Both of these Alarm.com Security Cameras support the robust and powerful Alarm.com Video Analytics package. Although we don't believe that ADC Video Analytics is a requirement for using full-screen two-camera mode, we still highly recommend getting ADC Cameras with Video Analytics support because its tremendous benefits.

The new two-camera mode allows both displayed cameras to be live-streamed in HD quality, without any sacrifice or compromise in terms of picture. This is the perfect feature if you are wanting to monitor two cameras in your home or business at the same time. Additionally, Alarm.com has retained its other viewing modes, including 2x2, 1+3, full-screen, and theater modes. And of course, you can still set a single camera to its own exclusive full-screen if desired. But it's nice to see Alarm.com giving its users additional viewing options.

Remember, you need to have an alarm monitoring plan with access to Alarm.com video services to take advantage of this new feature. Alarm Grid customers can choose between a Platinum Level Monitoring Plan (Self or Full) or our Video-Only Plan. If you have any questions about this feature, or if you want to learn more about our monitoring plans, please reach out to us by emailing support@alarmgrid.com. Remember that our support hours run from 9am to 8pm ET M-F. We look forward to hearing from you!

Tags: , , , , , , , , , , , , , , , , , , ,

Comments


Posted By

It's time for another video recap from Alarm Grid! Our video team only managed to put up a few new videos last week, but we think they will be really helpful. We always appreciate our viewers who take the time to subscribe to our channel and support our videos. Let's check out the new ones!

The Number of Wireless Zones On a Qolsys IQ Panel 2

Jorge explains how many wireless zones are available on a Qolsys IQ Panel 2 System. All versions of the IQ Panel 2 support up to 128 wireless zones. The original IQ Panel 2 can only support 319.5 MHz wireless sensors. The newer IQ Panel 2 Plus System can support PowerG Sensors, plus one of three (3) legacy sensor frequencies. These legacy sensor frequencies include 319.5 MHz, 345 MHz, and 433 MHz. Make sure you purchase the correct version of the IQ Panel 2 Plus based on the legacy sensors you want to support.


The Number of IQ Key Fob Devices Supported by a Qolsys IQ Panel 2

Jorge mentions that you can technically use up to 128 Qolsys Key Fob devices on a Qolsys IQ Panel 2 System. Each Qolsys IQ Fob-S uses one (1) single system zone. And since the IQ Panel 2 supports up to 128 zones, you can theoretically use a maximum of 128 IQ Fob-S devices on a system. Remember that since the Qolsys IQ Fob-S operates at 319.5 MHz, it will only work with the 319.5 MHz version of the IQ Panel 2 Plus and the original Qolsys IQ Panel 2 System.


Viewing a Live Video Feed On the Qolsys IQ Panel 2

Jorge shows you how to view the live video feed for a compatible Alarm.com Security Camera directly from a Qolsys IQ Panel 2 System. You must make sure that the Alarm.com Camera you are using is compatible with this feature. Most of the newer Alarm.com Cameras with Video Analytics support the feature. Additionally, the IQ Panel 2 System will need to be running a high enough firmware version. If the system needs a firmware update, you can always check out Qolsys IQ Panel 2 Plus Firmware Update Page for more information.

Tags: , , , , , ,

Comments


Posted By

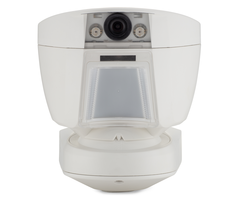
One excellent way to expand upon a new or existing Qolsys IQ Panel 2 Plus System is with an image sensor module like the DSC PG9944. This is an outdoor PowerG Image Sensor that can pair very nicely with the Alarm.com platform and all versions of the IQ Panel 2 Plus Security System.

Dsc pg9944 powerg 915mhz out wireless pir motion detector built

If you aren't familiar with image sensors, they are basically motion detection sensors with built-in still motion cameras. When your system goes into alarm, it will take multiple photographs. These photographs are then forwarded to the panel, and then ultimately to an interactive monitoring platform like Alarm.com.

For the DSC PG9944, it starts with it its reliable motion detection. The device features eight (8) internal passive infrared (PIR) sensors, with each using an advanced quad-detection configuration. This helps to ensure that the PG9944 reliably responds to movement, while ignoring potential false alarms. Operating in this manner is crucial for an image sensor device that will typically be used in an outdoor environment.

Being able to use your image sensor in an outdoor setting opens up a world of possibilities for keeping your home safe. Many users will install the PG9944 in a backyard, inside a garage, or even in a barn or shed on the property. These are all locations where you might otherwise have difficulties using standard indoor models. You can expect the PG9944 to work reliably when exposed to rain, dust, heavy sunlight, and extreme temperatures. And the device's IR night vision helps to ensure clear and concise images even during the darkest of nights.

Many Alarm Grid customers will choose to use the DSC PG9944 with the Qolsys IQ Panel 2 Plus Systems. We believe that this is a great alternative to using standard Alarm.com Security Cameras. A great aspect about image sensors is that you do not need a video-monitoring plan to use them. In fact, you can start using image sensors on an Alarm Grid Gold Level Plan (Self or Full), which is the standard level plan to start using Alarm.com. More info can be found on our monitoring page.

When the associated system goes into alarm, the PG9944 responds by taking ten (10) consecutive photos. These ten photos are sent to the IQ Panel 2 Plus for local viewing. These images can be easily viewed from the main screen of the IQ2+ by scrolling left or right until you see the other panel photos. Please note that they may be strung-together to appear as a stop-motion video. But rest assured, they are individual photos, and not a video. You can also take manual photos anytime, even if your system is not experiencing an alarm event.

It is also important to note that the Qolsys IQ Panel 2 Plus will send the first of the ten captured images to the Alarm.com platform for remote viewing. Only the first image is sent, and it will be available within the "Panel Camera Images" section of Alarm.com. Please note that this will only occur if the panel is connected with Alarm.com for monitoring and the "Panel Camera Images" feature is enabled for the Alarm.com account. That setting must be enabled by your monitoring company.

Also note that you will need to have the Panel Camera Alarm Image Uploads feature enabled on your Alarm.com account. You must enable this setting from the customer end of the Alarm.com website. Simply log-in to your Alarm.com account using a web browser, choose the Automation section, and make sure the rule is enabled. You can see an example in the image below.


We recommend using the DSC PG9944 if you require an image sensor for outdoor use. However, if you only need a unit for indoor use, then you might also consider the DSC PG9934P. This is another PowerG Image Sensor module that will offer similar performance to the DSC PG9944. But unlike the PG9944, the PG9934P can only be used indoors. This is a great device to use if you want to be able to see what's going on at home, but you don't necessarily want to pay the extra monitoring costs to use Alarm.com Video Cameras.

Both the DSC PG9944 and the DSC PG9934P are available right now from the Alarm Grid website. We recommend them for anyone looking for new image sensor modules for a Qolsys IQ Panel 2 Plus System. If you have any questions about these sensors or any of these other products on our website, please email us at support@alarmgrid.com. Remember that our support hours run from 9am to 8pm ET M-F. We look forward to hearing from you!

Tags: , , , , , ,

Comments


Posted By

Our video team was hard at work last week after their new year break. We put up several new videos, mostly featuring Jorge. We hope that you enjoy these new videos and find them super helpful. Remember, we make these videos to help you out. Let's take a look at our newest videos!


The Honeywell Home 6290W Works With a VISTA Alarm System

Joe explains how you can use a Honeywell 6290W Touchscreen Keypad with a Honeywell VISTA Security System. The Honeywell 6290W is perfect for anyone who wants to add touchscreen operation and control to their VISTA Panel. Many new users prefer touchscreen keypads because they are easier to operate and less intimidating than traditional push-button keypads. The 6290W connects to the panel just like any other keypad. It must be addressed before using. More information on addressing can be found here.


Using Motions with a Qolsys IQ Panel 2

Jorge talks about using motion detection sensors with a Qolsys IQ Panel 2 Plus System. All versions of the Qolsys IQ Panel 2 Plus can support PowerG Motion Sensors. These systems can also support one of three (3) different legacy sensor frequencies (319.5 MHz, 345 MHz, and 433 MHz). The legacy sensor frequency supported by your IQ Panel 2 Plus will depend on which version of the system you get. Meanwhile, the original IQ Panel 2 can only support 319.5 MHz motion sensors.


Using a Qolsys IQ Panel 2 Without a Phone Line

Jorge discusses how the Qolsys IQ Panel 2 Plus does not use a phone line for monitoring. Phone line communication was traditionally used with alarm systems, mostly before the rise of cellular and IP monitoring. However, it is rarely used today. This is largely because phone line connectivity is known for being very slow and unreliable. Qolsys knew that phone line communication was mostly an archaic technology, so they did not even make phone line monitoring possible for the IQ2.


Setting Up WIFI & Cell on a Qolsys IQ Panel 2

Jorge shows you how to set up WIFI and cellular communication for an IQ Panel 2 Plus. The system has a built-in LTE cellular communicator and an integrated WIFI card for connecting with Alarm.com. The cellular communication path must be set up per Alarm.com requirements. By connecting the system to a local WIFI network, the panel will utilize dual-path monitoring with both WIFI and cellular. This means that the system will send out signals across both WIFI and cellular when communicating with Alarm.com.


Self Install a Qolsys IQ Panel 2 and Still Get Monitoring

Jorge mentions how you can install your own IQ Panel 2 Plus System and still get monitoring service from Alarm Grid. The Qolsys IQ Panel 2 Plus is a very easy system to install, and the entire process can be completed using only a screwdriver. At Alarm Grid, we do not care whether you install the system yourself or hire a professional installer to do it for you. By installing your own security system, you can save a lot of money.


Rebooting The Qolsys IQ Panel 2

Jorge demonstrates the process for rebooting the Qolsys IQ Panel 2 System. Rebooting the panel refers to a reset, in which the system will power down and then automatically power back on. This is something that you may need to do as a troubleshooting step or for making sure that a new firmware update has been applied. The rebooting process can be completed from the system menus, without having to disconnect the system's transformer or backup battery.

Tags: , , , , , ,

Comments


Posted By

Alarm.com users have some new features to enjoy. The platform now lets users easily share and save highlight videos, and you can now perform Alarm.com Smart Scenes directly from the an Apple Watch. We are sure that many users out there will want to take advantage of these great features!


The Alarm.com video highlights feature was first introduced last year, though we never really mentioned it in our blog. Basically, Alarm.com keeps track of different events and arranges them into a "highlight reel" for you to review. Any Alarm.com user with Video Analytics enabled on their account can take advantage of this feature. You will need to have version 4.10.3 or higher of the Alarm.com Mobile App to view highlights on your Android or iOS device. Remember that you can update to the latest version from the Apple App Store or the Google Play Store.

Alarm.com includes the following events into highlight reels:

If you have Video Analytics enabled on your Alarm.com account, then you can conveniently view your daily highlight reel from either the Alarm.com Mobile App or website. Each individual "event" in the highlight reel can be selected by tapping its associated thumbnail. And you can tap the double arrow to switch to the highlight reel for a previous day.


The reason why we're just now bringing up Alarm.com Highlights is because the platform now allows users to conveniently download and share highlight reels directly from the Alarm.com Mobile App. You can download your daily highlight reel to save it for permanent use. You can also click the Share button to conveniently send it to a friend via text message or email, or you can upload it to various social media platforms.


The other new Alarm.com feature we briefly wanted to mention is the new ability to perform smart scenes from an Apple Watch. With just a few taps, you can adjust your lights, thermostats, door locks, and more. Now you can have total control right on your wrist! Please note that scenes will need to be set up using the Alarm.com Mobile App or website before you can initiate them from your Apple Watch.

Remember that you need to have an alarm monitoring plan with Alarm.com service to take advantage of these great features. If you don't have Alarm.com service yet, then you should check out our monitoring page to learn more. Keep in mind that you will need a Gold or Platinum Plan (Self or Full) if you intend on using Alarm.com with Alarm Grid. If you have any questions, you can always email us at support@alarmgrid.com or call us at (888) 818-7728. Remember that our support hours run from 9am to 8pm ET M-F. We look forward to hearing from you.

Tags: , , , ,

Comments