Alarm.com Posts

Posted By

Hi DIYers! We're here with our usual video recap. This time we have videos featuring Jorge and Joe. We hope that you find these instructional videos helpful in using your security system. Our dedicated video team has been hard at work putting together these videos. Let's check them out!

Programming an Encore FF345 with an L5210

Jorge shows you how to program the Encore FireFighter FF345 with a Honeywell L5210 Security System. The FF345 is a listening module that activates upon hearing the Temporal 3 sound of an activated smoke detector or the Temporal 4 sound of an activated carbon monoxide detector. The device is commonly used with high-voltage or conventional life-safety sensors that otherwise couldn't integrate with a security system. Any sensor that produces a Temporal 3 or Temporal 4 sound can be used with this device.


Connecting a LiftMaster MyQ Garage Door to a Honeywell Alarm System

Joe explains how you can use a LiftMaster MyQ Garage Door Controller with the Total Connect 2.0 platform. Total Connect 2.0 is an interactive monitoring and automation platform that is commonly used with Honeywell Security Systems. By pairing your MyQ WIFI Garage Door Controller with Total Connect 2.0, you can open and close your garage door from pretty much anywhere using the Total Connect 2.0 Mobile App. You can also get text alerts from TC2 regarding any garage door activity. However, you cannot use a MyQ Garage Door Controller with TC2 smart scenes.


IQ Panel 2 vs IQ Panel 2 Plus Alarm Systems

Jorge explains how the main difference between the original Qolsys IQ Panel 2 and the Qolsys IQ Panel 2 Plus is the sensors that they support. The original Qolsys IQ Panel 2 can only use 319.5 MHz sensors. This includes Qolsys S-Line Sensors. The Qolsys IQ Panel 2 Plus can use 915 MHz DSC PowerG Sensors, plus one of three different legacy sensor frequencies. You can choose between legacy sensor support for 319.5 MHz sensors, 345 MHz sensors, and 433 MHz sensors.


Using a Qolsys IQ Panel 2 w/o Monitoring

Jorge explains that while it is technically possible to use a Qolsys IQ Panel 2 without alarm monitoring service, it is not recommended. By not monitoring the system, you will not be able to receive text and/or email alerts from Alarm.com regarding system activity. You will also be unable to receive automatic emergency dispatch from a central monitoring station in the event of an alarm. But you can still use the system as a local noisemaker and as a Z-Wave hub without monitoring.


Activating the Chime on a Qolsys IQ Panel 2

Jorge teaches you about the chime settings on the Qolsys IQ Panel 2 System. A chime is a pleasant sound that lets you know when a sensor has been faulted. This sound is much quieter than a siren or an alarm. It's just a quick way to let you know that some activity has occurred. On a Qolsys IQ Panel 2, you can enable or disable chimes across the entire system. You can also set individual chimes for each zone. You can choose from a selection of different chimes for each zone.

Tags: , , , , , ,

Comments


Posted By

Hi DIYers! We are happy to announce that Qolsys has released Firmware Version 2.4.2 for the IQ Panel 2 and IQ Panel 2 Plus. The update is available for any IQ Panel 2 or IQ Panel 2 Plus that is connected to WIFI and running software version 2.0.1 or higher. It can be applied via Patch Tag.

Qolsys iq panel 2 verizon 7 security panel w slash z wave ready

We never covered IQ Panel 2 Firmware Version 2.4.1, as there were supposedly major issues with that version. However, Qolsys quickly rallied, and they revamped the 2.4.1 upgrade into Firmware Version 2.4.2 instead. This update should improve system stability and general performance. It offers some key upgrades and improvements over Firmware Version 2.4.0. We recommended that anyone with a Qolsys IQ Panel 2 or IQ Panel 2 Plus upgrades to 2.4.2 as soon as possible.

The following updates are included in Firmware Version 2.4.2:

  • An issue where the new IQ Remote (QW9104-840) would continue to produce Entry Delay beeps for a short period after disarming from the main panel has been fixed.
  • The PG9309, PG9312, and PG9945 now have Reed Switch as the default selection for the Sensor Input field when enrolled remotely from Alarm.com.
  • Disarm Photos can now be disabled for the IQ Remote Keypad.
  • Camera Page can be disabled from panel UI. Doing this will automatically turn-off Disarm Photos, Alarm Photos, Alarm Videos, and Settings Photos
  • The built-in panel glass break sensor can no longer be defined as a motion sensor when programmed remotely from Alarm.com.
  • An issue where the panel time might display an hour earlier than the actual time has been fixed.
  • Corrected a WIFI issue that occurred when using Alarm.com to request the system to scan for WIFI networks remotely.
  • Can now receive consecutive doorbell chime tones when a SkyBell device is pressed multiple times during a single notification event.
  • The randomized delay of 0 to 30 minutes when sending a panel software update from Alarm.com has been reduced to 0 to 5 minutes. This will speed up the process when updating from 2.4.2 to a higher firmware version that has yet to be released.
  • Fixed an issue where the Thermostat Page could appear as blank.

There is no cost to update to Firmware Version 2.4.2 using a Patch Tag. This process can be complete on any IQ Panel 2 or IQ Panel 2 Plus running Firmware Version 2.0.1 or higher. The system should be connected to a WIFI network and be plugged-in and not have a low battery. The system will need to be actively monitored and have service with Alarm.com.

To apply the update, start by clicking on the small grey bar at the top of the main screen. Then choose Settings > Advanced Settings > enter Installer Code (default 1111) > Upgrade Software > Patch Tage > enter iqpanel2.4.2 > OK > Upgrade Using Network. The update should then begin to go through. It will usually take a few minutes for the update to finish. Do not power down the system during this time! Just be patient until the update completes. The system will power cycle as part of the update process.


If you have any questions about the new Firmware Version 2.4.2 for the IQ Panel 2, please reach out to us! The best way to contact us is to email your questions to support@alarmgrid.com. Remember that our support hours run from 9am to 8pm ET M-F. We look forward to hearing from you!

Tags: , , , , , , , ,

Comments


Posted By

Hi DIYers! We're back with another video recap. Sadly, our video team took a break a couple weeks ago, so there was no recap last week. But they came back strong last week with seven (7) new videos! The Alarm Grid boys Jarrett, Jorge, and Joe are all back. Let's check out the videos!

Cellular Communicators That Work With a Honeywell VISTA 20P

Our always helpful alarm technician Jarrett explains which cellular communicators work with a Honeywell VISTA 20P. The system needs an added alarm monitoring communicator to connect with the AlarmNet360 servers and Total Connect 2.0. If you decide to get a cellular communicator, then you must make sure that your monitoring plan supports cellular service. It is strongly recommended that you get an LTE cellular communicator for the system. These include the Honeywell LTE-XA (AT&T LTE), the Honeywell LTE-XV (Verizon LTE), the Honeywell LTE-IA (AT&T LTE & IP) and the Honeywell LTE-IV (Verizon LTE & IP).


Deciding Whether to Use 2-Wire or 4-Wire Smoke Detectors

Joe smiles and waves as he helps you make the decision of whether to use 2-wire smoke detectors or 4-wire smoke detectors with your hardwired security system. Most users will choose 2-wire smoke detectors because they can be used without extra equipment. But the downside is that 2-wire smoke detectors can only be used with a designated smoke detector reset zone, such as Zone 1 on a Honeywell VISTA Panel. A 4-wire smoke detector can be used on any hardwired zone, but you will need extra equipment, including a power supply and relay.


Reasons Why the Wired Alarm Contact on a Door May Not Work

Joe gives another big wave as he provides various reasons why a hardwired door and window contact sensor may not be working properly. A common reason for this is that the magnet is not properly aligned with the sensor. This causes the reed switch inside the sensor to remain open, even when the door or window is closed. Properly aligning the magnet with the sensor will fix this issue. Another possibility is that the wire leading from the sensor to the panel may be damaged or cut. In that case, you would need to re-wire the sensor.


Putting a 5834-4 Into High Security Mode

Three cheers for Joe, as he explains how to put a Honeywell 5834-4 Key Fob into its high-security mode. This key fob can be set for a low-security mode or a high-security mode. When the key fob is in high-security mode, the device is essentially "synced" with the system and using rolling-code encrypted communication. This makes it significantly more difficult for a savvy intruder to try and tamper with the device. The 5834-4 will use a green LED in its low-security mode, while it will use a red LED in its high-security mode.


Enrolling a PowerG CO Detector to a Qolsys IQ Panel 2 Plus

Joe graces us with a fourth video, as he shows how to enroll a PowerG CO Detector with a Qolsys IQ Panel 2 Plus. Adding carbon monoxide sensors to your security system is important. Carbon monoxide is an odorless and tasteless gas that kills hundreds of people every year in the United States. Most of these deaths occur during the winter months when heaters are commonly used in homes. A faulty heater can lead to a CO outbreak. However, CO deaths can also occur due to other factors, such as accidentally leaving a vehicle running in an enclosed garage.

Learning the DSC PG9939 Key Fob to the Qolsys IQ Panel 2 Plus

Jorge is here to show us how to enroll a DSC PG9939 Key Fob with a Qolsys IQ Panel 2 Plus. This key fob can be auto-enrolled like pretty much any other compatible sensor for the system. This is done by putting the system into its auto-enrollment mode and then activating the device to transmit a signal. You will need to choose a Sensor Group for the key fob. The most common Sensor Group to choose is 1 - Mobile Intrusion. The DSC PG9939 features four (4) buttons that you can use to control the IQ Panel 2 Plus System.


Finding the Serial Number on a Honeywell Key Fob

Jorge is the master of key fobs, as he shows you how to find the Serial Number for a Honeywell Key Fob. The Serial Number is used for enrolling the key fob with the system. The best way to enroll a Honeywell Key Fob with a system is to auto-enroll it. If you manually enter the Serial Number, there is a chance that you might make a mistake. Auto-enrolling will prevent this. It also ensures that the key fob can communicate the with panel properly. Once you auto-enroll the key fob, the Serial Number will automatically appear on the screen.

Tags: , , , , , ,

Comments


Posted By

Hi DIYers! We know that it can be difficult to decide between all the available security systems on our site. Today, we're going to make that decision a little easier by presenting our list for the Top 5 Security Systems of 2019. We really have some great alarm panels to present!

Alarm grid inside security stickers

A good security system is easy to use, supports many sensors, and offers some excellent features. In 2019, competition is stiff, as alarm systems are becoming more and more user-friendly, and they are stepping up their game in terms of capabilities. Any of the 5 systems on our list would make a very nice addition to your home or business. But make sure to stick around until the end so you can see our favorite system!

With that out of the way, here are our Top 5 Security Systems for 2019:

5. Interlogix Simon XTi-5i


Interlogix may be shutting down at the end of 2019, but at least they put out a decent panel to go out on! The Interlogix Simon XTi-5i is a solid budget alarm system that offers a pleasant 5-inch touchscreen display and a customizable UI. It supports up to 80 wireless zones and a variety of Alarm.com Communicators, including dual-path options. Adding an Alarm.com Communicator will also allow you to use Z-Wave devices with the system. There are even some new Interlogix Encrypted Sensors specifically designed for the Simon XTi-5i System!

4. 2GIG GC2e

2gig gc2e wireless encrypted alarm panel

The 2GIG GC2e is a budget-friendly system that is perfect for users who are familiar with the old 2GIG Go!Control Panel. As an upgrade from the 2GIG GC2, the new GC2e includes a larger 5" touchscreen, Z-Wave Plus functionality, and support for the 2GIG eSeries Encrypted Sensors. The GC2e supports up to 60 wireless zones and 64 user codes. Note that you will need to add a compatible cellular communicator to get the system monitored and connected with Alarm.com!

3. 2GIG GC3e

2gig gc3e wireless encrypted alarm panel

The 2GIG GC3e is the flagship system from 2GIG, and it includes everything you could want in an alarm system. It features encrypted sensor support, partitioning, integrated WIFI, built-in Z-Wave Plus, and a beautiful 7-inch touchscreen display. The GC3e is very robust with its support for 100 wireless zones and 100 user codes. Just remember that a cellular communicator is needed to activate the system for monitoring and connectivity with Alarm.com. Once you add a cellular communicator, the system will be dual-path ready!

2. Honeywell Lyric Controller

Honeywell lyric controller encrypted wireless security system

The Lyric has been out for a few years now, but it is still one of our favorite security systems. It is the only panel on this list that offers compatibility with Apple HomeKit, and the only one of these systems that can be monitored through WIFI only. The panel features built-in WIFI, but you can add an optional LTE cellular communicator to make it dual-path ready. The Lyric is also the only system on this list that uses the Total Connect 2.0 platform instead of Alarm.com. Another benefit is that the Lyric has its own lineup of encrypted SiX Series Sensors. And you will love its 7" touchscreen. Other features for the system include support for up to 128 wireless zones, classic Z-Wave, 48 total user slots, a built-in 2MP camera, 10 chime settings, and so much more!

1. Qolsys IQ Panel 2 Plus

Qolsys iq panel 2 plus verizon lte with powerg s line and legacy

The Qolsys IQ Panel 2 Plus is the best security system of 2019. There is so much to love about the IQ Panel 2 Plus. It has a sleek, crisp design with a 7" touchscreen display. It is dual-path ready right out of the box with a built-in LTE communicator (AT&T or Verizon) and integrated WIFI. It offers some outstanding features, including live-streaming for compatible Alarm.com Cameras, support for four (4) partitions, automatic Bluetooth disarming, a built-in glass break sensor, a 5MP camera, and so much more. There are three (3) versions of the IQ Panel 2 Plus, with each one supporting a different legacy sensor frequency (319.5 MHz, 345 MHz, or 433 MHz). But the icing on the cake is that you can use DSC PowerG Sensors with ANY version of the IQ Panel 2 Plus. These sensors offer a wireless range of up to 2,000 feet away from the IQ Panel 2 Plus in open air, and they utilize 128-bit AES encryption for maximum wireless security. This is truly the best system on the market right now!

If you have any questions about any of these systems, or if you want to learn more about the monitoring services offered from Alarm Grid, please reach out to us! The best way to contact us is to email support@alarmgrid.com or call us at (888) 818-7728. Remember that our support hours are from 9am to 8pm ET M-F. We look forward to hearing from you!
Tags: , , , , , , , , , , , , , ,

Comments


Posted By

Hi DIYers! Today, we're presenting our own guide for installing the Qolsys IQ Panel 2 Plus. This system is very easy to use, and it can be installed by virtually anyone using nothing more than a screwdriver! This is the perfect security system for your home, office, or apartment!

Qolsys iq panel 2 at and t wireless security system with at and Most of the information presented in this post can be found in the Qolsys IQ Panel 2 DIY Installation Manual. You are free to follow along with that manual, which can be found here. We also have three (3) videos that we will include along the way. Feel free to follow along with those as well. All of this information applies to both the original IQ Panel 2 and the newer IQ Panel 2 Plus. With that out of the way, let's get started!

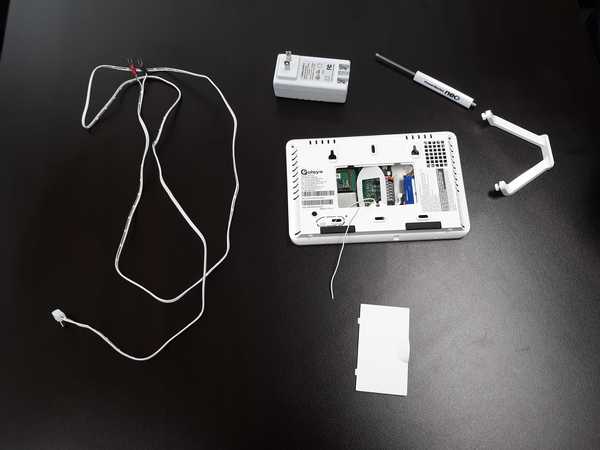
The first thing you will want to do is power on the system. The Qolsys IQ Panel 2 Plus comes with everything you need to get started. Once you have opened up the box, you should locate the panel, the power supply transformer, the power wire, the panel back cover, and the table stand. You will also want to have a screwdriver on hand.


Start by connecting the spade lugs of the power cable to the transformer. The IQ Panel 2 Plus uses DC power, so you must make sure to follow polarity. That means connecting the positive (+) wire and negative (-) wire accordingly. The positive and negative ends on the IQ Panel 2 power cable are marked for this purpose. The positive (+) wire has grey dashes and ends in a red spade connector. The negative (-) wire is solid white without grey dashes and ends in a black spade connector. Make sure that the wires are connected with the proper terminals on the transformer. You can see the positive (+) and negative (-) terminals marked on the transformer. The connection should be nice and snug, but not overly tight.

From there, you can connect the other end of the power cable to the IQ Panel 2 Plus System. There is a simple barrel connection for this purpose. The transformer can then be plugged into a wall outlet. When applying the panel back cover, make sure to run both the power cable and the thin RF receiver cable out from the indentation on the back cover. The back cover should snap nicely into place. The convenient table stand can be installed by putting it into the keyhole slots on the back of the panel and then sliding up. You can power on the system by pressing and holding the side power button until the system LED remains lit.


After the system powers on and boots up, you will be greeted by the Setup Wizard. It is recommended that you go through the Setup Wizard, as it will walk you through the entire setup process. Note that some steps of the Wizard will require you to activate the system for monitoring service. This involves registering the panel's built-in cellular communicator with Alarm.com. This is optional for initial set up. You can always register the cellular communicator with Alarm.com later.

Remember that activating the system is something you will definitely want to do before too long, as that is the only way for it to send out signals to you and/or a central station. Remember that you will need to provide the IMEI Number for the system in order for your monitoring company to activate the cellular communicator. This can be found on a sticker on the back of the panel. It will also be shown as you move through the Wizard.

You will do several things as you go through the Setup Wizard. You will connect the system to a WIFI network, run an initial check for the system, add sensors, perform an initial sensor test, set up the built-in panel glass break sensor, add Z-Wave home automation devices, pair your phone for automatic Bluetooth disarming, pair secondary IQ Remote Keypads, and add system users. Remember that you will want to have a good idea of Sensor Groups when enrolling sensors. You can learn all about the IQ Panel 2 Sensor Groups in this helpful FAQ.


The last thing you will want to do is install your sensors. We only focused on door and window contacts and motion sensors, but many of the same principles apply across any sensor type. What's great about wireless sensors that are used with the IQ Panel 2 Plus is that they can be mounted without drilling holes into the wall or using any power tools. You can safely mount and secure these sensors using double-sided foam tape. Most wireless sensors come with their own double-sided tape for this purpose, or you can buy some off our site!

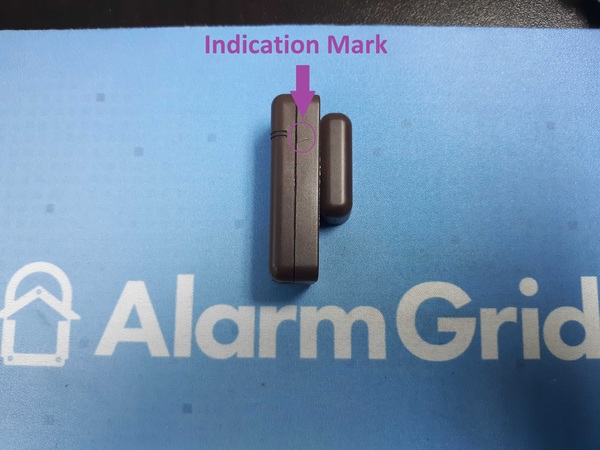
There are a few general tips when mounting these sensors. When mounting door and window contacts, you should have the magnet on the moving structure of the door or window, and the sensor itself on the door or window frame. Make sure the magnet is aligned with any indication marker shown on the sensor. Also remember to keep the magnet spacing gap in mind. Most Qolsys Door and Window Sensors allow for a magnet spacing gap of up to 0.75 inches.


As for motion sensors, you should have them mounted flat on a wall or corner-mounted. But keep in mind that only a flat-mount will allow you to install without drilling any holes. The motion sensor should be nice and level, and it should be installed at a height between 6 and 8 feet. Qolsys recommends 7.5 feet, which provides the best possible results. The motion sensor should not be facing any windows, vents, or air ducts. It should also not be facing any nearby furniture or stairwells if you have pets!

Most importantly, remember to test ALL your sensors after the final installation!


And that wraps up our Part 1 Guide for installing and using the Qolsys IQ Panel 2 Plus. Look forward to Part 2 coming soon! If you have any questions about the Qolsys IQ Panel 2 Plus or our monitoring service, please reach out to us by emailing support@alarmgrid.com. Remember that our support hours are from 9am to 8pm ET M-F. We look forward to hearing from you!

Tags: , , , , , , , , , , , , , , , , , , , , , , , , , , , , , ,

Comments


Posted By

Alarm.com has put out a proactive warning ahead of Halloween night (October 31st) stating that customers may notice minor delays between the hours of 5pm and 11pm ET. These delays should only affect non-critical, non-emergency signals and notifications, as well as doorbell cameras.


Alarm.com did not release an official reasoning for these likely delays, but we suspect that it will be the result of increased activity from the excellent Alarm.com SkyBell Video Doorbells due to Trick-Or-Treaters. And as we all know, SkyBell Cameras are the best video doorbells out there!

We think it's good for Alarm.com to give out this proactive warning just in case there are any delays. In the mean time, you can rest assured that any critical signals, including alarms, will still go through for Alarm.com. If you are an Alarm Grid customer seeking more information about the issue, then please email us at support@alarmgrid.com. We look forward to hearing from you!

Tags: ,

Comments


Posted By

Hi DIYers! We are very happy to announce that we have some exceptional new products from Alarm.com. There is a new Z-Wave Plus smart water valve, an upgraded ethernet-to-WIFI bridge for Alarm.com PoE Cameras, and a digital doorbell adapter for use with SkyBell Video Doorbell Cameras.


The first new product we will be discussing today is the Alarm.com ADC-SWV100 Smart Water Valve. This smart water valve uses Z-Wave Plus technology to communicate with your security system or Z-Wave hub. It allows you to remotely shut-off your main water line from virtually anywhere. This can be very convenient if a flood or leak occurs while you are away. The device is perfect for pairing with flood sensors that you have enrolled with your alarm panel. You can even set up smart scenes to have the device shut-off the water automatically whenever a flood sensor detects a leak.

Although the ADC-SWV100 was built with Alarm.com in mind, the versatile device can really be used with any Z-Wave controller that supports smart water valves. This includes Honeywell Alarm Systems that use the Total Connect 2.0 platform. One important thing to note is that if you use this device with Alarm.com, then you will need to have your monitoring company enable the Water Management Add-On Package for your account. If you have monitoring service with Alarm Grid, then we will do this for no additional monthly charge.


Next up we have the Alarm.com ADC-W110 Ethernet-to-WIFI Bridge. This accessory lets you take a hardwired ethernet device and have it communicate wirelessly across a local WIFI network. The device is great for use with compatible Alarm.com Cameras that use power over ethernet, also known as PoE. By using the ADC-W110, you can eliminate the need to run an ethernet cable from the IP router to the camera.

What's super convenient is that both power and IP data are supplied from the ADC-W110. You just need to connect the PoE camera with the ADC-W110 using an ethernet cable. The ADC-W110 will then take care of the rest! This device is actually a newer version of the older ADC-W100, which as of late October 2019 is still available. Keep in mind that you will still need to connect the ADC-W110 with a wall outlet for power.

Lastly, we have the Alarm.com ADC-VACC-DB-A SkyBell Digital Doorbell Adapter. This adapter makes any SkyBell Doorbell Camera with a digital doorbell chime. Normally the SkyBell devices only work with mechanical doorbell chimes. We actually created an FAQ that will help you get started using the SkyBell Digital Doorbell Adapter with your digital doorbell chime. You can check it out right here.

If you have any questions about these new products, or if you would like to learn more about our monitoring services or Alarm.com, please reach out to us! The best way to contact us is to email support@alarmgrid.com. We will review your email at our earliest convenience and reply back as soon as possible. Remember that our support hours for responding to emails are from 9am to 8pm ET M-F. We look forward to hearing from you!

Tags: , , , , , , , , ,

Comments


Posted By

Alarm.com has reported that their service is experiencing a technical issue that may be hindering the signaling ability of customer accounts. You may have trouble accessing the Alarm.com Mobile App or website during this time. The issue is currently being worked on and should be solved soon.

Alarm Grid will provide an update once we learn more.

Update 4:45 pm ET: We have learned that Alarm.com customer interfaces have stabilized. Command and signal processing has also improved. However, some customers may still experience intermittent delays during this time. The issue should be fully resolved shortly.

Update: The issue has since been resolved.

Tags: ,

Comments


Posted By

Hi DIYers! We're here with the Alarm Grid video recap covering October 21st thru 25th. We have eight (8) new videos this time. These videos proudly feature the Alarm Grid boys Jarrett, Joe, and Jorge. We hope you're ready to learn more about security systems! Let's check out the videos!

Issues Disabling Auto-Stay Arming for a Vista-128BPT

Joe talks about issues regarding Auto-Stay Arming on a VISTA-128BPT running firmware version 10.0. This firmware version has an error where Auto-Stay Arming is not automatically disabled when arming from Total Connect 2.0. This can cause issues if you Arm Away from Total Connect 2.0 and you aren't around to fault an Entry/Exit Zone during the Exit Delay countdown. When this happens, Auto-Stay Arming will go into effect for any zone where the feature is enabled.


Connecting The Lyric Alarm System to Alexa

Jorge explains how you can connect the Resideo Lyric Security System with Amazon Alexa for spoken voice commands. In order to do this, the Lyric Alarm System must be paired with the Total Connect 2.0 platform. Any voice commands for the Lyric System sent through Alexa will pass through Total Connect 2.0 before being forwarded to the panel. You can use Alexa voice commands through TC2 to arm the system, check current status, and control smart home devices.


Why Your Vista-128BPT is Armed Stay After Choosing Arm Away from TC2

Joe explains why you might find that your VISTA-128BPT Security System has Armed Stay even though you have selected Arm Away on Total Connect 2.0. This is due to the error on Firmware Version 10.0, were the TC2 platform doesn't know to automatically ignore Auto-Stay Arming settings if they are enabled. You can overcome this issue by upgrading to Firmware Version 10.4, or by manually disabling Auto-Stay Arming for every zone on the VISTA-128BPT Alarm System.


The Honeywell Lyric Security System Will Allow for Different User Codes

Jorge explains how you can set up multiple user codes on a Honeywell Lyric Alarm Panel. You need to provide a valid code to perform various system functions such as arming and disarming. Additionally, the Master Code and Installer Code both have special privileges on the system as well. The Installer Code is particularly important, as it is needed for programming the system. However, you can only disarm using the Installer Code if it was the code used to arm originally.


Using More Than One SkyBell With Total Connect 2.0

Jarrett explains how you cannot use more than one (1) SkyBell device with a Total Connect 2.0 account. If you want to use a second SkyBell Video Doorbell, then you will need a second Total Connect 2.0 account. Alarm Grid customers can add one (1) SkyBell to any Total Connect 2.0 account, even if their plan does not technically include video surveillance. We offer a special Video-Only Plan, which is perfect if you already have an alarm monitoring plan, but you are needing a second account to add a second SkyBell device.


Why A Legacy IPCAM Won't Work With Total Connect 2.0

Jarrett explains an issue that you might encounter when trying to use a legacy Total Connect 2.0 IP Camera with the TC2 platform. The older legacy TC2 IP Cameras have default software that is not compatible with the new HTML5 version of TC2. Resideo pushed down an update to these cameras to make them compatible with the new HTML5 platform. But any legacy TC2 IP Cameras that weren't connected at the time were unable to receive the update. Those cameras can no longer be used with TC2.


How a Qolsys IQ Panel 2 Behaves When the Internet Goes Down

Jorge explains what happens when a Qolsys IQ Panel 2 Plus System loses its internet connection. When this happens, the system will remain connected with Alarm.com using its built-in LTE cellular communicator. All versions of the IQ Panel 2 Plus have an integrated cellular communicator for this exact purpose. You can choose from AT&T LTE or Verizon LTE. We recommend going with the service that works best in your area, regardless of which one you use for your personal phone.


Resetting A Qolsys IQ Panel 2 to Factory Defaults

Jorge covers the process for factory resetting a Qolsys IQ Panel 2 Plus System. This is done using the Dealer Code, which is 2222 by default. By performing a factory reset and restoring the system to factory default settings, several things will happen. Any programming settings will be restored to their default. All programmed sensors will be deleted. All Z-Wave devices will be cleared. All user codes will be deleted, with the exception of default codes. If you changed the Master, Installer, or Dealer Codes, they will all be reset to their default.

Tags: , , , , , , , ,

Comments


Posted By

Alarm.com Rogers Communicators may be experiencing connectivity issues due to a temporary issue with the carrier. No other carriers are affected. We expect the issue to be resolved relatively soon. Alarm Grid will provide further updates once we receive more information from Alarm.com.

Update: This issue has since been resolved. Please contact us at support@alarmgrid.com if you are continuing to experience issues.

Tags: ,

Comments