News Posts

Posted By

The Alarm.com App can now be used directly from a car's touchscreen display via Android Auto™. Most cars made in 2018 or later can support the Android Auto™ feature. For some cars, a wired USB connection may be required, while others can take advantage of the feature wirelessly via Bluetooth.

Both Android Auto™ and Apple Carplay™ are meant to help you use your phone more safely while driving. By moving certain controls from the phone to the vehicle's touchscreen, you can take care of necessary phone interactions without having to actually look at the phone. In many cases, voice commands can be used, rather than having to look at and touch the screen. This promotes safety by reducing distracted driving.

Alarm.com can now take advantage of this safety-enhancing feature and work with Android Auto™. At this time, the Alarm.com App does not interface directly with Apple Carplay™ We currently have no word on when, or even if, it ever will. Whether your vehicle requires a USB connection or can interface via Bluetooth will vary per vehicle year and model.

It's simple to get started with this integration. All you need is a commercial or residential Alarm.com account, a compatible Android phone, and either a vehicle or an after-market stereo system that supports Android Auto™. Just login to the Alarm.com app, and connect the Android phone using Android Auto™. If this is your first time connecting to Android Auto™ you may need to check the phone's display for a permission message.

From there, you will be able to run the Home and Away scenes from the car's touchscreen. You can also see the status of your garage doors, open or close them, and receive important system notifications. These notifications may include pending alarms, alarms, arming reminders, and geo-fence-related events.

There are three (3) types of notifications you may receive when using Alarm.com with Android Auto™. They are Alarm.com notifications, Head Unit notifications, and Notification Center notifications:

Alarm.com Notifications:

This type of notification will include pending alarms, alarms, arming reminders, and location-based notifications such as garage door left open, sensor left open, and panel left disarmed among others.

Head Unit Notifications:

Head Unit notifications will appear on the touchscreen, even if the user is not logged into the Alarm.com Android Auto™ interface. This notification will likely appear as a banner at the top of the display. It will show the notification, along with an action and a dismissal icon.

For example, the notification may show that the garage door has been left open with an icon allowing you to close it, or an X to dismiss the notification. Head Unit Notifications will only provide the primary action as an option for dealing with the notifications. If you view the same notification in the Notification Center, there could be a primary and a secondary action option.

Notification Center Notifications:

Notification Center notifications provide slightly more information. In this screen, you may see up to two (2) different action options with text to explain what each available action is. For example, if the notification is that the system was left disarmed, you may have the option to arm it either Away or Stay. Whereas, on the same Head Unit notification, you will only be given the option to arm Stay (the primary action).

To get to the Notification Center, click the notification icon on the lower right side of the car's touchscreen. Use the arrows, or flick to scroll through the available notifications. Some notifications will not have any type of action associated with them. Others may have one (1) or two (2) different options to choose from.

The table below shows the different types of notifications and the primary action associated with that notification if there is one. Only the arming reminder notification offers a secondary action:

Notification Primary Action Secondary Action
Arming Reminder Arm Stay Arm Away
Garage Door Left Open Close NA
Lock Left Unlocked Lock NA
Pending Alarm/Alarm NA NA
Sensor-Based Notifications NA NA

Alarm.com constantly strives to find new ways to improve its product. This latest integration aims to keep you safe both at home and on the road. We're standing by to see what new feature they come up with next. I'm sure we won't have to wait long!

Tags: , , , , , , ,

Comments


Posted By

The 4th of July, aka, Independence Day is the ultimate summer event. It is a celebration of our country's independence from Britain. On this day, most of us will engage in cookouts, swimming, eating, drinking, and fireworks, or some combination of those things. Just remember to do it safely!

Our hardworking support staff will be off, and our offices will be closed for the holiday. Of course, our central station partners Cricitom (CMS) and Rapid Response will be on the job, monitoring Alarm Grid customer systems. When it comes to alarm response, nothing will change.

If you need to contact the central monitoring station, to cancel a false alarm or verify a signal, customers in the US can contact Criticom (CMS) by dialing (888) 818-7728 and choosing Option [9]. This will get you in touch with an operator who can assist you with canceling a false alarm, putting your system on test, or checking an alarm signal. You can also set up a MyAlarms.com account, so that you can do those things yourself online without having to call.

Canadian customers can contact Rapid Response at (800) 932-3822. Remember when you call either monitoring station, you will be asked for your name, address, and your false alarm password or phrase. Providing incorrect information when asked, will result in the dispatch of authorities.

If you have a support question or if you need to make adjustments to your account, the monitoring station cannot assist you. In that case, send an email to support@alarmgrid.com with details of your request and we will begin to address these support issues as soon as we return to the office on Wednesday, July 5. At that time, we will return to our normal business hours of 9:00 am - 8:00 pm Eastern, Monday - Friday.

We hope you enjoy the holiday. We recommend that you wear sunscreen, and drink plenty of water if you'll be spending time outdoors in the heat, even if you're swimming. Be careful if you'll be handling fireworks and let's all meet back here on Wednesday to share stories about our holiday!

Tags: , , , , , ,

Comments


Posted By

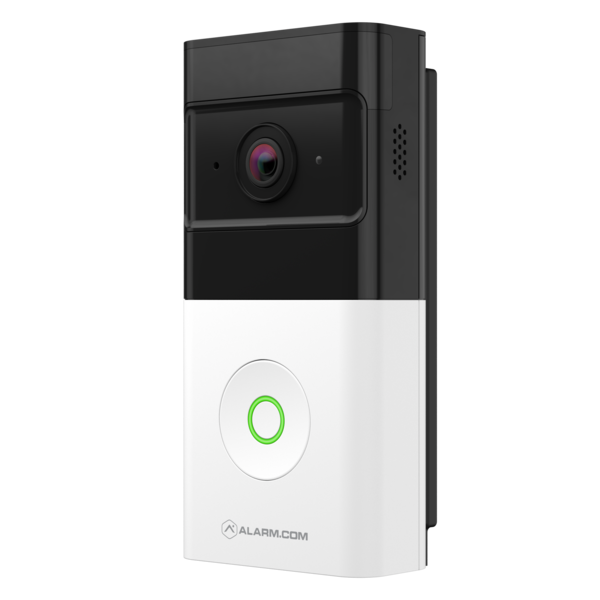
Alarm Grid is now proud to offer the Alarm.com ADC-VDB750 Wired Video Doorbell. This doorbell supports video analytics and two-way audio. It also offers an improved operating temperature range over older doorbells. No power module is required with mechanical chimes, for a simple installation.


The ADC-VDB750 will be replacing the silver SkyBell ADC-VDB105X Slimline II, which has been discontinued. As of this writing, the above-referenced Skybell is still available in Bronze and Satin Nickel from Alarm Grid. The operating temperature range of -58°F - 122°F (-50°C - +50°C) means that users in more extreme climates can now have access to the safety and peace of mind a video doorbell provides.

Also improved is the ADC-VDB750's field of view. With a 165° horizontal and 145° vertical field of view, users will be able to see more of the area surrounding the door. You can now capture all of the activity in the area surrounding the entry to your home. Package thieves, beware!

Is there such a thing as too much of a good thing? Sure, sometimes, but not when it comes to the field of view on this video doorbell. With Alarm.com's unparalleled video analytics, the ADC-VDB750 offers People Detection. With this powerful analytics engine you can be sure that when you receive a notification that someone's at the door, it will actually be a person. Not the neighbor's basketball, or your friendly neighborhood squirrel.

The ADC-VDB750 can use either AC or DC power. It can accept 16VAC to 24VAC at 10VA minimum and 40VA maximum (16VAC, 10VA is recommended), or 15VDC to 24VDC at 6W minimum to 20W maximum. If an AC power supply is being used for the existing doorbell, be sure it has the proper specifications to support the ADC-VDB750. A DC power supply can also be used, we offer the Alarm.com ADC-VDBA-PSU-DC which provides 16VDC at 20W. If you aren't replacing an existing doorbell, this might be the easiest way to go. Any DC power supply used will need to provide at least 15VDC at 8W. Be sure to remove power from the doorbell by turning off the breaker, in the case of an AC transformer, or unplugging the DC power supply, before beginning a doorbell swap.

If the existing doorbell uses a mechanical chime, you can replace that doorbell with the ADC-VDB750 and you won't have to use any type of power module. If you're replacing an older Alarm.com video doorbell that used a power module with the mechanical chime, you can remove it. If you will be replacing an older doorbell that uses a digital chime, you will need to install the ADC-VDBA-PM-750 power module.

This power module differs from the power module for the ADC-VDB770 because it only has two (2) wires instead of four (4). The two (2) wires for this power module will connect in parallel to the same terminals the doorbell wires are already connected to on the chime. For example, digital chimes commonly have screws with markings of FRONT, TRANS, and REAR. If your installation has wires connected to FRONT and TRANS, the wires for the power module will connect to these same two terminals, right on top of the existing wires. This connection does not observe polarity.

If you are replacing a Slimline I or Slimline II (Skybell) doorbell, you can use a backplate adapter for ease of installation. Power down and remove the old doorbell, but leave its mounting plate in place. Make sure that all wires are well connected to the screws on the plate and that the bottom set screw is backed out far enough that its threads don't stick up above the plastic. Attach the Alarm.com ADC-VDBA-750-BPA (sold separately) to the back of the new ADC-VDB750, then attach this entire unit to the existing Slimline doorbell mounting plate. Tighten the set screw and return power to the unit.

There is a wedge mount kit available for the ADC-VDB750. This kit contains a 5° downward angled wedge and a 15° left or right-angled wedge. Using these wedge mounts allows you to dial in and improve your doorbell's downward and/or left/right viewing angle for the perfect line of sight. The wedge mount kit, Alarm.com ADC-VDBA-750-WMK, is sold separately. Please note, if you are replacing a Slimline I or Slimline II Skybell Doorbell, and you wish to use the wedge mount kit, you will need to remove the Slimline doorbell backplate and use the one that comes with the ADC-VDB750 instead.

Finally, if you will be replacing an older and larger video doorbell with the new ADC-VDB750, and there's an area you need to cover such as a larger wiring hole, or an area where older, non-matching paint may show, you can use the Alarm.com ADC-VDBA-WPU. This is basically a trim plate that you can install behind the new doorbell's mounting bracket. This trim plate is larger than the mounting bracket and will cover any unsightly old paint or other marks from previous installations.

So, say hello to the Alarm.com ADC-VDB750. The latest, but surely not the last, entry in Alarm.com's impressive list of video doorbell offerings. It joins the Alarm.com ADC-VDB770 wired video doorbell and the Alarm.com ADC-VDB780B and ADC-W115C bundle, which includes the wireless doorbell camera with rechargeable battery, and a wireless chime module. When it comes to video doorbell cameras, Alarm.com has got you covered.

Tags: , , , , , , , , , , , , , , , , ,

Comments


Posted By

Qolsys has done it again, leading the industry with a first-to-market product that suits nearly any need. They've taken the IQ Panel 4 and merged it with the DSC PowerSeries NEO. The result is a hybrid system. From a small home to a school, church, or hospital the IQ Pro can protect them all.


The Qolsys IQ Pro jumps right into the market with a Qualcomm SnapDragon 8 Core SOM (System On a Module) processor and 16GB of NAND Flash Memory. It supports up to 128 zones, 8 partitions, 1000 users, and 16 keypads (wired or wireless). All IQ Pro panels offer PowerG and some also have an optional, built-in legacy wireless receiver.

It also has Dual-Path LTE and WiFi or Ethernet internet communication capability. It is available with an AT&T, Verizon, or Telus(Canada) cellular option. Also, as pictured above, it comes in either a plastic enclosure (left front) or a metal enclosure (right rear). The metal enclosure is the only enclosure option that will accept an external antenna.

The IQ Pro communicates through Alarm.com. When dual-path communication is enabled, it will send every alarm signal through both available paths. The signal that reaches Alarm.com first is processed, and the slower signal is disregarded. In this way, Alarm.com always ensures that each individual signal uses the fastest available path to communicate.

For Alarm Grid customers, a plan that includes cellular communication is required to activate the IQ Pro. Use of the WIFI or Ethernet path is optional, but the LTE cellular communicator must be registered with Alarm.com in order to activate the system for any type of monitoring. With Alarm Grid's Self Monitoring, all signals are sent from Alarm.com to the end-user via text, email, push notification, or any combination of those options. There is no central station involved.

For Full Monitoring customers, each signal is sent to Alarm.com and they forward the signals to the appropriate central station, and to the customer via text, email, push notification, or some combination of those options. The Alarm.com website or app is also how the customer can log in and control their system, check system status, and control automation devices, including Z-Wave devices that are connected to the panel. Alarm.com also offers many third-party automation options, such as the use of MyQ garage doors, Rachio or Rainbird irrigation, Sonos whole-house speaker systems, and many more. Both Self Gold and Full Gold Alarm Grid customers will have remote control options. Customers who aren't interested in remote control and automation options can choose the Alarm Grid Cellular Alarm Monitoring Plan.

The IQ Pro panel can be expanded by adding hardwired zones, an addressable wired loop, and/or variable wireless options. Adding hardwired zones requires an HSM2108 module. Each of these modules added provides an additional eight (8) hardwired zones, up to the max of 128 total zones. An addressable wired loop is usually used in a situation where the wire run for the devices is longer than usual, and may be more spread out. If you are replacing a system that has some type of addressable loop in place, you can choose to keep those points protected with wired devices by purchasing the corresponding compatible MX device (see table below) or replace them with PowerG wireless sensors.

There are multiple keypad options. The panel can support up to a maximum of sixteen (16) hardwired, or DSC NEO touchscreens (with a firmware update to the keypad via SD card), up to five (5) wireless or PowerG IQ remotes, and up to three (3) WIFI IQ Remote touchscreens.

For those who only plan to use the PowerG long-range, encrypted sensors, there is the PowerG-only IQ Pro. Or in addition to PowerG, users can also choose either a 345 MHz Honeywell or 2GIG compatible, 319.5 MHz Qolsys or Interlogix/GE compatible, or 433 MHz legacy DSC compatible model. With each also having a choice between a metal or a plastic enclosure.

The IQ Pro can also support up to ten (10) PowerG PIR Cameras such as the PG9944 Outdoor Motion Camera, or the indoor PG9934P PIR Camera. It has four (4) onboard programmable outputs and is expandable with up to 148 outputs. These relays are customizable according to your needs.

The IQ Pro has incorporated an addressable MX loop. By adding an HSM3105 module to the system, you can build out an addressable loop with up to 124 devices. In low-power mode, the MX addressable loop will get its power from the IQ Pro Corbus, which is how the MX module connects to the panel. In this configuration, the HSM3105 can be mounted inside the IQ Pro cabinet or in an approved external cabinet. In this mode, the MX Loop can have a maximum current draw of 67mA at 40V (equivalent to 360mA @ 11.3V or 325mA @ 12.5V). Wiring between the IQ Pro and the HSM3105 must not exceed 3' (1m) using 22 gauge wire, regardless of which power mode is used.

There is also an option to add an HSM2300 or an HSM2204. The HSM2300 is a power supply module that provides an additional 1A of current. The HSM2204 is a power supply and PGM module combined. It can provide an additional 1A of current and four (4) high-current programmable outputs. When used with either power supply, the power supply and the HSM3105 should be mounted in an approved auxiliary enclosure next to the main panel. This configuration is called high-power mode where the power supply connects to the Corbus, and the HSM3105 connects to the power supply. The HSM2300 and HSM2204 can only provide up to 228mA @ 40V (1000mA @ 12.5V) or 260mA @ 40V (1000mA @ 11.3V).

The HSM3105 has four (4) terminals for the MX Loop. This allows you to set it up in either a 4-wire "loop" configuration or a 2-wire "spur" configuration (see image below). The 4-wire loop configuration starts at one set of (+) and (-) terminals on the left side and terminates at the other set of (+) and (-) terminals on the right. The 2-wire spur configuration uses the left and/or right set of (+) and (-) terminals and terminates in the field at the last device.

Configuring the HSM3105 is done via the IQ Installer app, which is available as a free download from the Apple App Store or the Google Play Store. The family of MX devices includes a wide range of sensors to protect almost any environment. Each MX device uses the connection from the HSM3105 to get its power, whether the loop is in low-power or high-power mode.


MX Devices

Compatible Addressable Loop Devices

Model # Description
MX945 Universal Input
MX916 Smoke/Heat Detector
MX862 360 Ceiling Mount PIR
MX920 Line Isolator Module
MX922 Glass Break Detector
MX926 Smoke Detector
MX936 Heat Detector
MX975 Door/Window Contact
MX974 PIR w/ Pet Immunity
MXBASE 4" Fire Base
MX916KT Smoke/Heat Detector w/ 4" MXBASE
MX926KT Smoke Detector w/ 4" MXBASE
MX936KT Heat Detector w/ 4" MXBASE

Qolsys IQ Pro Panels with Verizon LTE Communicator:

Qolsys IQ Pro Panels with AT&T LTE Communicator:

The Qolsys IQ Pro is sure to be a crowd pleaser! With support for PowerG wireless, legacy wireless, multiple keypad types, wired expansion when it's needed, dual-path communication, including LTE wireless, optional Bluetooth disarming, and support for Z-Wave Plus, it has just about every feature you could want in a modern alarm system. If you've been looking for the perfect system, you can stop, it's right here.

Tags: , , , , , , , , , , , , , , , , , , , , , , , , , , ,

Comments


Posted By

Alarm Grid's Louisville support center will shut down at 12:30 pm today Wednesday, June 7, 2023, so that our team can take advantage of the ESX trade show taking place here. ESX is not as large as ISC West, but it still offers some great opportunities for learning and exploring new products.

ESX is the Electronic Security Expo, and is owned and operated by ESA, the Electronic Security Association. Established in 1948, ESA is the largest trade association in the United States representing the electronic security and life safety industry. ESA also offers training and certification courses for alarm technicians through the ESA National Training School.

There will be many familiar vendors at the ESX show, including Resideo, Alarm.com, CMS, JCI (owners of Qolsys and DSC), and many others. Also in attendance will be many new companies with new products and new ideas. Hopefully, our techs will see something awesome that we can then bring back and offer to our customers.

Although the support center will be closed during this time, our professional monitoring centers will be on the job. All alarm system signals will be processed as usual. Alarm Grid customers in the United States can contact CMS (Criticom Monitoring Services) by calling 888-818-7728 and choosing option 9. Do this if you need to cancel an alarm, put your system on test, or check on an alarm signal. Check out the MyAlarms.com site, set up an account, and you can do all of these things yourself, no phone call required.

Canadian Alarm Grid customers who need to cancel an alarm or verify a signal can call Rapid Response at 800-932-3822. Remember, whether you're contacting CMS or Rapid Response you will be asked to provide your name, address, and false alarm password. If you provide the Duress password, or the wrong password, the monitoring station will dispatch authorities.

If you need to make changes to your monitoring information, send us an email at support@alarmgrid.com and we will reply as soon as possible when we're back in the office on Thursday. The monitoring station cannot make these changes for you. We'll be back in the office on Thursday morning at 9:00 am for our regular business hours.

Tags: , , , , ,

Comments


Posted By

Alarm.com announces the addition of Tuscon Electric Power, Modesto Irrigation District, and American Municipal Power (AMP) to the Give Back, Get Back Demand Conservation Program. Customers with a qualifying smart thermostat, like the Alarm.com T2000 Thermostat, can earn incentives for participating in the program.

In different areas, these incentive programs are called different things. Demand Conservation, Give Back, Get Back, and others. Basically, they all boil down to one thing. During peak usage times, usually, in the summer months, when demand is at its highest, you give the utility company permission to make minor adjustments to your temperature settings, which allows them to lessen the demand on the power grid during peak usage.

If you sign up for the program, you have the ability to opt out of a single event, and you can opt out of the program completely at any time. However, if you do opt out, you will give up any further incentives that may be available through the program.

Tuscon Electric Power customers can earn a $50 Mastercard e-gift card for each eligible thermostat (up to two (2) total) for enrolling in the Smart Rewards program and earn another $40 Mastercard e-gift card for each year of participation. That's $90 for one thermostat or $180 for two. Between these incentives and the savings provided by a smart thermostat, this is an upgrade that will pay for itself in no time!

Modesto Irrigation District customers will receive a $50 bill credit when they enroll in the MID Power Smart program. Then, receive a $20 bill credit for each year that you remain in the program. If you're adding a new Energy Star® smart thermostat to your home, you can also apply for up to a $50 rebate toward the purchase of the thermostat. The rebate is limited to two (2) qualifying thermostats per household. Visit their website for full details.

American Municipal Power (AMP) operates in several states, including Kentucky, Pennsylvania, Ohio, Michigan, Virginia, West Virginia, Indiana, Maryland, and Delaware. According to Alarm.com, customers receive $55 when enrolling in the program with AMP. However, according to the AMP website, participants who sign up will be entered into a drawing for a $250 gift card at the end of each peaking season. So, do your research if you are an AMP customer looking to sign up. You can check out the program at AMP here. When in doubt, give them a call and get the details.

Not a customer of one of the utility companies listed above? Never fear! There are many, many companies that have been participating in some variation of this program for years. Not an Alarm.com customer? That's ok too. Most utility companies have a list of smart thermostats that are compatible with their version of the demand conservation program. Find your utility company's site and search "smart thermostat." You'll likely come up with the information specific to your area. If not, give them a call. There's a reason these companies are willing to pay incentives for participation in this program. It's good for everyone involved.

Tags: , , , , , , , , ,

Comments


Posted By

Google is ending support for conversational actions via their Google Home and Google Assistant platforms as of June 13, 2023. This will end Alarm.com users' ability to control their Alarm.com home automation devices using voice through the Google Assistant feature and Google Home devices.

It seems like yesterday, but it's been a couple of years since we brought you instructions on how to set up Alarm.com automation to be controlled using your voice via Google Home. Now that Google is deprecating its conversational actions feature, this integration is going away. This is a shame because we had many customers, and employees, who enjoyed this capability.

This is not something that is within Alarm.com's control. Google giveth, and Google taketh away. As of this writing, it doesn't appear that any new functionality will be replacing what is being removed. If you enjoy controlling devices using voice commands, and assuming you have an Android phone, your best bet for voice control moving forward is to use Amazon Alexa. Apple users also have the option to use Siri Shortcuts to achieve voice control.

We've had no word from Resideo as to how this change may affect the Total Connect 2.0 integration with Google Assistant and Google Home, so we reached out to technical support to ask them. According to their development team, "The sunset of Conversational Actions has no impact to our integration".

What do you think of this latest Smart Home functionality being deprecated by Google? Are you planning to move to Amazon Alexa or Apple Siri for voice-activated home automation? Leave a comment below and let us know what you think. We're always happy to hear from our readers.

Tags: , , , , , , , , , , ,

Comments


Posted By

Resideo has released Technical Notification #90 due to an issue in manufacturing. In this case, tamper switches on the 5800MINI were installed incorrectly. There is a sales hold on these units to allow a correction of this issue. Only white units are affected, this did not affect brown units.

The 5800MINI is a popular option. It has a small footprint and a convenient blue LED that indicates proper magnet alignment. Recently we have noticed that these units have been back ordered and are currently unavailable. This is most likely the cause.

The 5800MINI, like most wireless sensors, uses an internal tamper button to detect any unauthorized opening of the sensor. This button varies depending on the sensor, but in most cases on the cover, you typically will have a protruding plastic piece that is intended to press down on the tamper switch to close it when the cover is properly installed.

The defective units had this tamper button installed upside down. So when the cover is installed, the plastic piece built into the cover is not making contact with the actual tamper button. They have identified the faulty units to have been manufactured between February 13, 2023 and April 17, 2023. This would mean the date codes on these defective units will show 2307 through 2316. The date code consists of a 2-digit year, and 2-digit week of the year. The date codes can be found on a label on the box that the 5800MINI comes in.

If you recently installed an affected unit, you will likely already know, because the sensor will have indicated a tamper trouble that will not clear, even with the cover properly installed. Holding down the tamper with your finger and then disarming will allow you to clear it, though.

Commercial panels like the Vista-128BPT, have a feature that allows them to ignore zone tampers. This is enabled in programming field *24. If this feature is enabled on your commercial panel, you may not be aware of a tamper issue, as enabling this feature tells the panel to ignore all 5800 and polling loop zone tampers.

If you are currently installing one of these faulty sensors, and need a workaround until your warranty replacement arrives, there is an option. The 5800MINI, reports its tamper on loop 4. On Vista-15p, Vista-20p, and Vista-21ip panels, if you have an available unused wireless zone, you can program the serial number from the 5800MINI using loop 4 and use a non-response zone type, such as zone type 23 (no alarm response). For Lynx, Lyric, and PROA7PLUS panels, you can select "Other" as Device Type and "No Response" as the Response Type. Then the tamper will be ignored.

If you no longer have the box to visually identify the defective 5800MINI units by date code, compare yours with the pictures below. In the first picture, the IC chip is mostly covered with the serial number label, but the tamper button should be on the side closer to this chip. It is not. It is closer to the edge of the sensor.


If properly installed, the tamper should look like the second picture shown below. The IC chip is clearly shown in this image. It's a black square with a white dot in the middle. The black tamper button is on the side closest to this chip.


If you encounter one of these faulty devices, please contact the distributor or retailer where you purchased it. They can inform you of their method for resolving this issue. Alarm Grid customers can begin this process by emailing a picture of their faulty device's tamper switch and including the order number, if available. If you don't have the order number, please provide the email address associated with the order. Alarm Grid customers with defective devices will be sent a warranty replacement when the new ones are available. We can also offer you the workaround mentioned above, until the new product is available.

Resideo is offering the 5815 2-zone door and window sensor as a temporary replacement until 5800MINIs become available. For now, it will be at the same price as the 5800MINI. At alarmgrid.com we have made this adjustment to the pricing of the 5815. The 5815 has been lowered to a price of $24.99 until this issue is resolved. Please stay tuned for any updates on this issue, as we receive them.

Tags: , , , , , , , , , , , , , ,

Comments


Posted By

Alarm.com has made some nice feature enhancements for video customers. They will now have support for some 3rd party cameras. They've bumped up the maximum number of supported cameras to 64. They have introduced clip limit Auto-Restart. And perimeter guard is now available for ADC-VDB770 customers.


Alarm.com offers a wide range of video products. These include many different cameras and video doorbells. They continuously work on strengthening their video portfolio. Alarm.com, besides continuing to release new products, also focuses on improving current offerings. This announcement is proof of their dedication to their video customers.

Alarm.com has announced it will now support some 3rd-party camera setups. This enhancement is available for business accounts only. They will now make it possible to integrate hardwired cameras that use ONVIF Profile S and VAPIX communication protocols, to allow for operation with the Pro Series CSVR (ADC-CSVR2000P, ADC-CSVR2008P, or ADC-CSVR2016P). Businesses with those current video setups do not need to replace their entire camera lineup in order to begin using the features of alarm.com. This allows customers to begin taking advantage of things such as live view, 24/7 recording, and the SVR timeline, all accessible via Alarm.com website or mobile app (available for iPhone and Android devices).

Alarm.com will also allow twenty-five (25) live video feeds on a single Live View tab. Now you can live stream on more cameras, all at once. Making it easier to monitor or follow desired activity.

They have also bumped up the total number of cameras per location. Previously, it was 40 cameras max. Alarm.com will now allow a maximum of 64 cameras before requiring a second "location" to be set up. This enhancement is available for residential and commercial video services. Alarm Grid video customers still receive a max of eight (8) cameras per video package, but will no longer require the addition of a second location on their account for cameras 41-64.

Alarm.com still imposes a clip limit per service package. So, it is still important to set up your recording rules so that your cameras are only capturing the desired activity. For Alarm Grid Video customers, if you are surpassing your monthly limit every month, please contact us to discuss your options. For those customers who run into a "high" activity month from time to time, Alarm.com will auto-restart your recording rules on the first day of the following month. Previously, customers would have to log in on the first of the month to manually restart their recording rules. This update will only apply to cloud-saved clips. Clips will always continue to record on SVRs and onboard recording cameras.


Also, for customers with an ADC-VDB770, Alarm.com will now offer the Perimeter Guard feature. Perimeter Guard uses video analytics to detect people and then react with attention-grabbing audio alerts (for supported cameras) and blinking LED lights. The purpose is to alert unwanted guests and deter malicious activity. This has been available for some time on certain cameras, but will now be available on the ADC-VBD770 video doorbell. This feature is configured using the Customer Website or Customer app as part of the Video Analytics rules. There you choose your audio alert and LED options, for when the detection occurs.


Alarm.com has also updated their latest WIFI cameras to include manually-triggered warning sounds. Use this on-demand feature to deter potential intruders when you spot them in real-time. It can also be used after receiving a notification about unwanted activity. Access the desired camera from the customer website only, to manually activate warning sounds. This will sound an alert for thirty (30) seconds or until you manually turn it off. This feature is now available on ADC-V523, ADC-V523X, ADC-V724, ADC-V724X, ADC-VC727P, and ADC-VC728PF (LED only) cameras. This option is not offered on the mobile app at the time of this writing.

To round up our list of features and enhancements, there are improvements that will be coming to the Alarm.com mobile app. These are not yet available but will include bottom navigation for easier accessibility. The purpose is to provide a faster, more streamlined, and more intuitive experience for all. An all-new activity feed with video clips and grouped events will also be added. Alarm.com will also include more modern, easy-to-use controls that better utilize the entire mobile screen, with refreshed action sheets. They will also provide additional performance and visual enhancements to improve the overall app experience. This provides us with some cool stuff to look forward to.

Check out some of the new enhancements and let us know how you are enjoying them. Please feel free to comment below and share your experience.

Tags: , , , , , , , , , , , , , , ,

Comments


Posted By

We have recently become aware of a potential incompatibility issue between certain older First Alert panels and touchscreen keypads. Some older panel boards with newer chips have experienced this. Unfortunately, we do not have all the details, but we will share an example of one we ran into.

The First Alert Professional program was designed as a dealer program to allow smaller alarm dealers to have some of the same advantages as very large dealers. To accomplish this, they built Vista panels with slight variations and only sold them to dealers who were members of the program. The FA168CPS and FA148CP were two of the most popular panels in that line-up. These panels were, at their base, the same as a VISTA-20P and VISTA-15P respectively. In recent years, Honeywell, now known as Resideo, has ended the First Alert Professional Program.

The First Alert Professional program was very popular, so there are many of these panels still in use today. The thing that makes a panel First Alert vs. VISTA is a difference in the panel circuit board. The chips for a VISTA-20P and a FA168CPS, for example, are exactly the same. Because of this, it has become a popular custom to swap out the older version prom chip for a newer prom chip when an update is necessary.

For many years, this has been common practice and there have been no issues. Unfortunately, with newer technology in the keypads, and advancements in the industry, we are beginning to hear about some minor issues. So, upgrading the prom may not allow everything to function as expected.


There are two ways to tell if your panel is a First Alert version. First, the original prom will have a FA version at the bottom of the label.


Secondly, there is a label stuck underneath the phone line terminals on the terminal block.


We recently ran into a FA148CP board with a manufacture date of T070. The date code is located on a small white label near the top of the panel. The Letter T indicates that this panel was manufactured in 2013, and the 070 indicates that it was manufactured on the 70th day of that year. So this panel was manufactured in March 2013. This panel had a rev 9.12 chip, which was the current revision as of its manufacture date. While the prom was never changed, the customer still had a small issue with the new Honeywell Home Tuxedo he added.


This particular customer intended to use night stay arming mode. Night Stay allows you to arm certain motion detectors, while bypassing others automatically. While the Tuxedo supports this mode when setup properly in the panel, this particular customer's Night Stay option was grayed out on the Tuxedo keypad. This seems to only occur with the newer versions of the Tuxedo. Those being the Honeywell Home Tuxedo and the Resideo Tuxedo. This issue does not seem to appear with the old Tuxedo Touch WIFI. It could possibly affect the Honeywell 6290W touchscreen as well, but there are no reports of that as of this writing.

In talks with Resideo, they informed us that they had noticed similar behavior with a previous customer when using an older revision First Alert panel board with a newer chip installed. They indicated that when this is the issue, the only fix is to replace the panel board. While we are trying to get more details on this issue, we wanted to make our readers aware of the information that we do know. Please feel free to let us know in the comments if you have seen any oddities with a First Alert panel and a touchscreen keypad.


Tags: , , , , , , , ,

Comments