Total Connect 2.0 Posts

Posted By

Alarm Grid is now offering bundled versions of the Honeywell Lyric Alarm System that include the panel and a compatible LTE cellular communicator. The LYRICUPGRADE-A will have the LYRICLTE-A AT&T LTE Communicator, and theLYRICUPGRADE-V will feature the LYRICLTE-V Verizon LTE Communicator.

Honeywell lyric controller encrypted wireless security system

If you hang around our website regularly, then you probably already know that Lyric System Kits are nothing new for us. But these are fairly unique in that they offer just the system and communicator, without any new sensors. You might want to get one of these kits if you are upgrading from an older LYNX Touch System that can't receive a firmware update, such as a Honeywell L5100 System. The Lyric can support the vast majority of the Honeywell 5800 Sensors used with the older LYNX Touch Systems.

The reason why we decided to release these new Lyric Upgrade Kits is due to the 3G sunset that will be happening in 2022. Older cellular networks are being shut down, and many users are scrambling to find LTE options for their systems. With one of these new kits, you will be getting a Lyric System that is dual-path ready with both WIFI and LTE cellular connectivity. This is the best way to ensure that your panel stays reliably monitored, keeping any potential downtime to an absolute minimum.

The Lyric System offers some great features, such as a 7-inch touchscreen display, support for encrypted Honeywell SiX Series Sensors, connectivity with Total Connect 2.0, the ability to interface with Apple HomeKit, built-in Z-Wave functionality, a 2MP camera for taking disarm photos, and so much more. It truly is a state-of-the-art security system, and it can make a great addition to your home or business.

If you are interested in learning more about the Honeywell LYRICUPGRADE-A or Honeywell LYRICUPGRADE-V, or if you want to know more about monitoring service in general, please email us at support@alarmgrid.com. We check new email from 9am to 8pm M-F, and we always do our best to respond as quickly as possible. We look forward to hearing from you!

Tags: , , , , , , , , ,

Comments


Posted By

Apple HomeKit will soon be getting a new look to go along with the upcoming Apple iOS 14. This new, refreshed look brings a side-bar to the left-hand side of Apple HomeKit. The functionality should remain largely the same as the current version. But you're sure to love this sleek, new look!


As you know, we are big fans of Apple HomeKit when paired with the Honeywell Lyric Alarm System. By pairing your Lyric System with your Apple HomeKit Network you can control the system from pretty much anywhere using Siri Voice Commands. We have a guide to setting up the Lyric with HomeKit, which you can view here. We also recommend checking out this other guide to setting up HomeKit Automations.

As you can see above, the new look for Apple HomeKit will feature a new side-bar on the left-hand side to make navigation a bit easier. This layout will better utilize the space available on the iPad. However, we still expect the general principles to using Apple HomeKit to remain the same. It's nice to see that Apple hasn't totally overhauled Apple HomeKit, but they are changing it up enough to keep things fresh. From the picture shown at the top of this post, it looks great!

This new HomeKit look won't be arriving until Apple iOS 14 is available. Unfortunately, we don't have a firm release date available quite yet. It is our understanding that it will come out sometime in September. You would need to check with Apple for more info. However, we can assure you that the Apple Home App will automatically update once iOS 14 is installed on your Apple device. Until iOS 14 is out, you'll just have to wait patiently for the time being.

Like we said, we really don't know too much about what Apple is planning for their iOS 14 release. But we can say that we are really excited about the new "change" coming to HomeKit. If you want to learn more about using the Lyric with HomeKit, or if you are interested in our monitoring services, please email us at support@alarmgrid.com. We check email from 9am to 8pm ET M-F. We look forward to hearing from you!

Note: We have learned that this new look for HomeKit for Apple iOS 14 will only be visible for the Apple iPad. The Apple iPhone version of HomeKit will not be getting the same makeover.

Tags: , , , , ,

Comments


Posted By

Resideo (formerly Honeywell) has made a change to Total Connect 2.0 that now prevents Sensor Activity for motion sensors from being displayed in the Activity Log. The purpose of this change is to prevent the TC2 Activity Log from being flooded with "Sensor Open" events from motions.


If you aren't aware, the Activity Log on Total Connect 2.0 shows various activity affecting a Honeywell Security System. This includes sensor open and close events. Previously, motion sensor activity (namely, the sensor detecting movement) could be displayed in this Activity Log. However, Resideo found that many users had setup activity logs for motion zones without realizing what the feature really did. They were therefore flooding their TC2 Activity with "Sensor Open" and "Sensor Close" events as they walked around their property in the disarmed state.

To curb this issue, Resideo has disabled the Sensor Activity toggle switch on Total Connect 2.0 for all motion detection sensors with the Response Type of Interior Follower. This makes it impossible to enable Sensor Activity logging for motion sensors with the Interior Follower Response Type, meaning that motion sensor activity will no longer be displayed in the activity log. In addition, the sensor will not be displayed on the TC2 security card when faulted. The user must access the Sensors List to see the faulted motion sensor zone.

Most users will likely not mind this, as they wouldn't want to have the activity logs for their systems constantly being flooded with motion sensor activity. And fortunately, there are a couple of workarounds for this issue if you do want to be alerted regarding motion sensor activity on a particular sensor. Arguably the easiest solution is to change the Response Type for a motion sensor from Interior Follower to Interior w/ Delay.

The similar Response Type of Interior w/ Delay does not have the same restriction regarding Activity Logs as Interior Follower. The only major change with Interior w/ Delay is that it will always trigger an Entry Delay countdown, rather than an immediate alarm if the motion sensor is the first zone faulted while the system is in an Armed Away state. For more information on Honeywell System Response Types, please see this helpful FAQ.

Another option if you just want to be notified regarding sensor activity is to manually create a notification for the Interior Follower Motion Sensor within Total Connect 2.0. Luckily, we recently made an FAQ that outlines this very process. It will teach you all about text and email notifications for Total Connect 2.0. If you want to take a look, you can check it out here. We also recommend checking out this other guide that is more specific to Sensor Open/Close and Sensor Left Open Notifications.

If you are an Alarm Grid monitored customer and you need any additional help setting up your motion sensor for alerts, please reach out to us by emailing support@alarmgrid.com. We check our email from 9am to 8pm ET M-F. We look forward to hearing from you!

Tags: , , , , , , , , , ,

Comments


Posted By

If you have a Honeywell System with access to Total Connect 2.0, then you will probably want to set up some TC2 notifications. These are used for sending you text and email alerts regarding activity on your alarm system. You will have no trouble setting them up once you know how they work.


Before fully diving into the process of setting up notifications, it's important to understand exactly how TC2 notifications are organized. Notifications are sent out when predetermined system activity events occur, such as arming, disarming, AC power loss, a system alarm, or even just a faulted zone. The recipients of any given notification are determined based on the assigned notification group. Each notification group will have at least one assigned user, and each user can have multiple email addresses and phone numbers set up on their profile.

To break it down, a user must be assigned to a notification group, and that notification group must be associated with the particular event or events that they want to be notified about. Once the event occurs, every user within the assigned notification group will receive the alert. Each user can assign email addresses for email alerts and/or phone numbers for text alerts. Every assigned email and phone number will ultimately be used for notifications, provided that everything has been set up correctly.

Where some people can have trouble with TC2 notifications is when trying to set them up for multiple users. This is usually the case for families, where multiple people in the household want to each receive their own set of notifications. The solution is often to set up a unique user profile for every person who will be using the system and receiving notifications. Each user will need to choose a user code for controlling the system locally. If you want to limit the number of codes on your system, then the other option is to assign multiple email addresses and/or phone numbers to a single user profile. But the downside to doing that is that you won't have any real way of setting who receives what. The point here is that there are multiple ways to ensure that everyone using the system can receive notifications.

Total Connect 2.0 notification can be set up and configured from both the Total Connect 2.0 website and the Total Connect 2.0 mobile app. For our examples, we will mostly be focusing on the website, but understand that these menus are mostly the same on the app. They just might be organized slightly differently to better fit the smaller dimensions of a mobile phone. Really, both the website and mobile app are laid out very similarly, so if you can use one, then you should have very little trouble switching over to the other if needed. The important thing is to understand what all of the various terms mean and how they are all related.

First, let's take a look at the Users Menu of Total Connect 2.0. Like we said earlier, the most common practice is to set up an individual user account for each person who will be regularly using the system and receiving notifications. But if you are trying to limit the number of codes on your panel, then assigning multiple email addresses and/or phone numbers to a single user profile is also an option. On the TC2 website, you can easily locate the Users drop-down menu on the left-hand side.

As you can see, the available options within Users are All Users, My Profile, and Add New User. The All Users option is useful if you are logged into a Total Connect 2.0 account with admin access. It will show all the users you have set up. My Profile is used for adjusting the settings for the user who is currently logged into TC2. This includes setting the user's name, preferred language, TC2 login password, assigned email addresses, assigned phone numbers, and even the security code they use with the panel. And the Add New User option is used for adding a new user to the Panel and if desired, to the Total Connect 2.0 account.


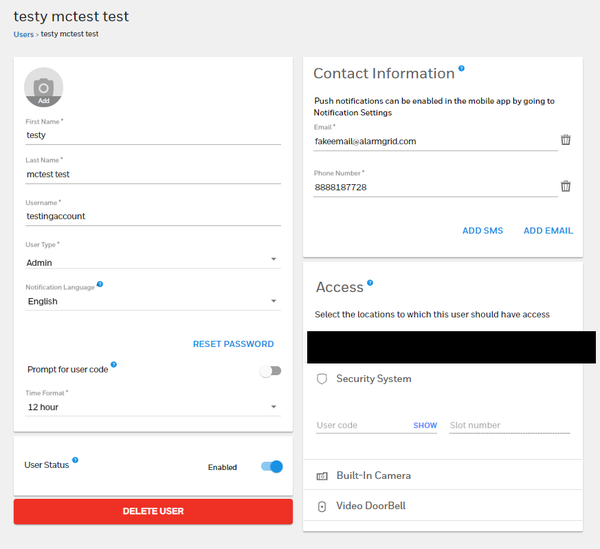
In the picture above, note the "Add SMS" and "Add Email" buttons. These are used for adding additional phone numbers and email addresses to a profile. Each assigned email and phone number will be used for notifications. If you don't want to create multiple users, then that is a method for ensuring that multiple people receive notifications. Just keep in mind that you will have no way of distinguishing which emails and phone numbers will receive which notifications. All emails and phone numbers assigned to the profile will be getting all the alerts.

Alternatively, if you create multiple user profiles, then you can pick and choose which profiles will be assigned to which notification groups. This is how you can set certain users to receive notifications regarding specific system events, while other users won't necessarily have to receive the same alerts for the same events. Whichever option you choose will work fine, and it's totally up to you. But you will have greater flexibility by creating multiple users.

Next, we would like to turn our attention to the Notifications Menu. This is where you will set up notification groups. Recall that different users can be assigned to different notification groups. Each notification group can correspondingly be assigned to different system events that will trigger notifications being sent out.


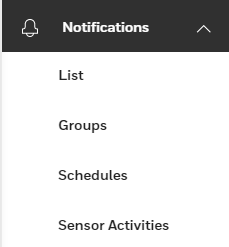
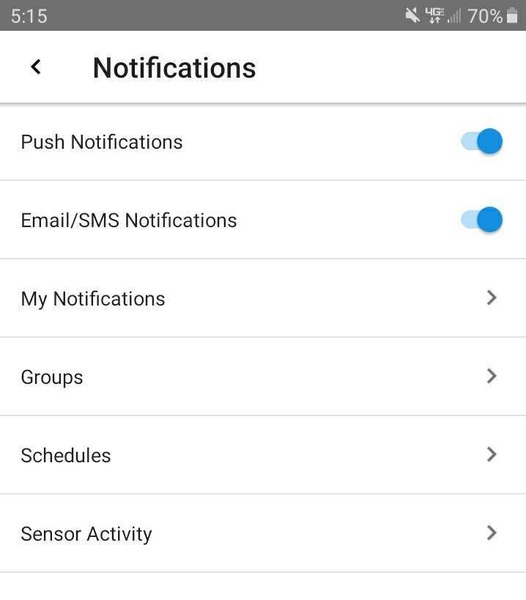
From the top, List shows the list of the specific system event triggers that will cause notifications to be sent out. Groups are the famous notification groups that we have been talking about throughout this post. Schedules are used for establishing set schedules for predetermined security and automation events to occur. Sensor Activities allows you to select specific sensors so that you can see if the sensor is faulted right from the main page of TC2, rather than having to access the complete system sensors list. For our purposes here, only List and Groups are really important.

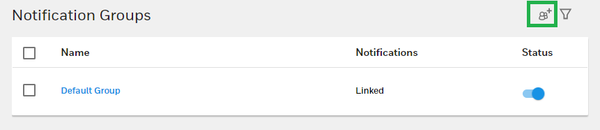
After you have created the necessary user profiles and assigned email addresses and phone numbers to said profiles as needed, the next logical step is to create notification groups using the Groups option under the Notifications drop-down menu. If you click on the button with the two people and the + sign, then you can create a new notification group. This will involve providing a name for the notification group and choosing which users are included.


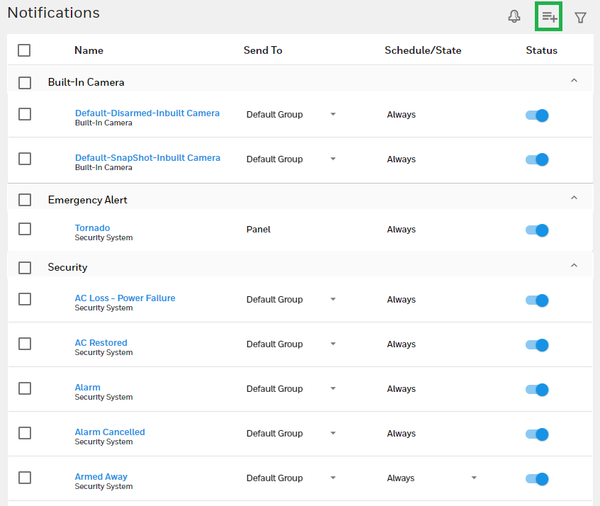
Upon building notification groups, you now get to the juicy step of actually building the triggers that will cause notifications to be sent out. These notification triggers are the actual system events that you want to be alerted about. To access this section, select List under the Notifications drop-down menu. You will likely find a bunch of notifications pre-assigned to the Default Group if you have never configured these settings before. To build new notifications, click the icon with three horizontal bars and the + sign. This will involve choosing the specific event that will trigger the notification to be sent out, as well as selecting the notification group that will receive the notification.


We know we've covered a lot of information here, so let us give a quick recap of the steps involved:

  1. Make user profiles. Each user profile will be able to control the system locally using their own user code. And Standard and Admin profiles will be able to access Total Connect 2.0 to control the system remotely. In most cases, each user profile will represent a different individual who uses the security system.
  2. Assign phone numbers and/or email addresses to user profiles. These are the contact points for sending notifications. Every added phone number and email will be contacted when a notification is triggered to be sent to the associated user. Note that phone number contacts are for text message alerts, NOT phone calls.
  3. Build notification groups. Each notification group consists of one or more user profiles. Every user in the notification group will receive notifications based on their assigned phone number(s) and/or email address(es) when a notification is triggered to be sent out. If you only want some users to receive a certain type of notification, then build a notification group that includes the relevant users, while leaving out users who do not need to be notified or who may receive the intended notification based on their inclusion in a different group.
  4. Create notifications. These are the actual system triggers that will cause a notification to be sent out. When creating a notification, you must select what system event will trigger the notification, and you must also choose which notification group will receive the alert.

Lastly, we briefly want to touch on push notifications that you can set up on your Android or iOS device. A push notification is sort of like a text message notification, in the aspect that it will appear on your phone. But the big difference is that the alert will not appear through your text messaging app, but rather from the TC2 app itself. These push notifications can only be configured by using the Total Connect 2.0 mobile app on a mobile device or tablet. You cannot set up push notifications using a web browser. After enabling Push Notifications from within the TC2 app on your device, you will be prompted by your phone or tablet to allow the App to perform Push Notifications.

First, we will discuss enabling Push Notifications from within an Android device. Upon opening up the TC2 app and logging into your TC2 account, click the three horizontal bars in the upper-left corner. Then choose Settings, followed by Notifications. You can then toggle the Push Notifications option ON or OFF. To set which system events will trigger push notifications, use the My Notifications option.

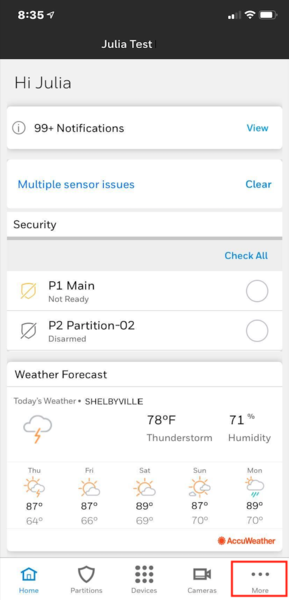
When using an iOS device, you will reach the option for Push Notifications by clicking the "More" option in the lower right corner of the main screen. From there, go to Settings > Notifications > Push Notifications, making sure that the option is enabled. Once you enable this option through the app, you will be prompted by the phone or tablet to allow the TC2 App to send you Push Notifications.


We really hope that this helps some users overcome their struggles with receiving TC2 notifications. If you are monitored by Alarm Grid, and you are still struggling with Total Connect 2.0 notifications, please feel free to email us at support@alarmgrid.com for extra assistance. We are certainly happy to help you out so that you can get notifications set up exactly how you want them. Our hours for checking emails run from 9am to 8pm ET M-F, so keep that in mind. We look forward to hearing from you!

Tags: , , , , , ,

Comments


Posted By

Alarm Grid has learned that a firmware update for the Honeywell 6290W Touchscreen Keypad is available. Honeywell 6290W Firmware Update 2.01.028.0002 corrects an issue where the keypad Disarm screen does not automatically appear when the Honeywell VISTA System goes into its Entry Delay.


Resideo never made a public announcement about Firmware Update 2.01.028.0002, so it's possible that it may have already been out for a little while. However, we only just heard about it the other day. Although the change it makes is relatively minor, having the Disarm screen automatically appear when the system is in its Entry Delay should make things more convenient for end users. That way, you won't have to manually pull up the Disarm screen when entering the premises and disarming your system. We recommend upgrading to the latest firmware as soon as possible if you haven't already.

Firmware updates for the Honeywell 6290W are provided automatically over-the-air (OTA) from the Resideo AlarmNet360 Servers. They are not pushed down manually, so there is no need to contact us to request the update. However, you must enable WIFI and enable Remote Upgrading for the keypad in order for the update to be automatically sent down. Once the 6290W has checked-in with the AlarmNet Server, the update will be put into a queue and pushed down as soon as possible. This usually occurs within 24 to 48 hours of the keypad checking-in. Alarm Grid recently uploaded a document that shows the process for enabling WIFI and Remote Upgrading, which you can view here.

As a quick reference, WIFI is enabled by pressing the Settings icon (the gear) on the main screen, followed by "System WIFI". From there, toggle the WIFI option, and select the desired WIFI network. Enter the network's password, and click on Connect. Once the process is complete, return to the home screen by clicking on the picture of the house. Next, enable Remote Updating by clicking the Settings icon again and choosing System Info. Click on the Enable Remote Upgrade option to turn on the feature. You can then return home.

Remember, the Settings icon for the keypad looks like .

If you are monitored by Alarm Grid and you need additional assistance enabling OTA updates, please email us at support@alarmgrid.com. We check for new emails from 9am to 8pm ET M-F. We look forward to hearing from you!

Note: After the update is pushed down to the keypad, it will only be applied once the system is in a disarmed state with no faulted zones and no trouble conditions, including low battery or AC power loss. The update will also be delayed if the system is in programming mode or if there is a zone in alarm memory. The keypad will reboot as part of the update process.

Tags: , , , , , ,

Comments


Posted By

If you want to add multiple users to Total Connect 2.0 all at once, then you're in luck! The TC2 platform allows users to upload an Excel document with multiple new users. There is even a pre-prepared template on Total Connect 2.0 under the Users tab that you can use to get started.

The first thing you should know about the batch enrollment feature is that it is only accessible through the Total Connect 2.0 website. Batch enrollment is not possible through the Total Connect 2.0 Mobile App. Make sure you are using the website when you go to get started.

Within the Users tab on the left side of the screen, you can choose the option for "Add New User". From there, you will choose the blue "Add Multiple Users" button.

Next, you can download a template for building the users list, and you can re-submit the template after filling it out. Once you do that, all of the new users will be added to your Total Connect 2.0 account. For more information on batch enrolling multiple users to TC2, please see this guide.

If you have any questions about the TC2 batch enrollment feature, or if you want to get started with alarm monitoring service, please email us at support@alarmgrid.com. We check our email from 9am to 8pm ET M-F. We look forward to hearing from you!

Tags: , , , , , , ,

Comments


Posted

Update 01/13/22: This feature has now been expanded upon, but only for the ProSeries panels. You can read all about it here!

The Total Connect 2.0 Mobile App for Android now allows users to arm, disarm, and check current system status using Google spoken voice commands. This handy new feature can be very useful for quickly and conveniently controlling your Honeywell Security System from almost anywhere.


In order to use Google voice commands with TC2, you must have the feature set up for your phone. To enable, go to Settings > Apps > Total Connect 2.0 > Enable Microphone. Once configured, you should see a blue microphone button in the bottom-right corner of the TC2 App. You can click on this button to have your phone begin listening for voice commands. At this time, only arming/disarming and status commands are available. We are hopeful that more commands will be arriving in the future.

Also keep in mind that you will need to give Total Connect 2.0 permission to use the microphone for your phone. Make sure to adjust the appropriate app permissions if you have not already done this. Remember that you can only make TC2 voice commands while you have the app opened. Google will not be able to understand any commands intended for TC2 unless they are performed through the app.

Please note that some commands may require a valid code entry. The following voice commands are available within the TC2 Android App:

  • Arm Stay: Puts the system in Arm Stay mode.
  • Arm Away: Puts the system in Arm Away mode.
  • Disarm: Disarms the system.
  • Home: Returns you to TC2 App home screen.
  • Sensors: Displays list of programmed sensors.
  • Keypad: Displays on-screen virtual keypad.
  • Events: Displays Events list.
  • Settings: Opens the TC2 Settings Menu.
  • Profile: Opens your TC2 Profile.
  • Location Settings: Opens the TC2 Locations Menu.
  • Manage Locations: Opens the Manage Locations tab within the Locations Menu.
  • Change Password: Opens the Change Password tab within your TC2 Profile.
  • Help: Opens the Help Menu.
  • Sign Out: Logs you out of TC2 and closes the app.

If you have any questions about this feature, or if you are interested in starting monitoring service for use with Total Connect 2.0, please email us at support@alarmgrid.com. We check our email from 9am to 8pm ET M-F. We look forward to hearing from you and helping you get the most out of Total Connect 2.0.

Tags: , , , , , , , , ,

Comments


Posted By

Alarm Grid has a handy tip for you today. We have discovered that the latest TC2 redesign also now allows Android users to adjust the font size and style. When you adjust the font from within the Android device settings, you will also be adjusting the font in the Total Connect 2.0 App.


Adjusting the font size and style in TC2 is only available for Android devices. We haven't seen the feature implemented for iOS devices yet. To access the Font & Style Settings, start by accessing your phone's main Settings Menu. Then choose Display, followed by Font Size and Style. You will then be taken to a menu where you can adjust the font to your liking. The menu may appear slightly different from the one shown above, but any differences should be minor. Remember that changing these settings is not just for Total Connect 2.0, but for your phone as a whole.

Once you go into Total Connect 2.0, you should find that the font for the app has changed. Keep in mind that the changes may not go into effect if you are not running the latest version of TC2. You can download the latest version for free from the Google Play Store. If you need any help using the TC2 app, or if you are interested in starting monitoring service so you can gain access to TC2, then please email us at support@alarmgrid.com. We check our email from 9am to 8pm ET M-F. We look forward to hearing from you!

Update: Below you can see what it looks like with the font set to "Cool Jazz". As you can see, the top menu and the arming buttons have updated with the new font.


And here you can see the same screen with the default font:

Tags: , , , , , , , ,

Comments


Posted By

We have learned that Resideo has made some cool new updates to Total Connect 2.0. The platform has a sleek new look that is sure to turn some heads. Resideo also introduced a more streamlined process for creating scenes. It is a great time to get started with a Honeywell System and TC2.


Upon logging into your Total Connect 2.0 account from either the website or mobile app, you will be greeted by the familiar "What's New" screen that provides an overview of what changes to expect. From there, you will continue to the main menu where you can control your system and smart home devices like usual. The layout isn't too different, so it is unlikely that you will have any trouble navigating the website.


We think the new TC2 interface looks a lot like the UI for the upcoming Resideo PROA7PLUS Security System that everyone is super excited about. That makes sense, considering Honeywell is expected to release the system sometime in the near future. Some of our team members have been beta testing the upcoming system, and we think it will make a great option for DIYers and professional installers alike. You can check out our beta test in this earlier blog post. Also remember to sign-up for our mailing list so that you can stay informed about the upcoming system from Resideo.


In addition to the new look, the latest TC2 update has also changed the previous Automation Menu to the all-new Devices Menu. This new menu features new icons and action buttons for controlling programmed devices. Users will also find it much easier to create new smart scenes, thanks to the new streamlined scenes set up process. Finally, connected SkyBell Video Doorbells can now be streamed in a vertical display or a horizontal (landscape) display.

If you want more information about these changes, please email us at support@alarmgrid.com. Our team checks email from 9am to 8pm ET M-F. Also remember to check our monitoring page if you are interested in starting monitoring service for use with Total Connect 2.0. We look forward to hearing from you!

Tags: , , , ,

Comments


Posted

One of the best perks of owning a home security system is that it can also serve as an automation hub for controlling compatible smart devices. Apple HomeKit is an excellent platform to build around if you are a frequent iOS or Apple user. And a new Lyric System can make a great addition!

Honeywell lyric controller encrypted wireless security system

If you aren't familiar with Apple HomeKit, it is an app for iOS devices that allows you to control and automate compatible devices around your home. What's really cool is that you can perform various actions from virtually anywhere in the world using spoken Siri voice commands. Possible actions include arming or disarming your security system, controlling Lutron Smart Lights, and performing complete HomeKit scenes where multiple devices are controlled at once.

In order to get started using a Lyric with Apple HomeKit, you must have a Lyric System with the HomeKit feature enabled. The Lyric comes from the factory with HomeKit disabled. You'll need to sign up for alarm monitoring service, at least temporarily in order to get it enabled. Once your system is registered, your alarm dealer can then enable the HomeKit feature for you. Once HomeKit is enabled just follow This simple FAQ to get it set up.

If you sign up with Alarm Grid, we recommend any plan Self Bronze or higher. More information is available on our monitoring page. This will also give you an opportunity to try out Total Connect 2.0, which can complement Apple HomeKit. This is because HomeKit only works with burglary alarm sensors while Total Connect can notify you of alarms and other conditions for all sensors.

Remember that having a dedicated HomeKit Hub as part of your automation network is a requirement if you want to control your system remotely. An iPad, Apple HomePod, or an AppleTV Gen 4 or higher can be used as a HomeKit Hub, but the device must remain with the alarm system to allow remote control. You might also want to check out this FAQ on creating HomeKit Automations. That is how you will have your HomeKit compatible devices activate automatically with certain system events or based upon a set schedule.

When expanding upon your HomeKit network, make sure to look for devices that feature the Apple Home logo or other markings identifying them as HomeKit-compatible.

The only way to enable Apple HomeKit for your Honeywell Lyric (assuming it hasn't already been enabled) is to sign up for monitoring and have your alarm dealer enable it. Alarm Grid has no contracts, so if you try our service and decide it's not for you, you can cancel any time within the first month after we enable HomeKit for you.

Please email us at support@alarmgrid.com for more information. We check our email Monday thru Friday from 9am to 8pm ET. Our team will be happy to help you find new HomeKit devices and build a robust and powerful HomeKit network that you can control from anywhere using your voice. Getting started is super easy, and we will be there every step of the way!

Tags: , , , , ,

Comments