Training Posts

Posted By

It's Monday again, and it's time for another Alarm Grid video recap! We have six (6) new videos for you. Five (5) feature the DSC PowerSeries NEO, while the last one covers the Honeywell LTE-IA and LTE-IV Communicators for VISTA Systems. All videos feature yours truly. Let's check them out!

Alarm grid inside security stickers

Adding a DSC HS2TCHP Touchscreen Keypad to a DSC PowerSeries NEO

I show you how to add a DSC HS2TCHP Touchscreen Keypad to a DSC PowerSeries NEO Security System. Adding a touchscreen keypad like the DSC HS2TCHP to a system can be more inviting and easier for end users to understand than a traditional numeric keypad. The DSC HS2TCHP connects with the same on-board panel terminals as any other keypad for the system. Remember to power down your NEO Panel completely before adding a keypad or making any other hardware changes.


Adding Hardwired Zone to DSC PowerSeries NEO Security System

I show you how to add a wired sensor to a DSC PowerSeries NEO Security System. As a hardwired alarm panel, the DSC PowerSeries NEO can used wired sensors with no extra add-ons being required. All wired zones on the NEO will use end of line 5.6k ohm resistors, which are color coded green-blue-red-gold. This includes wired zones that are not actively being used with the system. New wired sensors will be connected with the panel, and the appropriate Zone Definition will be set at the corresponding zone.


Program a Wireless Zone to a DSC PowerSeries NEO

I show you how to add a wireless sensor to a DSC PowerSeries NEO Security System. The NEO cannot support wireless sensors right out of the box. Instead, a wireless transceiver must be added to the system. The NEO supports PowerG Transceivers that will allow you to use PowerG Wireless Sensors with the system. The advantage to using wireless sensors is that they are much easier to install than wired sensors. This is because you will not need to run wires for wireless sensors.


Enrolling a PowerG Sensor to a DSC PowerSeries NEO

I show you how to add a PowerG Sensor to a DSC PowerSeries NEO Security System. This will require that a PowerG Transceiver is added to the system, such as a DSC HS2LCDRF9 N Keypad or a DSC HSMHOST9 Standalone Transceiver. PowerG Sensors are widely seen as some of the best wireless sensors in the security industry. This is because these sensors offer a wireless signal range of up to 2km in an open air environment, and they utilize military grade 128-bit AES encryption for exceptional security.


Delete a Zone From a DSC PowerSeries NEO

I show you how to delete a zone from a DSC PowerSeries NEO. This process differs depending on whether the zone is wireless or hardwired. For a wireless zone, you are clearing the sensor from the system so that it is no longer recognized. For a wired zone, you are merely changing the Zone Definition for the associated wired zone to [000] for Null Zone. Deleting a zone from a DSC PowerSeries NEO will open up the zone so that it can be used with a different sensor.


Installing a Honeywell LTE-IA or LTE-IV Communicator to a VISTA-21iP System

I show you how to add a Honeywell LTE-IA or a Honeywell LTE-IV to a Honeywell VISTA-21iP Security System. The LTE-IA and the LTE-IV are dual-path communicators that use both IP connectivity (wired ethernet) and LTE cellular connectivity. When adding one of these communicators to a VISTA-21iP, you must first disable the internal IP communicator for the system. This is done by re-positioning the white jumper to the bottom two (2) prongs. Make sure to power down the panel before re-positioning the jumper and installing the communicator!

Tags: , , , , , , , , , , , ,

Comments


Posted By

Alarm Grid is back with another video recap, this time covering videos from July 21st thru July 24th. The highlights this week include a classic video from Jorge, as well as the start of a new video series where I teach you how to set up the DSC PowerSeries NEO. Let's check out the videos!

Connecting a Honeywell Tuxedo Touch to WIFI

Jorge shows you how to connect a Honeywell Tuxedo Touch to a local WIFI network. The Tuxedo Touch uses an internet connection for sending and receiving Z-Wave signals from Total Connect 2.0. It is important to understand that the Tuxedo Touch is not actually an AlarmNet Communicator for facilitating monitoring service. Its internet connection is merely for automation purposes and displaying the current weather forecast. Without a reliable internet connection, the current status of Z-Wave devices on TC2 cannot be updated.


Powering the DSC PowerSeries NEO Security System

I show you how to provide power to a DSC PowerSeries NEO Security System Primary power comes from a 16.5VAC, 40VA transformer. Since AC power is being used, polarity does not matter when connecting wires to the module. We recommend using 18-AWG, 2-Conductor wire for this job. But if you have existing wire lying around, then that should work fine, as long as maximum wire run limits are observed. The PowerSeries NEO also receives backup power from a connected battery.


Add Wired Keypad to DSC PowerSeries NEO Security System

I show you how to add a wired alphanumeric keypad to a DSC PowerSeries NEO Alarm System. The first keypad you add to your NEO Panel should be a wired alphanumeric model for programming purposes. In particular, we recommend using the DSC HS2LCDRF9 N for this purpose. That model includes a built-in PowerG Transceiver so that you can begin adding wireless PowerG Sensors with your system. The initial keypad allows for one-touch enrollment, while additional keypads must be added through the initial keypad.


Tags: , , , , , , , ,

Comments


Posted By

Many users consider adding keypads to their alarm systems so that they can control their systems from multiple on-site locations. And for wired panels, at least one keypad is required for on-site operation. Today, we will briefly cover some of the alarm keypads that you might encounter.

Honeywell lkp500 wireless keypad for lyric controller

First, it is important to understand that a keypad is NOT an actual alarm system. It is merely an input and output device for an alarm system. A user will input commands through the alarm keypad. The system will also provide information about security panel status through the keypad. Nearly all keypads will provide basic functionality, such as arming and disarming and bypassing zones. Some more advanced keypads may offer additional capabilities, such as system programming and performing home automation functions.

If you have a wired system, then you will absolutely need at least one keypad. This is because the panel will need some means for on-site operation. When adding your first keypad to a wired system, it is usually recommended that you get an alphanumeric keypad with a built-in wireless receiver. Alphanumeric means that the keypad will display full language text, which is important for successfully programming the system. Having a built-in wireless receiver will allow you to start pairing wireless sensors with the system, which will give you more flexible installation options. Examples of alphanumeric keypads with integrated wireless receivers include the Honeywell 6160RF for Honeywell VISTA Systems and the DSC HS2LCDRF9 N for DSC PowerSeries NEO Systems. For additional keypads, you should just use standard keypad models, without integrated wireless receiver modules.

But for a wireless system, adding a keypad is almost always optional. This is because a wireless panel is consider "all-in-one", and you can control the system directly from the panel itself. Some wireless panels like the Honeywell Lyric and the Qolsys IQ Panel 2 Plus have built-in touchscreen controllers for this purpose. Other wireless panels like the Honeywell LYNX Plus L3000 have a less fancy, but still perfectly functional, numeric touchpad for this task. Most wireless system users don't bother adding an external system keypad.

That being said, you can still choose to add a keypad to a wireless system if you want. The benefit to adding a keypad is that you will have an additional physical device for controlling your system while you are on-site. This can be very useful if you have multiple entrances for coming and going, such as a front door, back door, and garage door. You might also consider putting a keypad in an easily accessible location, such as by the bed in your master bedroom so that you can conveniently operate your security system from that location as well.

Many systems will provide you with multiple keypad options to choose from. Depending on your needs, you may be selecting between a numeric touchpad keypad and a touchscreen keypad. A numeric touchpad keypad is operated by pressing various buttons on the device to enter specific codes and command sequences. These keypads are relatively basic, but they can be convenient for performing simple system functions. On the other hand, a touchscreen keypad will provide a colorful touchscreen display with intuitive menu icons. This can be more cheerful and inviting for someone who isn't used to operating an alarm system. The downside with a touchscreen keypad is that they are often much more expensive than numeric touchpad keypads. And it's also important to understand that your selection of keypad choices may be limited based on the panel you are using.

But before you navigate our site to start purchasing new keypads for your system, you should really consider if you actually need one. The most common alternative to a secondary system keypad is an interactive service platform that can be accessed through your phone or a web browser. If your system is monitored, then there's a good chance that you already have access to one of these platforms. Most Alarm Grid monitored customers have access to either Total Connect 2.0 or Alarm.com, depending on the system they are using. Both platforms can be conveniently accessed remotely to offer the same functionality that you would get from a physical on-site keypad. So instead of going to your secondary system keypad, you might just pull up your phone to access Total Connect 2.0 or Alarm.com and control your system from there! Check out our monitoring plans to see which ones offer access to these exciting platforms.

Another option is to get a key fob for your system. A key fob is a small handheld device that enrolls with a security system wirelessly to perform various inputs and commands. You can easily carry a key fob around in your pocket or purse, or you can put it on a key ring for easy access. Then, with a press of a button, you can arm or disarm, trigger an automation device, or activate an alarm on your system. Key fobs are often more limited than fixed-location keypads, but they can be very convenient for performing quick commands. Just make sure to not lose your key fob. The devices are quite small, and they can easily become misplaced or lost. The same usually cannot be said for a keypad mounted on your wall!

If you are interested in learning more about alarm system keypads, or if you want to find out which keypads are compatible with your system, then we are happy to help! We offer a wide selection of keypads for use with many types of security systems. The best way to contact us is to email support@alarmgrid.com. If you are trying to determine system compatibility, then you may want to include a picture of your panel so that we know what brand and model you are working with. Remember that our hours for checking email run from 9am to 8pm ET M-F. We look forward to hearing from you!

Tags: , , , , , , , , , , , , , , , , , , , , , , , , ,

Comments


Posted By

We have heard reports lately of RF supervision troubles on 2GIG GC2e and 2GIG GC3e Systems, particularly for zones set up with encrypted 2GIG eSeries Sensors. Upon further testing, we have learned that eSeries Zones configured with incorrect Equipment Codes can cause supervision trouble.

2gig pir1e wireless encrypted pir motion detector

Equipment Codes are somewhat of a unique quirk for 2GIG Security Systems. This numeric code identifies the model number of the wireless sensor that is being used. It should not be confused with the sensor's Serial Number, which is unique for each individual sensor. You set the Equipment Code when programming a new zone. Alarm Grid has helpful guides available for programming a GC2e zone and programming a GC3e zone.

The following table contains the current list of eSeries Equipment Codes:

Product Name Equipment Code
2GIG eSeries Smoke Detector (USA) 2058
2GIG eSeries CO Detector (USA) 2860
2GIG eSeries Tilt Sensor 2061
2GIG eSeries Flood Sensor 2065
2GIG eSeries Shock Sensor 2066
2GIG eSeries Repeater 2067
2GIG eSeries Translator 2068
2GIG eSeries Water Sensor 2070
2GIG eSeries Thin Door/Window Contact 2862
2GIG eSeries Recessed Door Contact 2863
2GIG eSeries Glass Break Detector 2864
2GIG eSeries Pet-Immune PIR Motion Sensor 2869
2GIG eSeries Takeover Module 2873
2GIG eSeries 4-Button Keyfob Remote 2866

Before the rise of 2GIG eSeries Encrypted Sensors, the Equipment Code setting on a 2GIG System was largely seen as a formality. The general practice was to find the corresponding sensor if available, but generally not worry about it very much if you couldn't match it exactly. Some third-party sensors do not have their own Equipment Codes, and an "equivalent" is usually selected instead. For example, the Honeywell 5800MINI and the VERSA-2GIG can both just use the Equipment Code for "Existing Door/Window Contact", rather than finding an exact match.

But for the 2GIG eSeries Sensors, the Equipment Code selection is actually very important. Failing to set the exact corresponding equipment code can result in the system displaying an RF supervision loss trouble condition for the associated zone. This trouble is typically used to identify that the system has lost communication with the sensor, due to either the sensor powering down from a dead or missing battery, or the sensor being taken out of wireless range. But it seems that the GC2e and GC3e cannot properly supervise a 2GIG eSeries Sensor with an improper Equipment Code. More information can be found in this FAQ.

Missing Equipment Codes are more common for third-party sensors not produced by 2GIG. For a 2GIG Sensor, you should almost always have a direct Equipment Code selection available. And the 2GIG eSeries Sensors are still quite new, so 2GIG made sure to put in Equipment Codes specifically for each of these sensors. However, you may be unable to find an Equipment Code for a brand-new eSeries Sensor if your 2GIG System isn't on the latest firmware version. Adding support for new sensors is a major part of most 2GIG Firmware Updates. You can view our GC2e Firmware Page here, and our GC3e Firmware Page here.

If you need any help programming a GC2e or GC3e wireless zone, then make sure to check out the programming FAQs we linked earlier. Alarm Grid monitored customers can also receive additional free support by emailing support@alarmgrid.com. This is also a great email to use if you are interested in signing up for new monitoring service. We check our email from 9am to 8pm ET M-F. We look forward to hearing from you!

Tags: , , , , , , , , , , , , , , , , ,

Comments


Posted By

It's Monday again, and this is normally when we would be present you with a video recap. But since we're still working on getting our entire video team together, we figured this was a good time to catch up on some videos we missed in previous recaps, as well as present some classic videos.


How Do I Clear a Latched Alarm Using a Tuxedo Touch Keypad?

I show you how to clear a latched alarm on a Honeywell Tuxedo Touch Keypad. This is done by performing a typical disarm and then clearing the faulted zone. The reason why alarms become latched or stuck is because of the alarm memory feature on the Honeywell VISTA Systems. The panel wants to be sure that you are aware that an alarm previously occurred, so it makes you clear the faulted zone, even after disarming at the keypad.


Programming a Zone to a 2GIG GC3e

I show you how to program a wireless sensor to a 2GIG GC3e Security System. This is a very important step when setting up a security system. Every sensor used with the system will require at least one zone on the system. When you program the zone, you will set various options and configurations that will determine how the system responds when the associated sensor is faulted. You will also enroll the Serial Number with the GC3e so that the panel can recognize the sensor.


Honeywell 5808W3: Program Low-Temp to Lyric

Alarm Grid Co-Founder Sterling shows you how to program the low-temperature detection function for a Honeywell 5808W3 Smoke Detector to a Honeywell Lyric Alarm System. The Honeywell 5808W3 is a smoke and heat detector that also offers low-temperature detection, which is commonly referred to as freeze detection. The 5808W3 uses Loop Number 3 for low-temperature detection, and it activates a temperatures below 41°F. This is good for letting the user know before the pipes potentially freeze.


Lyric Security System: Change Master Code

Sterling shows you how to change the Master Code on a Honeywell Lyric Security System. The Master Code is used primarily for arming and disarming the system and accessing the Master Tools Menu. It can be used to adjust or change a limited selection of system settings. However, changing most advanced settings and making zone changes will require the Installer Code. We strongly recommend changing the Master Code from its default of 1234 for security purposes. But we advise leaving the Installer Code at its default of 4112.

Tags: , , , , , , , , , ,

Comments


Posted By

Alarm Grid has a short but sweet video recap for you! Last week's recap was skipped to spread the cheer about our headquarters reopening, but we're here now! Unfortunately, we only have three (3) videos to share. Also, our usual team wasn't quite ready yet, so I had to make more appearances.

2gig gc3e wireless encrypted alarm panelThis week's videos are centered around the 2GIG GC3e Security System. This is a wireless all-in-one panel with support for encrypted 2GIG eSeries Sensors, as well as non-encrypted 345 MHz sensors. The system has a beautiful 7-inch touchscreen, built-in WIFI, partitioning support, and an integrated Z-Wave Plus controller. We hope these videos help you feel more comfortable in setting up your own 2GIG GC3e System for your home or business!

Pairing a Z-Wave Device to the 2GIG GC3e

I show you how to pair a Z-Wave device with the 2GIG GC3e. The GC3e has a built-in Z-Wave Plus controller, which allows you to pair Z-Wave Plus and classic Z-Wave devices with the system. Common Z-Wave devices include lights, door locks, thermostats, and more. Programmed Z-Wave devices can be controlled from the panel and remotely from Alarm.com if the system is monitored. Most Z-Wave devices are excluded, or cleared, from the network before being added.


Programming a Key Fob Into a 2GIG GC3e

I show you how to add a key fob to a 2GIG GC3e. A key fob is a small handheld device that you can use to control your security system from a distance. Most key fobs will allow you to conveniently arm and disarm your system and operate programmed relay-triggered devices. Many key fobs also have the ability to set off panic alarms in distress situations. The 2GIG GC3e supports various 345 MHz wireless key fobs.


Adding or Changing User Codes on a 2GIG GC3e

I show you how to add, change, and delete user codes on a 2GIG GC3e. A user code is a sequence of numbers that you enter into a system to verify that you are an authorized user. The 2GIG GC3e supports up to 100 user codes. It is advised that each regular user has their own code. Each new code on the GC3e must be enabled for the use with system after it has been added.

Tags: , , , , , , , , , , ,

Comments


Posted By

Alarm Grid has been releasing some useful new FAQs and guides on using and setting up the 2GIG GC2e and 2GIG GC3e Security Systems. We wanted to let you know about this content so that you can start getting the most out of these panels. Both can make a great addition to a home or business!

2gig gc3e wireless encrypted alarm panel

2gig gc2e wireless encrypted alarm panel

Both the 2GIG GC2e and 2GIG GC3e support the Alarm.com interactive service platform. By activating the system on a compatible monitoring plan, you will be able to control your 2GIG Panel remotely through the Alarm.com website and mobile app. This is great for operating your system while you are on the go! You will need a compatible LTE cellular communicator for the system to activate it for monitoring service!

Another exciting feature is that both systems offer built-in Z-Wave Plus functionality, which allows you to build a robust and powerful smart automation network for automatic operation and control for various devices used around your home or business. You can also integrate the exclusive lineup of encrypted 2GIG eSeries Sensors with these systems for enhanced wireless security and protection.

The 2GIG GC3e is a bit more robust than the GC2e, as the GC3e offers additional features like built-in WIFI, Smart Area Partitioning, and a larger touchscreen. You also have the ability to set up more wireless zones on the GC3e, which can come in handy for a larger home or business. But really, both systems can adapt well to nearly any situation.

Here we have some recent FAQs we have written for the 2GIG GC2e:

And here are some on the 2GIG GC3e:

If you want to learn more about the 2GIG GC2e or 2GIG GC3e, or if you have questions about alarm monitoring in general, please email us at support@alrmgrid.com. Our team would love to help you out so that you can make an informed buying decision. We check our email from 9am to 8pm ET M-F. We look forward to hearing from you!

Tags: , , , , , , , , , , , , , , ,

Comments


Posted By

If you have a Honeywell System with access to Total Connect 2.0, then you will probably want to set up some TC2 notifications. These are used for sending you text and email alerts regarding activity on your alarm system. You will have no trouble setting them up once you know how they work.


Before fully diving into the process of setting up notifications, it's important to understand exactly how TC2 notifications are organized. Notifications are sent out when predetermined system activity events occur, such as arming, disarming, AC power loss, a system alarm, or even just a faulted zone. The recipients of any given notification are determined based on the assigned notification group. Each notification group will have at least one assigned user, and each user can have multiple email addresses and phone numbers set up on their profile.

To break it down, a user must be assigned to a notification group, and that notification group must be associated with the particular event or events that they want to be notified about. Once the event occurs, every user within the assigned notification group will receive the alert. Each user can assign email addresses for email alerts and/or phone numbers for text alerts. Every assigned email and phone number will ultimately be used for notifications, provided that everything has been set up correctly.

Where some people can have trouble with TC2 notifications is when trying to set them up for multiple users. This is usually the case for families, where multiple people in the household want to each receive their own set of notifications. The solution is often to set up a unique user profile for every person who will be using the system and receiving notifications. Each user will need to choose a user code for controlling the system locally. If you want to limit the number of codes on your system, then the other option is to assign multiple email addresses and/or phone numbers to a single user profile. But the downside to doing that is that you won't have any real way of setting who receives what. The point here is that there are multiple ways to ensure that everyone using the system can receive notifications.

Total Connect 2.0 notification can be set up and configured from both the Total Connect 2.0 website and the Total Connect 2.0 mobile app. For our examples, we will mostly be focusing on the website, but understand that these menus are mostly the same on the app. They just might be organized slightly differently to better fit the smaller dimensions of a mobile phone. Really, both the website and mobile app are laid out very similarly, so if you can use one, then you should have very little trouble switching over to the other if needed. The important thing is to understand what all of the various terms mean and how they are all related.

First, let's take a look at the Users Menu of Total Connect 2.0. Like we said earlier, the most common practice is to set up an individual user account for each person who will be regularly using the system and receiving notifications. But if you are trying to limit the number of codes on your panel, then assigning multiple email addresses and/or phone numbers to a single user profile is also an option. On the TC2 website, you can easily locate the Users drop-down menu on the left-hand side.
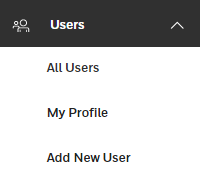
As you can see, the available options within Users are All Users, My Profile, and Add New User. The All Users option is useful if you are logged into a Total Connect 2.0 account with admin access. It will show all the users you have set up. My Profile is used for adjusting the settings for the user who is currently logged into TC2. This includes setting the user's name, preferred language, TC2 login password, assigned email addresses, assigned phone numbers, and even the security code they use with the panel. And the Add New User option is used for adding a new user to the Panel and if desired, to the Total Connect 2.0 account.
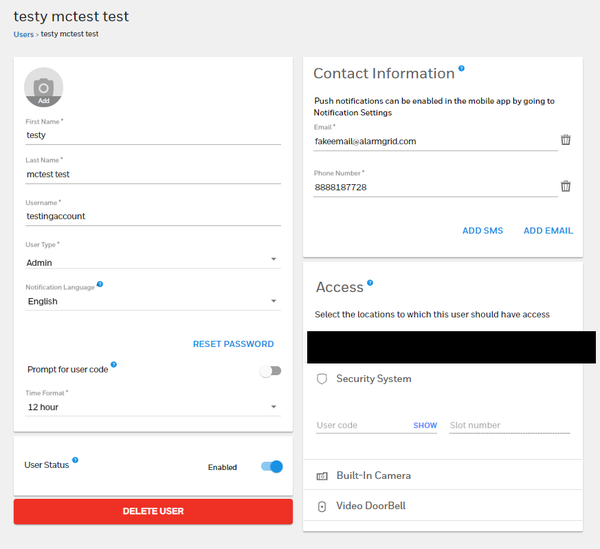

In the picture above, note the "Add SMS" and "Add Email" buttons. These are used for adding additional phone numbers and email addresses to a profile. Each assigned email and phone number will be used for notifications. If you don't want to create multiple users, then that is a method for ensuring that multiple people receive notifications. Just keep in mind that you will have no way of distinguishing which emails and phone numbers will receive which notifications. All emails and phone numbers assigned to the profile will be getting all the alerts.

Alternatively, if you create multiple user profiles, then you can pick and choose which profiles will be assigned to which notification groups. This is how you can set certain users to receive notifications regarding specific system events, while other users won't necessarily have to receive the same alerts for the same events. Whichever option you choose will work fine, and it's totally up to you. But you will have greater flexibility by creating multiple users.

Next, we would like to turn our attention to the Notifications Menu. This is where you will set up notification groups. Recall that different users can be assigned to different notification groups. Each notification group can correspondingly be assigned to different system events that will trigger notifications being sent out.
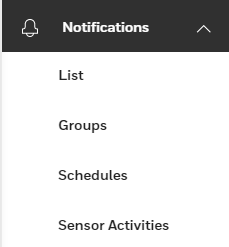

From the top, List shows the list of the specific system event triggers that will cause notifications to be sent out. Groups are the famous notification groups that we have been talking about throughout this post. Schedules are used for establishing set schedules for predetermined security and automation events to occur. Sensor Activities allows you to select specific sensors so that you can see if the sensor is faulted right from the main page of TC2, rather than having to access the complete system sensors list. For our purposes here, only List and Groups are really important.

After you have created the necessary user profiles and assigned email addresses and phone numbers to said profiles as needed, the next logical step is to create notification groups using the Groups option under the Notifications drop-down menu. If you click on the button with the two people and the + sign, then you can create a new notification group. This will involve providing a name for the notification group and choosing which users are included.


Upon building notification groups, you now get to the juicy step of actually building the triggers that will cause notifications to be sent out. These notification triggers are the actual system events that you want to be alerted about. To access this section, select List under the Notifications drop-down menu. You will likely find a bunch of notifications pre-assigned to the Default Group if you have never configured these settings before. To build new notifications, click the icon with three horizontal bars and the + sign. This will involve choosing the specific event that will trigger the notification to be sent out, as well as selecting the notification group that will receive the notification.
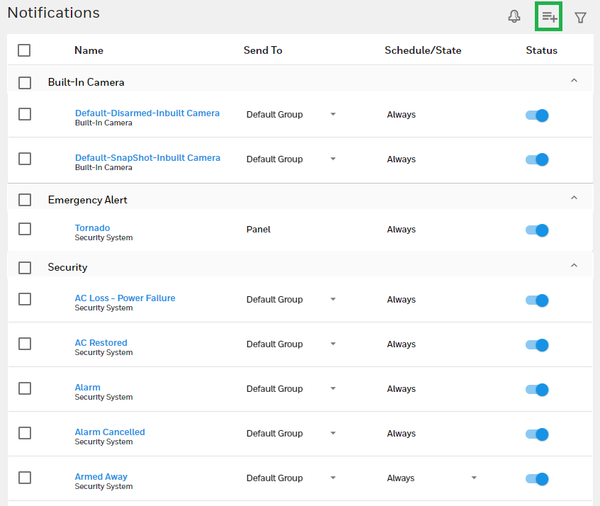

We know we've covered a lot of information here, so let us give a quick recap of the steps involved:

  1. Make user profiles. Each user profile will be able to control the system locally using their own user code. And Standard and Admin profiles will be able to access Total Connect 2.0 to control the system remotely. In most cases, each user profile will represent a different individual who uses the security system.
  2. Assign phone numbers and/or email addresses to user profiles. These are the contact points for sending notifications. Every added phone number and email will be contacted when a notification is triggered to be sent to the associated user. Note that phone number contacts are for text message alerts, NOT phone calls.
  3. Build notification groups. Each notification group consists of one or more user profiles. Every user in the notification group will receive notifications based on their assigned phone number(s) and/or email address(es) when a notification is triggered to be sent out. If you only want some users to receive a certain type of notification, then build a notification group that includes the relevant users, while leaving out users who do not need to be notified or who may receive the intended notification based on their inclusion in a different group.
  4. Create notifications. These are the actual system triggers that will cause a notification to be sent out. When creating a notification, you must select what system event will trigger the notification, and you must also choose which notification group will receive the alert.

Lastly, we briefly want to touch on push notifications that you can set up on your Android or iOS device. A push notification is sort of like a text message notification, in the aspect that it will appear on your phone. But the big difference is that the alert will not appear through your text messaging app, but rather from the TC2 app itself. These push notifications can only be configured by using the Total Connect 2.0 mobile app on a mobile device or tablet. You cannot set up push notifications using a web browser. After enabling Push Notifications from within the TC2 app on your device, you will be prompted by your phone or tablet to allow the App to perform Push Notifications.

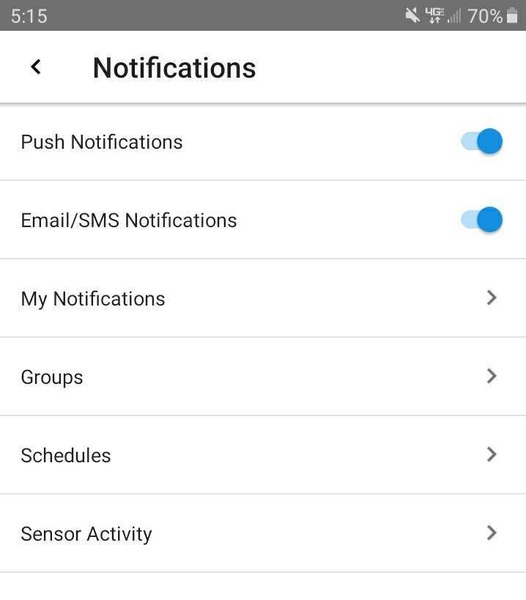
First, we will discuss enabling Push Notifications from within an Android device. Upon opening up the TC2 app and logging into your TC2 account, click the three horizontal bars in the upper-left corner. Then choose Settings, followed by Notifications. You can then toggle the Push Notifications option ON or OFF. To set which system events will trigger push notifications, use the My Notifications option.
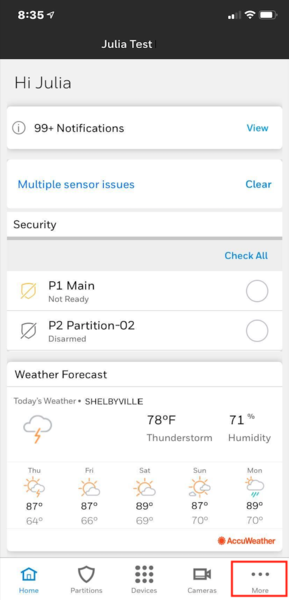
When using an iOS device, you will reach the option for Push Notifications by clicking the "More" option in the lower right corner of the main screen. From there, go to Settings > Notifications > Push Notifications, making sure that the option is enabled. Once you enable this option through the app, you will be prompted by the phone or tablet to allow the TC2 App to send you Push Notifications.

We really hope that this helps some users overcome their struggles with receiving TC2 notifications. If you are monitored by Alarm Grid, and you are still struggling with Total Connect 2.0 notifications, please feel free to email us at support@alarmgrid.com for extra assistance. We are certainly happy to help you out so that you can get notifications set up exactly how you want them. Our hours for checking emails run from 9am to 8pm ET M-F, so keep that in mind. We look forward to hearing from you!

Tags: , , , , , ,

Comments


Posted By

One feature on the Qolsys IQ Panel 2 Plus that we have never discussed before is the Smart Start feature. This feature is used for conveniently enrolling compatible smart home automation devices by scanning a QR code. It is a nice alternative to the traditional inclusion process.

Qolsys iq panel 2 plus verizon lte with powerg s line and legacy

The Smart Start feature was quietly included back in Qolsys IQ Panel 2 System Firmware Version 2.4.0. As it is a relatively minor feature, it was largely overlooked, and we never covered it in great detail. If your Qolsys IQ Panel 2 Plus had System Firmware Version 2.4.0 or higher installed when it was brand-new, then it already has the Smart Start feature. If the system was running a lower firmware version when brand-new, then you need to upgrade the Z-Wave firmware for the system to unlock the feature. Upgrading the system firmware will not automatically update the Z-Wave firmware and provide access to the Smart Start feature. We wrote a comprehensive FAQ on upgrading the Z-Wave firmware on a Qolsys IQ Panel 2 Plus, which you can view here.

The required Z-Wave firmware version for using the Smart Start feature on the Qolsys IQ Panel 2 is Z-Wave Firmware Version 6.81.03. In addition to providing access to the Smart Start feature, upgrading to this Z-Wave firmware version will also upgrade the Z-Wave security protocol for the system to S2. This protocol is more advanced and offers better security than the Z-Wave security protocol previously used with the system. You won't notice any real changes with the S2 protocol, but it is still a nice addition.

UPDATE: Qolsys has identified issues affecting IQ Panel 2 Z-Wave Firmware Version 6.81.03. They are currently working on a new Z-Wave firmware version to fix these issues. But as of July 2020, the new Z-Wave firmware version is not yet available.

Before we continue any further, we do want to stress that updating the Z-Wave firmware for an IQ Panel 2 System is completely, 100%, optional. This isn't nearly as important as updating the system firmware to the latest version. We mention this fact because updating the system's Z-Wave firmware often requires clearing all of the Z-Wave devices from the network and then re-adding them once the update is complete. This can be extremely inconvenient if you have a large Z-Wave network. And since all you're really doing here is gaining access to the Smart Start feature and making a slight improvement to the security for your automation network, we totally understand if you just decide to skip this process. Also note that you can attempt the updating process without clearing your Z-Wave network first. It's just that this may result in errors that can only be solved by ultimately clearing the network and then re-adding the devices. You should only clear the network and re-add the devices if devices that were working fine previously are later giving you issues after the update.

Note: We have noticed issues when using the August Smart Lock Pro with a Qolsys IQ Panel 2 System running a Z-Wave Firmware Version of 6.81.03. If you intend on using the August Smart Lock Pro with a Qolsys IQ Panel 2, then do NOT upgrade the panel Z-Wave firmware! This is expected to be fixed in a future Z-Wave firmware release.

If we haven't scared you away yet, let's take a look at the feature! Once your IQ Panel 2 is running a high enough Z-Wave firmware version, you will find the SMART START icon within the Z-Wave Devices Menu of Installer Programming. This menu is accessed by clicking the small grey bar at the top of the main screen and choosing Settings > Advanced Settings > enter Installer Code (default 1111) > Installation > Devices > Z-Wave Devices > SMART START.

Choosing SMART START will cause the panel to pull up the front camera for the IQ Panel 2. There will be a red square inside which you will position the QR code for the device. The QR code can be found either on the device itself or on its packaging. Simply position the QR code inside the red box, and the system will begin scanning.

Once the scan is successful, powering up the Z-Wave device will complete the setup process automatically. And just like that, you have saved yourself the trouble of performing the traditional exclusion/inclusion process for adding a new Z-Wave device. Petty cool!

At this time, the list of devices that can be added in this way is still very small. Here is the current list of devices that we know work with the feature:

For even more information regarding the Qolsys IQ Panel 2 Plus Smart Start feature, we strongly recommend checking out this comprehensive FAQ we wrote on the feature. It will tell you pretty much everything you would want to know about using Smart Start on the IQ Panel 2.

If you have any additional questions about the Smart Start feature or the Qolsys IQ Panel 2 Plus, including the system's Z-Wave firmware version, please email us at support@alarmgrid.com. This email is also great if you want to contact us about starting monitoring service. Our team checks email from 9am to 8pm ET M-F. We look forward to hearing from you!
Tags: , , , , , , , , , ,

Comments


Posted By

Did you know that your Alarm Grid Security System most likely has smart home automation capabilities? While keeping your home or business safe with trusted monitoring service is the main function of an alarm system, the world of home automation is easily accessible and very exciting.

Qolsys iq lightbulb dimmable z wave lightbulb for iq and iq pane

As a quick recap for anyone who may not be familiar with automation or the concept of a "smart home", it refers mostly to two (2) somewhat related ideas.

1) Being able to control devices remotely (aka, while you are away from the premises).

2) Being able to have devices activate automatically based on a schedule and/or predetermined events, with no action required on your part.

These devices that we speak of are collectively referred to as "smart devices". There are all sorts of smart devices that you can integrate into your automation network. Some examples include:

  • Smart Lights - Illumination devices that you can control remotely and turn ON or OFF automatically. These come in many forms, including light bulbs, in-wall switches, plug-in modules, and even wall outlets. Smart lights are perfect for making it appear as though someone is present while away or on vacation.
  • Smart Door Locks - Access control devices that you can operate remotely and LOCK or UNLOCK a door automatically. These are typically deadbolt devices that prevent unauthorized individuals from gaining access to your home or business. In addition to remote operation, these devices can also be automated based on a schedule or the condition of other devices in your home.
  • Smart Thermostats - Temperature control devices that you can be adjusted locally or remotely and INCREASE or DECREASE the temperature. The operation of these devices can also be automated based on a schedule or event. These wire in directly with the HVAC system in your home or business. The setup is surprisingly simple, and it can be easily completed by a DIY user.
  • Smart Water Valves - Water shut-off switches that you can trigger locally or remotely. If you CLOSE the valve, then the flow of water will be stopped. If you OPEN the valve, then the flow of water will proceed when a faucet is activated. Smart water valves can be very important if the building is prone to flooding or water damage. These devices can be automated based on the activation of a flood sensor.

Now that you know a little more about smart devices, you're probably wondering how to get started. The first thing that we advise doing is selecting a smart protocol to build around. This refers to the type of wireless communication that the individual smart devices will use to speak with the centralized hub.

The smart hub, also known as the controller, is the single most important piece of equipment in any smart home. All of your individual smart devices will communicate their status with this centralized hub. And when you go to control your devices remotely, all incoming commands will pass through the hub before ultimately being forwarded to the individual device. Without the smart hub, home automation is impossible.

Honeywell lyric controller encrypted wireless security system

When you select a smart hub, you are also selecting the wireless protocol for your network. All of the individual smart devices in your network must use that same wireless protocol to communicate successfully with the main hub. As a result, your smart hub determines which devices can (and cannot) join the network.

A great aspect of most security systems sold by Alarm Grid is that they can double as smart hubs for your automation devices. The panels that we sell support the Z-Wave wireless communication protocol. Virtually any Z-Wave device can be enrolled with an alarm system that supports Z-Wave communication.

Once you have a Z-Wave device enrolled with your system, a few things become possible:

1) Operate your programmed Z-Wave devices on the main system display. This is the same place where you arm and disarm your system.

2) Control your programmed Z-Wave devices remotely using the same platform you use for controlling your system, namely, Alarm.com or Total Connect 2.0. This requires monitoring service.

3) Build complete smart scenes, in which multiple Z-Wave devices are controlled simultaneously. This is done through either Alarm.com or Total Connect 2.0. Again, alarm monitoring service is required.

While all of this certainly sounds exciting, we understand that it may seem a little daunting at first. If you are already an Alarm Grid monitored customer, then there's a good chance that your system is already capable of serving as a central hub for your Z-Wave network.

The following systems readily support Z-Wave communication, with no add-ons being required:

Additionally, the following panels can be upgraded to support Z-Wave communication:

Of course, there are other options besides Z-Wave for home automation. If you are an iOS user, then you might consider getting a security panel that can support the robust and powerful Apple HomeKit automation platform. The Honeywell Lyric is a great option for this. You can learn more about HomeKit in this prior post.

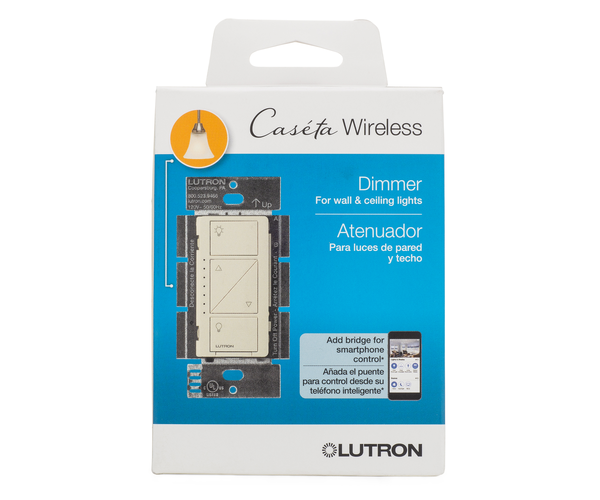
Another option for lighting control is the Lutron devices that use their own communications protocol. Lutron is known for their tight integration with Alarm.com, and they certainly make for a great starting point if you are looking to establish a smart lighting setup. More info on using Lutron with Alarm.com can be found here.


Alarm Grid is about more than just security. We can help you establish the perfect automation network for your home or business. Getting started with smart home automation is easy, and it's a fantastic way to get the most out of your security system. Whether you go with Z-Wave, Apple HomeKit, Lutron, or use a combo setup, we will be there to help you every step of the way.

If you aren't already monitored by Alarm Grid, now is a great time to get started. Smart home automation is included with all of our Silver, Gold, and Platinum Level Plans. This post will tell you all about our monitoring plans so that you can make an informed decision. Alarm Grid monitored customers are provided with free technical support online and over the phone. This includes helping you create the perfect smart home.

The best way for an Alarm Grid monitored customer to get help with all of their smart home questions is to email support@alarmgrid.com or call (888) 818-7728. Our support technicians will be happy to help you in building your smart home network. Remember that our business hours run from 9am to 8pm ET M-F, so make sure to plan accordingly. We look forward to hearing from you soon!

Tags: , , , , , , , , , , , , , , , , , , , , , , , , , , , , , , , , , , , , , , , , , , , , , , , , , , , , , , , , , , , ,

Comments